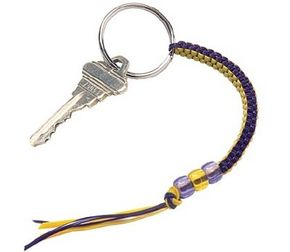
When you're looking for a craft project -- for yourself or for the kids -- why not choose something practical, as well as colorful and fun? This article will show you how to make beaded key chains so eye-catching that missing car keys and house keys will be a thing of the past!
There's no glue or sewing involved, and the instructions for each beaded key chain include a carefully illustrated step-by-step guide that you'll find simple to follow (although the smallest crafters may need some assistance with some of these projects). Your biggest decisions? Which one will you make first -- and will you keep it for yourself, or give it to a deserving friend?
Advertisement
This article will tell you how to make the following beaded key chains:
High-Flying Kite: This breezy beaded key chain is bound to catch the eye of everyone around.
Cool Key Chain: Simple, yet snazzy, this key chain can be made in a variety of colors and is perfect for every key-owner on your list.
In "Plane" Sight: Whether you love aviation, or just love knowing where your keys are, you'll enjoy this uplifting beaded key chain.
Heartbreaker: A heart-shaped beauty, this key chain can be sassy or sweet.
Wingin' It Butterfly: Once you've mastered the beading, choose a new selection of colors for this key chain to create a variety of butterflies.
Hip-Hip Hooray Cheerleader: Have a passion for cheering -- or know someone who does? This cute key chain will help you tell the world!
Want to make one of your own? Continue to the next page to get started on a fun key chain that looks like a kite.
For more ideas and instructions for fun craft activities, see:
This high-flying kite key chain is not only fun, it will make your keys a snap to find. Best of all, this craft is easy to make when you follow our step-by-step illustrated instructions.
What You'll Need
6-foot length transparent blue lanyard
24mm split ring
Baby pony beads: 44 light blue,14 yellow, 9 red
Nail clippers
What To Do
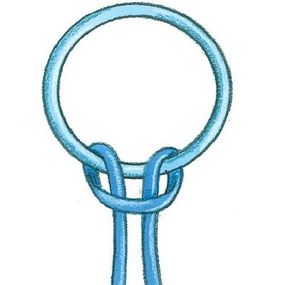
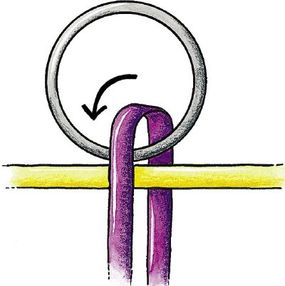
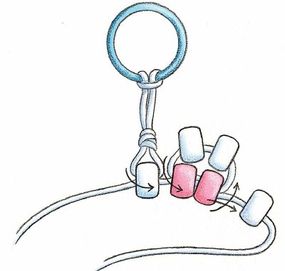
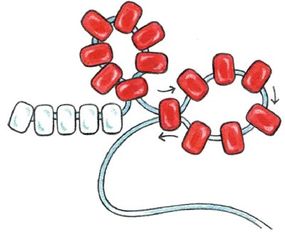
1. Fold the lanyard in half, and slip the looped end through the split ring. Pull the cut ends up through the loop and pull tight.
Advertisement
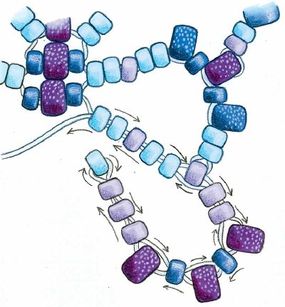
Start your kite beaded key chainby looping lanyard around the ring.
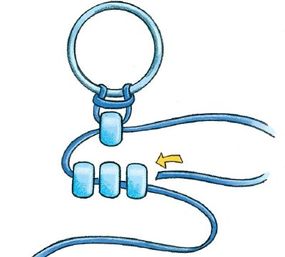
2. String a light blue bead onto the left strand and slide it all the way up. Weave the right strand through the bead from right to left. Now slide 3 light blue beads onto the left strand. Weave the right strand through the beads from right to left.
Can you see the kite shape being to take?
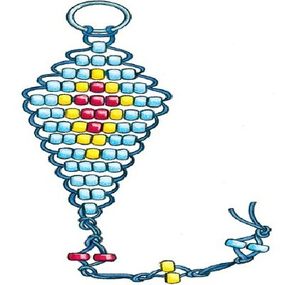
3. Keep stringing and weaving in this manner, following the pattern in the picture below. Be sure to pull the cords firmly and to keep the lanyard flat as you weave each row.
Follow this guide to create your kite key chain.
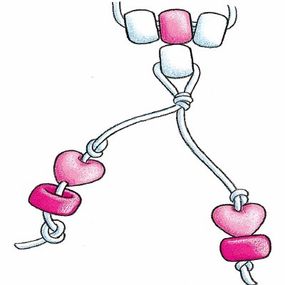
4. Finish the body of the kite by tying both lanyard ends in an overhand knot. To do this, twist both lanyard ends into a loop and then pull the free ends through the loop.
5. Tie a second overhand knot about 1/2 inch from the first, then string 1 red bead on each strand of lanyard followed by another overhand knot -- this creates the "bows" that weight the tail of the kite. Repeat this process to make 2 more bows with yellow and light blue beads.
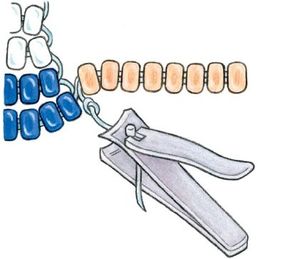
6. Use nail clippers to trim the excess lanyard, leaving a 1/2-inch tail.
Still have more keys to corral? On the next page you'll get all the information you need to create a cool lanyard-style key chain.
For more ideas and instructions for fun craft activities, see:
Simple, yet eye-catching, this lanyard key chain is a star!
This sleek, simple lanyard makes a cool key chain -- especially with its unique bead accent. You can choose your favorite colors and substitute them in the step-by-step directions below.
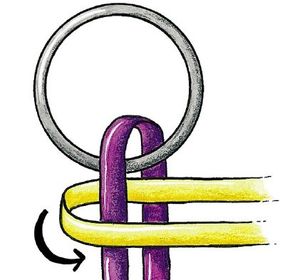
1. Insert one end of the purple lace through the key ring. Position the key ring at the center of the lace. Cross the lanyard laces at the centers, with the yellow lace over the purple lace below the key ring.
Advertisement
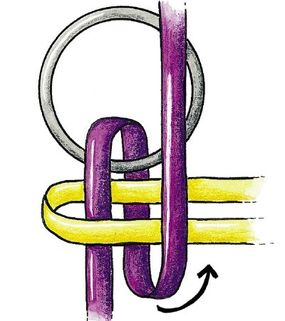
2. Fold the top purple lace down over the yellow lace.
Loop the lanyard throughthe key ring to begin.
3. Fold the left yellow lace to the right over the top purple lace.
Fold the yellow laceover to start the pattern.
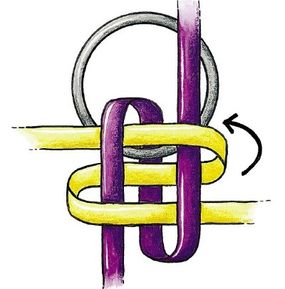
4. Fold the back purple lace up over the yellow laces.
Up and over goes the purple.
5. Fold the back yellow lace over the right purple lace and under the left purple lace.
Now you're weaving!
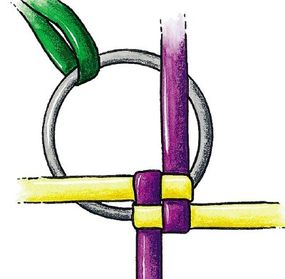
6. Pull all laces tight to form a square. Insert the anchor lace or safety pin through the key ring to anchor.
Get set, the actionis about to begin...
7. Follow -- and repeat -- these steps to make 3 inches of woven key chain:
Fold the top purple lace down over the right yellow lace, and fold the bottom purple lace up over the left yellow lace.
Fold the left yellow lace to the right over the nearest purple lace and under the next purple lace. Fold the right yellow lace to the left over the nearest purple lace and under the next purple lace.
Pull all the laces tight.
Fold the top purple lace down over the left pink lace, and fold the bottom purple lace up over the right pink lace.
Fold the right yellow lace to the left over the nearest purple lace and under the next purple lace. Fold the left yellow lace to the right over the nearest purple lace and under the next purple lace. Pull all the laces tight.
8. Make sure all four laces are pulled tight. Thread three pony beads on all four laces. Tie all the laces together in a tight knot. Trim the ends to 3 inches. Remove the anchor.
Finish your coolkey chain with flair.
Now you're ready for a challenge. Click to the next page for instructions on making a beaded key chain -- in the shape of an airplane!
For more ideas and instructions for fun craft activities, see:
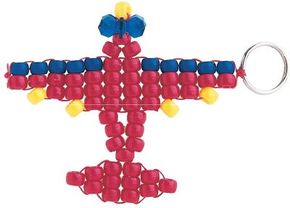
Whether you're an aviation buff or just in need of something to keep your keys from flying away, with this unique key chain, you'll find your keys are always in "plane" sight.
What You'll Need
48 red pony beads
10 royal blue pony beads
5 yellow pony beads
1 blue starflake bead, 25mm
5 feet red plastic lanyard
24mm split ring
What To Do
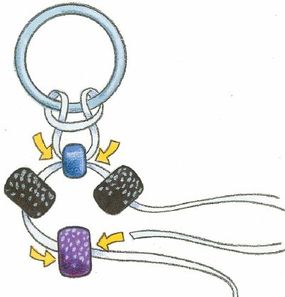
1. Tie the lanyard onto the split ring in a lark's head knot. Make a lark's head knot by folding the lanyard in half and slipping the looped end through the split ring. Pull the cut ends up through the loop and pull tight. Because this project features a "spine," it's best to use plastic lanyard.
Advertisement
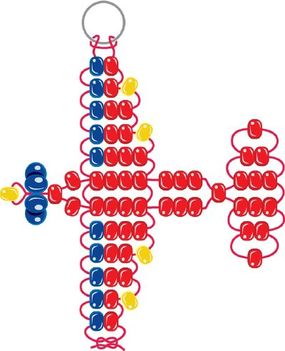
2. Following the diagram below, begin weaving at the top wing of the plane. As you string each row, skip the yellow beads as you weave back. The yellow beads act as "increase" beads between rows.
Don't forget to skip the yellowson your way back through.
3. The top wing ends after five rows of beads, and the body of the plane begins. String and weave the first four beads of the airplane's body, then use the left strand and follow the sidepath for the nose of the plane. (Hint: Before you string the starflake bead on, check whether the lanyard will pass through it twice. You may have to use tweezers to help weave it back through.)
4. Before starting the tail sidepath on the right side of the plane, string the next four beads of the airplane's body on the left strand -- then weave back through the four beads directly above and then back through the last row. Pull firmly so this four-bead "spine" will hold the plane neatly together. (Both strands will now be on the right side of the plane.)
5. String four beads on the top right strand before beginning the sidepath for the tail. Follow the diagram above closely to determine the order in which the beads should be strung and woven. First string and weave beads 1 through 6 to create the top of the tail, then string and weave beads 7 through 12 to create the bottom of the tail. Once the tail is complete, weave back through the bead to the left of the tail, then string three more beads before weaving back through the last row of the body of the plane.
6. Continue bead weaving to create the bottom wing. Again, skip the yellow beads as you weave back -- they are now "decrease" beads between rows.
7. To finish, tie the lanyard ends in a square knot and trim the excess.
Be a square -- and keepyour airplane's beads in place.
Whew! After that project, you're no doubt getting to be a pro, and perhaps you have some ladies on your list who would enjoy a softer, more feminine key chain. Continue to the next page to create the heartbreaker.
For more ideas and instructions for fun craft activities, see:
Make this beaded key chain for the special ladies in your life and they're sure to LOVE it -- whether they're all heart or heartbreakers! Our easy, illustrated steps make creating this craft a snap.
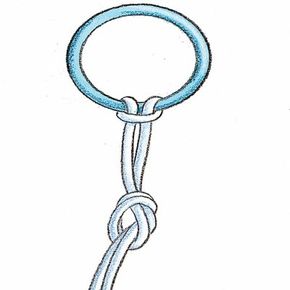
1. Make a lark's head knot by folding the lanyard in half and slipping the looped end through the split ring. Pull the cut ends up through the loop and pull tight. Then tie an overhand knot about 1/2 to 1 inch from the lark's head knot.
Advertisement
2. String a white bead onto the left strand and slide it all the way up to the knot. Weave the right strand through the bead from right to left. To make the heart's upper arches, weave a "sidepath" by stringing beads 1 through 4 on the right strand. Leave a little space between the beads, and weave back through beads 1 and 2. Pull tightly as you weave back, allowing the beads to curve as shown below. Repeat to make a sidepath with the left strand. Add a white bead on the end of each sidepath before you move on to the next row.
Pull the lanyard tight tomake the heart's curves.
3. String beads onto the left strand in the following order: one white, two pink, one pink glitter, one pink, one pink glitter, two pink, and one white. Weave the right strand through the same beads from right to left. Repeat this basic bead-weaving technique for the remaining rows, using the bead diagram below for reference.
Follow this pattern to giveyour heart a glittery center.
4. Finish by tying both cord ends together in an overhand knot. To do this, twist both lanyard ends into a loop and then pull the free ends through the loop. Tie a second overhand knot on each cord about 1 1/2 to 2 inches from the first knot. String a heart pony bead and a glitter bead on each cord, and finish each with another overhand knot. Trim the excess cord with the nail clippers, leaving 1/2-inch tails.
Finish your key chainwith a saucy flourish.
Enjoying this love-filled craft theme? Learn how to make a beautiful butterfly key chain with our instructions on the next page.
For more ideas and instructions for fun craft activities, see:
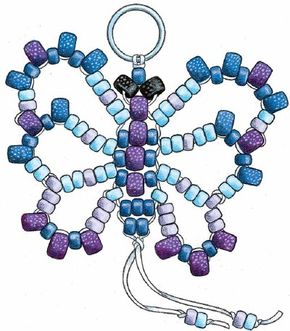
This beautiful beaded butterfly looks more like a piece of jewelry than a key chain. But no matter how lovely, the Wingin' It butterfly key chain is guaranteed to help you keep track of all your essentials. You'll just look good in the process!
What You'll Need
6 feet of clear plastic lanyard
24mm split ring
26 royal blue baby pony beads
2 black glitter pony beads
14 purple glitter pony beads
34 light blue baby pony beads
22 lavender baby pony beads
10 blue glitter pony beads
Nail clippers
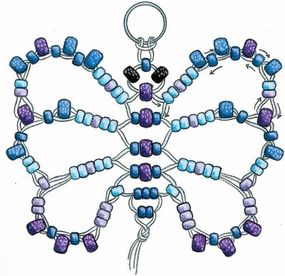
What to Do 1. Fold the lanyard in half, and slip the looped end through the split ring. Pull the cut ends up through the loop and pull tight. String a royal blue baby pony bead onto the left strand and slide it all the way up. Weave the right strand through the bead from right to left. String one black glitter pony bead onto each strand for the eyes, then add one purple glitter pony bead to the left strand. Weave the right strand through the purple glitter bead from right to left. Be sure to keep the lanyard flat as you weave it from one row to the next.
Advertisement
It's no cocoon, but here'show this butterfly is born.
2. To make the first "sidepath" of the right butterfly wing, string beads 1 through 15 on the right strand. Leave a little space between the beads, and weave back through, skipping the larger beads (beads 12, 10, 8, and 6). Pull tightly as you weave back, allowing the beads to curve. Repeat to make the first sidepath of the left butterfly wing with the left strand. Add one royal blue baby pony, one purple glitter pony, and one royal blue baby pony to the left strand. Weave the right strand through the same three beads right to left.
Weave carefully so your butterflywill have functional wings.
3. String the second sidepath on each side of the butterfly. As you weave back toward the body, make sure to skip bead 15 from the first sidepath. Similarly, after stringing the third sidepath, skip bead 12 from the middle sidepath as you weave back toward the body.
Count your beads soyou form the right shape.
4. Lace the last bead (16) of both lower wings to the body as a bead between rows as shown above. Use the bead diagram below as a guide to finish the last two rows.
Your complete guideto butterfly creation
5. Tie the lanyard ends together in an overhand knot. To do this, twist both lanyard ends into a loop and then pull the free ends through the loop. Tie a double knot toward the end of each strand. Thread a lavender bead and a light blue bead on each end, then tie a double knot on each strand to hold the beads in place. Trim excess lanyard with nail clippers, leaving 1/4-inch ends.
Secure your work ofart with a firm knot.
If you've conquered all these key chain projects, you're ready for your masterpiece: the cheerleader. Follow our directions on the next page to create this cheerful key chain.
For more ideas and instructions for fun craft activities, see:
Once you have the basic beading techniques down, use different colors of beads to create all kinds of butterflies. Try making a monarch butterfly with orange, black, and white beads.
Advertisement
Hip-Hip Hooray Cheerleader Key Chain
Hip-Hip Hooray Cheerleader Key Chain
A perfect way to let the world know about your hobby (or coaching job, or daughter), this hip-hip hooray cheerleader key chain is a beaded masterpiece. Younger cheerleaders may need some adult coaching help, but the instructions and illustrations below should provide everything you require to complete this project.
What You'll Need
7 feet of clear plastic lanyard
24mm split ring
Baby pony beads: 18 black, 31 dark blue, 43 red, 35 white, 23 peach, 2 light blue
Nail clippers
What to Do
1. Fold the lanyard in half, and slip the looped end through the split ring. Pull the cut ends up through the loop and pull tight.
Advertisement
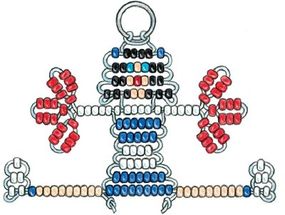
2. Begin at the top of the cheerleader's head by stringing four black baby pony beads onto the left strand. Weave the right strand through the beads from right to left. Add one dark blue baby pony bead to each strand.
3. Follow the diagram below to string and weave the next two rows of beads, counting the beads carefully as the colors change to create the cheerleader's face and hair. Be sure to pull the cords firmly and to keep the lanyard flat as you weave each row.
When you get to the fourth row, string beads onto the left strand according to the diagram, and weave the right strand back through all the beads. Now weave the left strand through the second black bead from the left and the right strand through the second black bead from the right.
Face comes first when youcreate this perky cheerleader.
4. For the fifth row, or the cheerleader's arms, start by stringing and weaving four white baby pony beads. Add six white pony beads to the right strand, then make three "sidepaths" with red beads for the cheerleader's pom-poms. To make a sidepath:
String on beads 1 through 7.
Leave a little space between the beads, and weave back through bead 1. Pull tightly as you weave back, allowing the beads to curve as shown below.
Repeat for other two sidepaths, then weave the strand back through the last five white beads. Repeat for the left arm and pom-pom with the left strand.
Pull tightly to make the pom-poms fluffy.
5. Continue weaving and stringing rows 6 through 10 according to the beading diagram below.
6. When you get to row 11, or the legs, string nine dark blue baby pony beads onto the left strand; weave the right strand back through the beads. Now string nine peach beads and one dark blue bead on the right strand.
7. Make a foot by stringing on beads 1 through 5. Leave a little space between the beads, and weave back through beads 3, 4, 1, and 2 (allow the beads to curve as shown). Weave back through bead 1 again, then weave the strand through the last dark blue pony bead and nine peach beads. Repeat for the other leg and foot.
Make sure both sides are even.
8. Finish by twisting each lanyard end into a loop and then pull the free end through the loop. Trim any excess lanyard with the nail clippers.
One quick snip and she'sready to take on the world!
By now you are likely weaving lanyards with the greatest of ease and astounding all your friends with the fabulous beaded key chains you create.
Don't be afraid to select alternate colors of lanyards and beads to produce an endless array of fun and functional key chains.
For more ideas and instructions for fun craft activities, see: