Sculpting a cat balloon is entertaining for both the sculptor and the audience. And while balloon sculpting looks hard, it's really easy. All you need to know is a few of the basics.
After you have the skill to pinch and twist some bubbles and to twist-lock those bubbles together, you can sculpt your own adorable cat balloon. Be sure to read the safety tips before you get started.
Advertisement
Safety Tips
1. Always stretch the balloon before attempting to inflate.
Stretching the balloon weakens the wall of the balloon enough to make it easier to inflate.
This can be very important when you consider that it may pop while you are inflating it.
2. Always inflate at a downward angle.
Balloons that pop while you are inflating them can be dangerous, not only to the balloon sculptor but to others in the audience.
Inflating the balloon at a downward angle can lessen the risk that a piece of the popped balloon will hit someone in the face.
3. Expect balloons to pop.
If there is one truth about balloons (especially pencil balloons), it is that they pop, and when you least expect it. The sting of a popped pencil balloon is worse than the sting of a snapped rubber band.
You should be especially careful to avoid having a balloon hit you in the eves. Be ready to turn your head quickly should a balloon pop. You can keep your hands open while inflating, which helps mask part of your face.
Do not put an inflated balloon in your mouth. And, always ask people in the audience to stand a safe distance when you are sculpting. Anticipation is your best defense.
4. Supervise children.
An adult should always be present and supervise children, whether they are playing with the balloons or are learning how to twist them. Inhaling a rubber balloon can be deadly.
Never allow children under 3 years old to put balloons (inflated, un-inflated, or popped) in their mouths. Any broken pieces of a balloon should he discarded immediately.
HOW TO MAKE A CAT BALLOON:
Step 1: Begin by inflating a balloon, leaving a 5-inch tail.
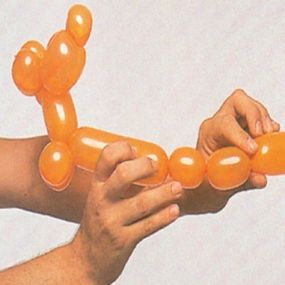
Step 2: Pinch and twist three round bubbles and a 2-inch bubble.
Step 3: Hold the 2-inch bubble and the second and third round bubbles together and twist-lock.
Make sure your cat has a long tail.
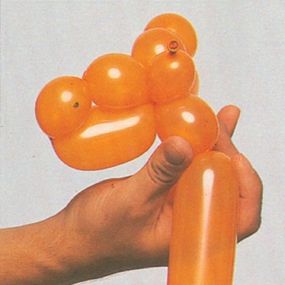
Step 4: Pinch and twist two round bubbles and a 2-inch bubble. Repeat step 3 once.
Step 5: Pinch and twist a round bubble.
Step 6: Hold this bubble and the first bubble together. Pull the tied neck of balloon around through this junction, as shown.
Step 7: Pinch and twist a 1-inch bubble.
Step 8: Place the twist back through the middle (the eyes).
Step 9: Turn the three joined bubbles so one faces up and two face down. This twist-locks the last bubble into place.
Step 10: Of the four round bubbles across the face, ear-twist the end bubbles.
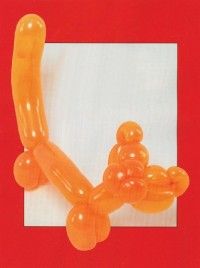
You now have the Cat's completed head:
The finished head of your cat balloon.
Step 11: Pinch and twist three round bubbles.
Step 12: Hold the second and third bubbles together and twist-lock.
Step 13: Pinch and twist a 2-inch bubble and two round bubbles.
Step 14: Hold the two round bubbles together and twist-lock.
Ta-Da! You are now finished making your very own cat balloon.
Continue reading to learn how to make a kitty corner for your sleepy cat.
Give your outdoor cats a warm and snuggly cat bed for curling up. Many cats prefer spending time outdoors. If you have a kitty friend that lives for wide-open spaces, why not make a cat bed craft for those sleepier times?
Does your cat have a favorite spot under the rose bush? Does she sleep on the back porch in the sun? Make a mental note of where your cat snoozes. Now, ask your parents for old newspapers, an old blanket, and a needle and thread.
Advertisement
What You'll Need:
Old blankets
Newspaper "stuffing"
Safe scissors
Needle and thread
Cut two pieces of the blanket into heart shapes about three feet across and three feet tall. Stitch one side of the heart together at the edges to make a pillow, stuff it with newspapers, then sew up the remaining half at the edges. Then, put your cat's new special pillow in its favorite spot.
Continue reading to find out more about the following project, a mouse your cat is sure to love.
Make the cat and mouse craft out of felt. It's an easy craft to make, and will keep your cat busy over and over again.
What You'll Need:
Advertisement
Scrap paper
Felt scraps
Scissors
Yarn
Yarn needle
Black marker
Catnip
How To Make Cat and Mouse:
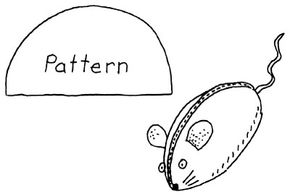
Step 1: On the paper, draw a small hill shape about 2 inches high and 2 inches wide, with a straight line at the bottom.
Step 2: Cut it out, and use it as a pattern to cut out 2 pieces of felt.
Step 3: Match up the 2 pieces of felt and stitch them together around the outside top curve.
Step 4: Stuff the mouse with catnip until it's plump. Stitch the bottom edge closed. Draw in the eyes, one on either side of the seam.
Step 5: Cut out 2 circles of felt that are 1 inch wide. These are the ears. Sew them on, just above and slightly to the side of each eye. Use a few tight stitches on part of the ear nearest the eye. Let the other side remain loose.
Step 6: Draw on a nose and whiskers with the marker. Sew a yarn tail on the other end.
Does a toy for your little kitty sound interesting? Continue to the next page and learn more about how to make this craft.
Cats go crazy for this catnip toy craft, whether it's still growing or made into a toy.
What You'll Need:
Felt
Scissors
Pen
Needle
Thread
Catnip
Catnip is an herb that you can buy at a plant nursery and grow in a pot or garden. Cats love to play in it and eat it. Don't just make toys out of catnip -- plant some in a place where a cat can enjoy it.
Advertisement
How To Make Your Catnip Toy:
Step 1: Cut a piece of felt into an interesting shape, such as a mouse.
Step 2: Lay the shape on another piece of felt and trace around it. Cut out your tracing to make a second shape that's exactly the same as the first.
Step 3: Use a needle and thread to sew the two pieces of felt together, but leave a small opening.
Step 4: Stuff the toy with catnip, then sew it shut.
On the next page you'll learn to make a kitty-cat face craft using an egg carton and paper plate.
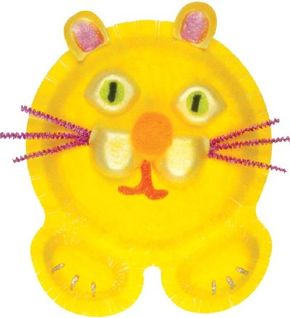
This kitty-cat face craft looks warm and expressive.
This kitty-cat face is fun to make, and it's pretty, too. This craft will keep your child occupied and delighted.
What You'll Need:
Animal-shape paper plate
Yellow acrylic paint
Yellow foam egg carton
6 cotton balls
Orange pom
2 purple sparkle chenille stems
Glitter glue: purple, green, pink, silver
Small piece black chenille stem
Paintbrush
Scissors
Masking tape
Craft glue
How To Make a Kitty-Cat Face:
Step 1: Paint the back of the plate yellow; let dry.
Advertisement
Use masking tape to keep the cotton balls in place.
Step 2: Cut 2 egg cups from the outside edge of an egg carton, leaving the connecting piece between them intact. Place a cotton ball inside each cup and tape over it with masking tape so you will have a better surface to glue to the plate. Glue to the center of the plate with the rounded edge toward the "paws."
Step 3: Cut 4 more cups from the egg carton; discard the rest. Cut the bottom of 2 cups into pointy eye shapes, place a cotton ball inside each and tape over it, and glue the eyes to the plate.
Step 4: Cut the last 2 cups into ears, tape cotton balls inside, and glue them to the rim of the plate, cotton side down. Let all glue dry.
Step 5: Glue a pom between the 2 egg-cup cheeks. Cut both metallic chenille stems into three 3-inch pieces. Slide 3 pieces under the outside edge of each cheek, and glue in place.
Step 6: Decorate the inside of the ears with purple glitter glue, draw a green glitter glue iris on each eye, add a pink glitter glue mouth, and draw silver claws. Glue a short piece of black chenille stem onto each eyeball. Let dry.
Use animal-shape plates to make all different kinds of animals!
On the next page you'll learn how to make another cat craft, called Ms. Kitty, out of a colored paper bag.
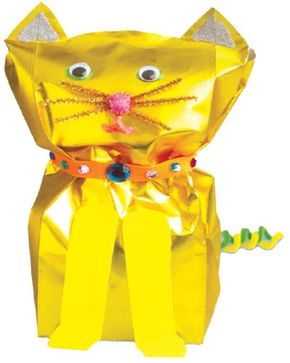
Ms. Kitty features soft whiskers and a curled tail.
With her finest gems and her tail curled up, Ms. Kitty is all ready for a party!
What You'll Need:
Gold paper bag
Pink sparkle pom
Chenille stems: 2 gold metallic, 1 yellow, 1 light green
Glitter glue: silver, pink, green
2 wiggle eyes
Craft foam: orange and yellow
Faux gems
Newspaper
Scissors
Low-temperature glue gun and glue sticks
Ruler
Clothespin
Pencil
How To Make Ms. Kitty:
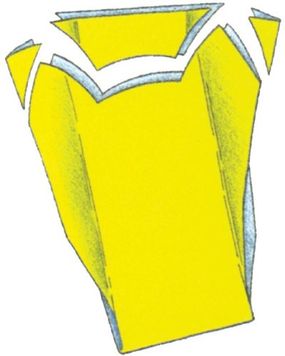
Cut cat ears out of the paper bag.
Step 1: Lay the bag flat on your work surface, and pull the sides of the bag out at the top. Cut ear shapes at the corners and round off the top of the head.
Advertisement
Step 2: Glue a pink sparkle pom to the center of the face. Cut 2 gold chenille stems into six 2-1/2 to 3 inch pieces, and glue the ends under the pom to form whiskers. Let dry.
Step 3: Paint a triangle of silver glitter glue inside each ear. Draw a mouth with pink glitter glue. Paint green glitter-glue eyes, and set a wiggle eye in the center of each. Let dry completely.
Step 4: Make a collar by cutting a 1/2 × 10-inch strip of orange craft foam. Glue faux gems all around it, placing the largest gem in the center. Set aside to dry.
Step 5: Cut 2 legs from yellow craft foam; glue them to the front of the bag.
Step 6: When all glue is dry, open the bag and loosely stuff it with crumpled newspaper. Gather it at the neck, and put the collar around it. Glue the collar closed. Hold in place with a clothespin until the glue sets. Glue the top of the bag closed as well.
Step 7: To make the tail, coil a yellow and a light green chenille stem around a pencil to form a spiral. Remove the pencil. Poke a small hole in the back of the bag, near the bottom, and glue the tail into the hole.
ABOUT THE CRAFT DESIGNERS:Cat Bed Craft by Maria Birmingham, Karen E. Bledsoe and Kelly Milner HallsKitty-Cat Face by Sharon Broutzas, Rice Freeman-Zachery, Connie Matricardi, Susan Milord, Lynnette Schuepbach, Kim Solga, Florence TemkoMs. Kitty by Sharon Broutzas, Rice Freeman-Zachery, Connie Matricardi, Susan Milord, Lynnette Schuepbach, Kim Solga, Florence Temko
Advertisement
Cite This!
Please copy/paste the following text to properly cite this HowStuffWorks.com article: