Coming and Going Stroller Quilt Pattern

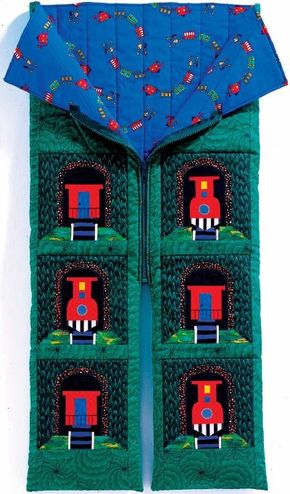
©2007 Publications International, Ltd. Your youngster is sure to stay nice and snuggly is this darling stroller quilt.

The Coming and Going Stroller Quilt features separate legs to help baby fit into strollers and car seats. All aboard for fun! The finished piece measures approximately 16 X 33 inches. Download the three-page Coming and Going Stroller Quilt Pattern as a PDF to print out the pattern.

You'll Need:

Advertisement

  • 1/4 yard dark green tree fabric
  • 1/8 yard light green grass fabric
  • 1/8 yard black fabric
  • 1/4 yard brown rock fabric
  • 1/8 yard black-and-gray stripe fabric
  • 1/8 yard red fabric
  • 1/8 yard black-and-white stripe fabric
  • Scraps blue fabric
  • Scraps yellow fabric
  • 1 X 3-inch fusible reflective material
  • 1 yard dark green background fabric
  • 1 yard blue lining fabric
  • 3/8 yard black ribbon, 1/4 inch wide
  • 3/4 yard silver ribbon, 1/4 inch wide
  • Lightweight fusible webbing
  • 36 X 37-inch piece of batting Nylon filament thread
  • Black thread
  • Thread for assembling quilt top and machine quilting
  • 14-inch heavyweight zipper

Put all these materials together to create a practical and fun stroller quilt for your little one. Learn how on the next page.

Not what you're looking for? Try these:

  • Find a baby quilt you love on our Baby Quilt Patterns page.
  • Flip through our Quilt Patterns to find your next quilting project.
  • Learn How to Quilt or brush up on the basics with our refresher course.

Advertisement

How to Make Coming and Going Stroller Quilt Pattern

These trains are "comin' 'round the baby" thanks to the separate legs featured on this adorable quilt. Download a photo and the patterns for the Coming and Going Stroller Quilt in this three-page PDF.

To make the Coming and Going Stroller Quilt Pattern:

Advertisement

  1. Cut six 61/2-inch squares of dark green tree fabric.
  2. Coming blocks: From grass fabric, fuse 51/2 X 7-inch webbing, and cut 3 right grasses and 3 left grasses. From black, fuse 5 X 91/2-inch webbing and cut 3 tunnels. From brown rock, fuse 5 X 111/2-inch webbing, cut 3 rocks. From black-and-gray stripe, fuse 21/2 X 7-inch webbing, and cut 3 track bed fronts. From red, fuse 31/2 X 7-inch webbing, and cut 3 train fronts. From black-and-white stripe, fuse 21/2 X 3-inch webbing, and cut 3 cowcatchers. From blue, fuse 1 X 11/2-inch webbing, and cut 3 windows. From yellow, fuse 1 X 11/2-inch webbing, and cut 3 smokestacks. Trace around dime 3 times on paper backing of reflective material for headlights. Remove paper.
  3. Going block: From grass fabric, fuse 51/2 X 7-inch webbing, and cut 3 right grasses and 3 left grasses. From black, fuse 5 X 91/2-inch webbing, and cut 3 tunnels. From brown rock, fuse 5 X 111/2-inch webbing, and cut 3 rocks. From black-and-gray stripe, fuse 21/2 X 7-inch webbing, and cut 3 track bed backs. From red, fuse 31/2 X 9-inch webbing, and cut 3 train backs. From blue, fuse 11/2 X 61/2-inch webbing, and cut 3 doors. Remove paper.
  4. Cut twelve 7/8-inch pieces of black ribbon for wheels. Cut twelve 13/4-inch pieces of silver ribbon for tracks. Use 1/4-inch seam to sew each piece of ribbon wheel to track. Press seam open and trim to about 1/8 inch. Cut narrow strips of webbing and fuse to ribbon. Remove paper.
  5. From dark green background fabric, cut 181/2 X 331/2-inch rectangle, two 11/2 X 331/2-inch strips, two 61/2 X 101/2-inch strips, two 31/2 X 61/2-inch strips, and four 11/2 X 61/2-inch strips.
  6. Assembling coming block: Arrange pieces in order. Fuse each piece in place on dark green tree square. Fuse left and right grass; brown rocks to background; black tunnel to brown rocks; black-and-gray stripe track bed; tracks and wheels just overlapping track bed; red train front; cowcatcher at base of train; and smokestack, window, and headlight to train. Use narrow zigzag stitch and nylon thread to stitch around each piece. Make 3.
  7. Assembling going block: Arrange pieces in order. Fuse each piece in place on dark green tree square. Fuse left and right grass; brown rocks to background; black tunnel to brown rocks; black-and-gray stripe track bed; tracks and wheels just overlapping track bed; red train back; and door to train. Use narrow zigzag stitch and nylon thread to stitch around each piece. Use black thread to embroider railing on back of caboose. Make French knot with black thread for door knob. Make 3.
  8. Arrange all pieces of quilt top as shown in diagram below. Sew blocks, sashing, and rectangles of background fabric together in a row for each side of quilt front. Sew each 11/2 X 331/2-inch strip to outside of row. Sew units to either side of 181/2 X 331/2-inch rectangle. Press seams. ©2007 Publications International, Ltd.This diagram will help you make sense of the quilt's layout.
  9. Fold quilt top in half, vertically, and press crease up center back. Mark quilt top with quilting design if necessary. Stretch out batting. Place lining face up on batting. Spread quilt top face down over lining and batting. Pin so that all layers are smooth. Sew around outside edges of quilt, stopping about 6 inches short of where you started. In the center back, sew 1/4 inch on either side of crease you pressed into quilt top, up 14 inches from bottom edge.
  10. Cut up center back between lines of stitching, stopping 1/4 inch before end of stitching. Trim fabric from corners, taking care not to cut stitching. Clip to stitching at corners in center back. Turn quilt right side out. Along opening, fold seam allowance to inside. Pin and slip stitch opening closed. Baste for quilting. Stitch 1/4 inch from outside edge around quilt. Stitch in ditch around each block and in rows 2 inches apart in open areas.
  11. Using zipper foot, sew zipper to both sides of front of quilt. The bottom of zipper should be 14 inches above bottom edge of quilt. Slip stitch across bottom of each leg and up to zipper to close each leg of quilt.

Want more information? Try these:

  • Find a baby quilt you love on our Baby Quilt Patterns page.
  • Flip through our Quilt Patterns to find your next quilting project.
  • Learn How to Quilt or brush up on the basics with our refresher course.

Advertisement

Advertisement

Loading...