How Pottery Works

pottery
Pottery can be formed into many different shapes and colors -- which is what makes it art!
Ashok Sinha/Photodisc/Getty Images

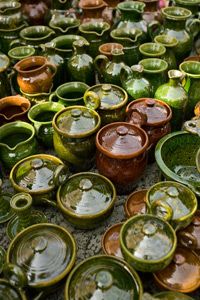
­Pottery is one of the oldest art forms on Earth, but it didn't start out being considered art. For years, p­ottery was created by craftspeople strictly for utilitarian p­urposes with little consideration for how they looked. These pots were hand-built, fired in bonfires and served the purpose of carrying grains, water and other liquids, as well as storing seeds. Shortly thereafter they began to use pots for cooking.

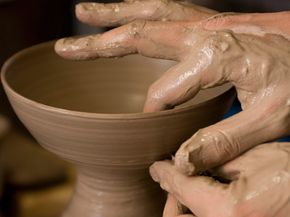
Pottery is broken down into three wares -- earthenware, stoneware and porcelain. These are all considered ceramics, which explains why potters are often referred to as ceramic artists. It's a tactile, often meditative form of making art with a scientific bent. A good ceramic artist understands the tricky relationship between human and clay. Clay can be temperamental ­and the act of shaping, heating, hardening, cooling and glazing all take a lot of practice to get just right. There are many steps involved in creating a ceramic piece and entire volumes of books have been written about the intricacies of the craft.

Advertisement

The distinction between art and craft is hazy at best and pottery is c­onsidered both. Crafting has made a big comeback in recent years with both men and women discovering the fun of activities their parents enjoyed in the 1960s and 1970s like pottery, sewing, knitting and woodworking. It's become big business these days, too. The American Hobby Industry Association states that the craft industry grew by almost $10 million between 2000 and 2004 and in 2008, was a $31 billion dollar industry [source: hobby.org].

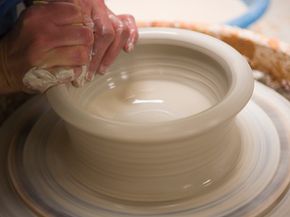
Whether working with hand-built pieces or on a potter's wheel, creating a ceramic piece can be a lot of fun. Read on to find out a little more history of this ancient art and craft.

­

History of Pottery

The oldest known body of pottery dates back 10,000 years, during the Neolithic revolution. Lifestyles in the Middle East and Africa were transitioning from nomadic hunters and gatherers to farmers who put down roots and planted crops. Baskets were useful handicrafts used for gathering, but they couldn't hold liquids. Mind you this was long before hoses or irrigation systems were in the picture, and farmers needed to be able to water their crops. Necessity dictated that it was essential to find a material that was readily available and inexpensive, pliable enough to shape and light enough to carry. Clay fit the bill and was an abundant resource in the region. Early pots were built by stacking rings of clay, which were then smoothed out and fired in a hole in the ground, under a bonfire. These pots were undecorated and expendable -- they were created simply as a means to transport liquids, and sometimes were only used once they were being disposed of.

The Greeks were credited with making pottery an art form, although at the time, potters were still known as craftsmen. Their pots and vases were utilitarian in nature and were mainly created for drinking and pouring, or storing wine and olive oil. But these craftsmen decorated their vessels with characters from Greek mythology and were the first to experiment with adding color by combining the clay with other naturally occurring ingredients, such as ochre and potash.

Advertisement

It's not known exactly when the potter's wheel arrived on the scene, but this was an important development in pottery making. At the beginning of the Bronze Age, around 3000 B.C., potters were using the slow wheel. This was simply a moveable platform that allowed them to turn the pot as they worked, instead of having to get up and walk around it. By the time the next century rolled around, most potters in Europe and Asia were using the fast wheel, which used a platform similar to the slow wheel, except the platform spun on an axle much like a toy top. The potters would start with a lump of clay sitting on the wheel, then gave the wheel a good spin or kick, which enabled them to draw the pot out of the clay through the spinning motion. The fast wheel was a big technological breakthrough, because it made it possible to work quickly and reproduce the same design. The invention of electricity brought us the motorized potter's wheel that we know today.

The next big breakthrough in pottery came about in 600 A.D. during the Han Dynasty in China, when potters began to make porcelain. These delicate and artful pieces, now known as fine china, were created from white kaolin clay combined with ground granite, which was fired at extremely high temperatures. It was very expensive to transport, so potters in West Asia invented lead glazes to mimic the look of porcelain. These glazes were important because not only did they add a decorative element to pottery making, they also made the porous earthenware waterproof. European potters soon followed suit, creating colorful glazes to use in their pottery. Throughout the centuries, pottery has continued to evolve as both a craft and an art.

Pottery Clay

pottery clay
Working with pottery clay is a hands-on experience.
flashfilm/Digital Vision/Getty Images

­Anyone who has ever been to summer camp has probably worked with clay. This abundant and naturally occurring resource is the basis of pottery. Pottery clay is mined from the Earth and ground into a powder. This powder is combined with other water and other ingredients to form what's called the clay body -- what you probably picture in your mind when you think of a potter at work. The type of clay, h­ow it's prepared and the amount of water used are all variables in how the final product turns out. There are lots of clays on the market in a wide spectrum of colors depending on your needs and preferences.

Pottery clay needs to be moist, durable and exhibit a good amount of plasticity. This means that it's easy to mold and retains its shape. You can buy a clay body that's ready right out of the box, but many potters prefer to make their own mix specific to a particular piece of pottery. Ingredients like nylon or sand can be added to the clay to aid plasticity, or to lower or raise the clay body's firing temperature, which also affects the color. And because you don't want a 20 pound ashtray, you can add materials like sawdust or coffee grounds to help reduce the weight of the finished piece.

Advertisement

Earthenware clay is most similar to what our ancestors used and is the kind of clay you might find in your backyard or that summer camp craft class. Earthenware pottery pieces are porous, so they need a sealing glaze to make them watertight. These clays require the lowest temperatures for firing, and finished products typically turn out in rich reds, browns and oranges. Terracotta planter pots are a good example of earthenware pottery.

Stoneware clay is more heavy-duty and requires higher firing temperatures. These high temperatures yield a pretty cool result -- the clay vitrifies, or turns into a glass-like substance. An added benefit of vitrification is that it makes the pottery waterproof. This makes glazing stoneware unnecessary, but still an option for decorative purposes. Stoneware clay is typically used for pottery with practical uses like plates, bowls and vases.

Kaolin clay, also called white clay, is used to make porcelain. It goes by many other names as well, including China clay and white cosmetic clay. It has lower plasticity than earthenware and stoneware clays, making it tricky to work with. If you're a beginner, you may want to work your way up to working with white clay. Aside from its uses in the arts and crafts world, Kaolin clay is used in soaps, scrubs and facial masks because it's so mild. These beauty products use Kaolin clay to help reduce swelling and draw impurities from the skin. Next, we'll look at some techniques used in pottery making.

Hand Building Pottery

Hand building is the most primitive form of pottery making but is considered by some to be the most complex. Why? Because the sky is the limit as to what you can make. If you're interested in trying hand building yourself, all you need is a little clay and some creative inspiration. Hand-built pottery tends to look more rustic and rough around the edges than pottery thrown on a wheel -- which is part of its charm. The three basic techniques of hand building are pinch, coil and slab construction. They can be used individually or combined together to suit your whims.

Making a pinch pot is the simplest way to begin working with clay. You start by kneading the clay into a small lump about the size of your fist. Next, you'll want to "open" the pot, which creates the middle portion. To do this, press your thumb into the middle of the clay to create an indentation. Then form the sides and enlarge the middle by pinching it little by little. You can experiment with making the walls thicker or thinner. This helps you learn how the clay works. It's best to make the walls uniform in thickness so the pot dries evenly and doesn't crack. Once the pot is about 75 percent dry, known as "leather-hard," you can use a wooden rib tool to smooth out the sides.

Advertisement

Coil construction is the method Native Americans used to make bowls. To begin, roll the clay into a long narrow cylinder a little thicker than a pencil. The trickiest part here is achieving uniform thickness throughout the coil. Once it's rolled out, join the ends in a circle and stack the coils on top of each other. To join them together, smooth out the insides with your fingers or a wooden rib.

Slab construction is used for creating objects with 90 degree angles, like boxes. It's the most involved of the three hand building techniques, but can be mastered with practice and patience. Creating the slab is similar to rolling out dough for baking cookies. You take the lump of clay and spread it out on a smooth surface with the palm of your hand. Then roll it out with a rolling pin, paying careful attention to ensure its thickness is uniform. You can place yardsticks on both sides of the clay and roll it until the sides are even with the stick to help ensure uniformity. Using a ruler and a knife, cut square pieces out of the clay to form the bottom and four sides and let them sit until they're leather hard.

Then, take a needle or a sharp pencil and scratch a criss-cross pattern into the edges where the pieces will join together. Next you'll want to create a paste of clay and water called slip. It should be about the consistency of yogurt. The slip dries and helps bond the pieces together -- think of it as your glue. Brush the slip onto the criss-cross areas and assemble the box, and then use a damp brush to smooth out the edges where the clay is joined together.

It's important to let all hand-built pottery dry slowly -- this will minimize the potential to crack. Next, we'll talk about throwing on the pottery wheel.

Pottery Wheels

pottery wheel
The pottery wheel is where all the magic happens.
Juan Silva/Photodisc/­Getty Images

­Watching a skilled potter can make you believe that using a pottery wheel looks deceptively easy, but it's actually a process that takes skill, patience and lots of practice to master. Using the pottery wheel is called throwing, and these wheels are specifically designed for forming uniformly circular pieces like plates, cups and bowls.

The first step before starting the wheel is to prepare the clay, which gets the air bubbles out. This is an essential step because an air bubble can cause a piece to crack during firing. Firing is the term used for baking the clay in a kiln, which is like an oven. There are two methods used to prepare the clay: wedging and spiral kneading. Wedging is a physical task that entails repeatedly banging your lump of clay onto a table in the effort to knock out as much air as possible. Spiral kneading is a lot like kneading bread dough, where work the clay with your hands. Using your palm, you twist the clay in a spiral shape that compresses the clay to pop the air bubbles.

Advertisement

The next step is to select your bat. Bats are metal plates that attach to the wheel, and provide a surface for the clay. Bats come in different sizes, and you would use a different bat to throw a plate than you would a bowl. The wedged clay is placed in the center of the bat. Before you can start shaping your piece, you need to get the clay centered on the wheel. To do this, forcefully plop the clay down on the center of the bat and start the wheel. You'll want to apply water to the clay while pushing the mass down and pulling it up and you repeat these steps until you are certain there is no wobble. This process may take a bit of time, but it's very important. If the clay isn't centered, you can lose control of the piece. Centering is the trickiest part for beginners, but is something that can be mastered with practice.

Once the clay is centered, the next step is opening up the clay. Similar to building a pinch pot, this is done by holding one hand on the outside of the clay to steady it, and pressing the thumb of your other hand into the middle and pressing down into the clay. This creates a hole, which becomes the center of the pot.

Once the clay has been opened up to the desired width, the next step is to slowly pull it up into the shape that you desire. This requires slowing the wheel down for more precision, and you should always use both hands. It's important to keep the clay lubricated, so water is applied as needed throughout the shaping. Excess water tends to pool in the hole, and needs to be removed with a sponge so the piece can dry evenly. If you forget this step, it could cause your piece to crack.

Excess clay can form around the base of the piece, so the next step is to remove this, which is done with a rib. Ribs are tools that are used to shape the clay and come in many shapes and sizes. They can be made of wood, metal or plastic.

­ When you're ready to take the piece off the wheel, you can use a long piece of wire to remove it while the wheel is slowly moving. In our next section, we will talk about firing and glazing.

Glazing and Firing Pottery

Once a pot is built and comes off the wheel it needs to sit and dry until it's leather hard, meaning it's still a little damp, but can be handled without changing its form. At this point, you can trim off any excess clay and carve details into the piece. Pottery at this stage, called greenware, is very fragile and needs to be handled with care.

The next step is to put the piece into the kiln for the first round of firing, called a bisque firing. The purpose of this initial firing is to turn your pottery into ceramic material. The firing process is measured in cones, a standard unit of measurement that accounts for time and temperature. It's important that the temperature rises slowly and cools slowly. Failure to do so could cause the piece to burst, putting you back at square one. Many kilns have programmable cone settings to help prevent this.

Advertisement

After the bisque firing, you want the piece to be strong enough that it doesn't fall apart during glazing, but porous enough to accept the glaze. This allows it to bake without completely drying out. The temperature of a bisque firing typically ranges between 1700 and 1900 degrees Fahrenheit (around 926 to 1038 Celsius). This is the equivalent of 05 to 04 cones. If you went to a craft store where you can paint your own pottery, you'd be decorating the product of a bisque firing, or bisqueware.

Now comes the fun part -- you get to decorate or color your work of art by painting or glazing. Painting is pretty straightforward -- all you need is acrylic paint and your imagination. Glazing is more complex, but we can offer an easy-to-understand overview. Glazes consist of silica, fluxes and aluminum oxide. Silica is the structural material for the glaze and if you heat it high enough it can turn to glass. Its melting temperature is too high for ceramic kilns, so silica is combined with fluxes, substances that prevent oxidation, to lower the melting point. Aluminum oxide is used as a stiffening agent, allowing the glaze to adhere to the surface of a bowl or vase without run off. Glazes get their colors from a wide variety of mineral oxides.

Using glazes requires a lot of experimentation and practice. Many factors, like the kind of kiln or the kind of clay you use, impact the final result. Glazes can be applied with a brush or the entire piece can be carefully dipped into a glaze bath. Glazes often require multiple coats and a lot of patience to get them just right. When that time comes and the piece is dry, you're ready for the glaze firing, where the pottery is heated to maturity. Next, we'll talk about different types of kilns.

Types of Kilns

Kilns are where the magic of pottery happens. The process of firing turns clay into ceramics and your raw work of art into a finished masterpiece. While early kilns consisted of a bonfire over a hole in the ground, technology has vastly improved to create sophisticated ceramic kilns. How a ceramic piece is fired has a huge impact on the look of the finished result. Firing is a craft in itself, and requires an open mind and a good deal of experimentation.

Kilns are freestanding, and their size can range from the size of a stove to a full room. Most kilns contain shelves, where the pottery is lined up. It's important that glazed pieces don't touch, or they can adhere together. There's a method for firing large un-glazed pieces that's called tumble stacking, where pieces are carefully stacked on top of one another. This is a job best suited to a skilled potter.

Advertisement

The three most common types of kilns are electric, gas and wood. Electric kilns are probably the most common type of kiln used in ceramics. They're comparatively inexpensive, and small ones can plug directly into a 120-Volt wall socket, making them accessible to small pottery operations. These kilns always fire in oxidation, meaning there's oxygen present in a completely controlled environment, which yields consistent results with glazes. This control is important for a potter who wants to replicate their work.

Gas kilns run on natural gas and fire in reduction, which doesn't allow oxygen in during firing. Reduction firing results can be unpredictable, but typically yields rich, earthy colors. It's difficult to maintain consistency, so gas kilns are most ideal for one-of-a-kind creations.

Wood kilns are fueled by wood and have been used for thousands of years in pottery. They're very labor-intensive because they need constant stoking and re-fueling of the fire to keep the wood at consistently high temperatures. A wood kiln firing can take three times as long as it would in an electric or gas kiln, and it needs to be monitored the whole time. The kiln creates its own glaze when the wood ash lands on the pieces as they're firing. Many potters feel that the unique results are worth the extra work.

There are also a couple types of specialized kilns that produce specific surface results. Salt kilns, also known as soda kilns, produce a bumpy glaze that's most commonly found on stoneware pieces. This happens when salt is introduced during the final stage of firing. The heat puts the salt through a chemical reaction that leaves a residue glaze resembling an orange peel. This glaze also ends up all over the kiln, which can decrease its lifespan.

Raku kilns are another type of specialty kiln that yields a specific finish. Raku pottery is heated until it's glowing, and then pulled with tongs out of the kiln. After it cools, the piece is immersed in cold water, creating a crackle effect. Unglazed areas of the clay become black from the carbon in the burning fuel, and when the carbon is scrubbed off, a bright metallic finish is revealed.

Lots More Information

Related HowStuffWorks Articles

  • Arizona State University, Herberger College of the Arts. "Three Basic Pottery Techniques. " March 29, 2007. http://artswork.asu.edu/arts/students/navajo/lesson4.htm
  • ­­Baitpond Pottery. "Handbuilt Pottery." http://www.baitpondpottery.com/handbuilt_1.htm
  • ­­Big Ceramics S­tore. "Types of Firing: Oxidation, Reduction, Salt, Wood, Raku." http://www.bigceramicstore.com/Information/types_of_firing.htm
  • ­­City of Stoke on Trent . "A Brief History of the Pottery Industry." http://www.stoke.gov.uk/ccm/museums/museum/2006/gladstone-pottery-museum/information-sheets/a-brief-history-of-the-pottery-industry.en
  • ­­Clay Planet. "Raw Clays." http://www.claymaker.com/ceramic_central/info/raw_clays.htm
  • ­­Clay Times Magazine. "Clay Basics." 1997.http://www.claytimes.com/reference-guide/clay-basics.html
  • ­­Craft & Hobby Association. "CHA Attitude and Research Study." 2006. http://www.hobby.org/research.html
  • ­­Digitalfire Reference Database. "Are Your Glazes Food Safe or are They Leachable?" http://digitalfire.com/4sight/education/are_your_glazes_food_safe_or_are_they_leachable_12.html
  • ­­Gascoigne, Bamber. "History of Pottery and Porcelain." History World.http://www.historyworld.net/wrldhis/PlainTextHistories.asp?historyid=ab98
  • ­­Gaulin, Pam. " Selecting a Type of Pottery Style to Learn." Associated Content. February 12, 1997. http://www.associatedcontent.com/article/140237/selecting_a_type_of_pottery_style_to.html?cat=24
  • ­­Hester, John. "Pottery Tutorial: A beginners guide to the art of ceramics." August, 2003. http://www.jhpottery.com/tutorial/tutorial.html
  • ­­Kusakabe, Masakazu and Lancet, Mark. " Japanese Wood-Fired Ceramics." KP Books. 2005. p.200.
  • ­­Peterson, Susan. "Pottery By American Indian Women." Women Artists of the American West, 1997. http://www.cla.purdue.edu/WAAW/peterson/Petersonessay2.html
  • Prindle, Tara. " Making Hand-built Coiled Pottery." Native American Technology and Art. 1994. http://www.nativetech.org/pottery/making.htm
  • ­­Rogers, Phil. "Throwing Pots." University of Pennsylvania Press, 1995. pp.18-22.
  • Smith, Whitney. Owner, Whitney Smith Pottery. Personalcorrespondence. February 18, 2009.
  • ­­ Woodhouse, Charles Platten. "A History of Pottery." Grolier, Inc. 1997. http://www.artistictile.net/pages/Info/Info_pottery.html