How to Repair Parquet Flooring
Wood parquet is beautiful, but damaged blocks can be a problem. For invisible repairs, replace the damaged wood with matching parquet tile.
Tools:
- Drill or brace and bit
- Sharp chisel
- Hammer
- Needle-nosed pliers
- Putty knife
- Wire cutters
- Notched spreader or small mixing dish and stir stick
- Scrap wood block
- Weights
Materials:
- Matching prefinished parquet tile
- Medium-grit sandpaper
- Tile adhesive or epoxy cement
- Carpenters' glue
- Cloth
- Polish or wax
Time: About 1/2 hour per block
Advertisement
To replace the damaged section of parquet, use a matching prefinished tile; if you can't get prefinished tile, finish the new tile to match before installing it. Use the whole tile or one piece of the unit, as required; replace as small an area as possible.
Removing the Damaged Wood
First, remove the damaged piece of wood. If the entire tile or unit is damaged, make a row of large holes across the block, against the grain, with a drill or a brace and bit. Drill completely through the damaged block, but not into the subfloor under it. Then, with a sharp chisel and a hammer, carefully split the block and pry up the pieces. Make sure you don't damage the surrounding pieces of wood.
Most parquet tile is held together with tongue-and-groove joints. At the grooved sides, carefully pull the pieces of the block out over the adjoining tongues. If the grooved sides stick, use the chisel to cut through only the top side of the groove; be careful not to damage the tongues of the abutting pieces. At the tongued sides of the tile, carefully pull out the tongue that held the damaged block to the next tile. If the tongue piece sticks, cut it off with the chisel and then carefully pry out the cut piece.
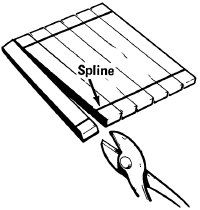
If only one piece of a parquet tile or unit is damaged, remove only that piece. With a sharp chisel and a hammer, very carefully split the damaged piece and pry out the splinters. If the pieces of the unit are held together by a wire spline, hold the damaged piece of wood with needle-nosed pliers; cut the spline with wire cutters to free the damaged piece.
Replacing the Damaged Wood
After removing the damaged piece of wood, prepare the gap for the replacement piece. Scrape the subfloor to remove any remaining adhesive; make sure all parts of the old piece of wood have been removed. If you cut a wire spline to remove the old piece, trim the cut ends flush and tap them lightly with a hammer to flatten the sharp points of the wire.
To replace the damaged wood, use a whole matching tile or one piece of a matching unit. If you're using a whole tile, match the tongued and grooved edges to the surrounding tiles. With a sharp chisel and a hammer, carefully cut off the protruding bottom edges of the grooved sides; the new tile will fit on top of the abutting tongues instead of locking around them. Test the tile for fit to make sure you've cut enough.
If you're using one piece of a matching unit, carefully take the unit apart to remove the desired piece of wood; if necessary, cut the wire spline that holds the piece into the unit. Trim the cut ends of the spline flush, and tap them lightly with a hammer to flatten them. Test the piece of wood for fit in the gap. If the piece is too tight in the opening, sand the edges of the replacement piece lightly with medium-grit sandpaper. Be careful not to damage the finish on the wood.
Completing the Repair
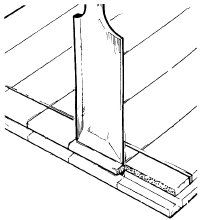
To complete the repair, glue the new block of wood into position. If you're replacing a whole tile, use floor tile adhesive; apply the adhesive to the subfloor in the opening with a notched spreader. On the grooved sides of the tile, apply a thin coat of carpenters' glue to the bottom edge of the top groove. Carefully set the new tile into place, tongued sides first, to lock into the grooves of the abutting tiles; set the grooved sides firmly down over the abutting tongues.
When the tile is correctly positioned, set a block of scrap wood over it and tap it firmly down with a hammer to bond and level it. The edges of the new tile should be flush with the surface of the surrounding tiles. Quickly remove any excess adhesive with a damp cloth.
If you're replacing one strip or one piece of a unit, use epoxy cement to bond it into place. Mix the epoxy as directed by the manufacturer, and apply the epoxy to the back and to the edges of the replacement piece. Set the piece into place in the opening and tap it into place with a wood block and a hammer to bond and level it. Quickly remove any excess epoxy with a damp cloth.
To make sure the new piece of parquet bonds firmly, cover it with a piece of scrap wood and weight it for the entire curing time of the adhesive or epoxy, as directed by the manufacturer. Let the adhesive or epoxy dry completely before removing the weight. Finally, if the finish on the new piece of wood doesn't blend in with the surrounding floor, polish or wax the entire floor.