How To Fix a Spray Hose
Many modern sink faucets are fitted with spray hose units, and these units occasionally leak or malfunction. The assembly has a diverter valve within the spout body, a flexible hose connected to the spout under the sink, and a spray head with an activating lever and an aerator assembly. The spray head body and lever are part of a sealed unit; if it malfunctions, the unit must be replaced with an identical unit. Other parts of the spray system, however, can be repaired.

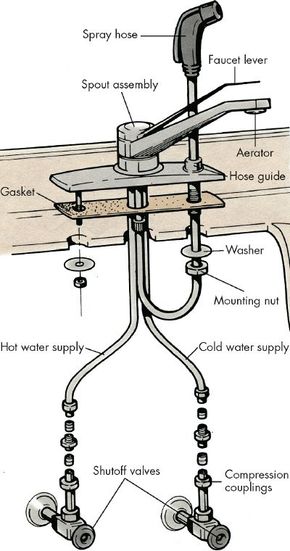
A spray hose is attached under the sink at the base of the spout assembly.
The entire spray assembly can be removed from the top of the sink
by unscrewing it and pulling it out through the hose guide.
See more pictures of plumbing.
In this section, we'll provide detailed instructions on how to service the various parts of a spray hose. We'll start by discussing repairs to the aerator on the next page.
Not what you're looking for? Try these:
- Plumbing: Tackling plumbing problems in the home can be quite daunting. Don't dismay -- the plumbing tips detailed in this article are sure to help, even if helping means advice on when to call a plumber.
- How to Fix Sinks, Tubs, and Drains: Plumbing issues related to sinks, tubs, and drains, can be fixed by the average homeowner...if you have some tips under your belt to help you identify and fix the problem. Find such tips in this article.
- Plumbing Troubleshooting: Sometimes figuring out what's wrong with your toilet, drain, or other plumbing-related area is half the battle. Find helpful troubleshooting tips here.
- Plumbing Tools: You may already have many of the tools necessary for most plumbing jobs because they are the same tools used for other do-it-yourself projects. Find out about special plumbing tools, such as pipe wrenches, in this article.
Repairing an Aerator
The aerator portion of the spray head is similar to a faucet aerator. If aeration is inadequate or water squirts off at various angles, the aerator screen has become clogged with sediment or mineral deposits and must be cleaned.
|
Step 1: Remove aerator, and disassemble it.
Step 2: Backflush screens and perforated disc with strong stream of water, being careful not to let parts get washed down drain.
Step 3: Dry all parts, then brush them gently with fine-bristled but fairly stiff brush. Mineral deposits can sometimes be removed by soaking parts in vinegar or by scraping deposits with penknife.
Step 4: Reassemble aerator, making sure you get all parts positioned in proper order and direction.
Learn the basics of repairing a flexible sink hose in the next section.
Not what you're looking for? Try these:
- Plumbing: Tackling plumbing problems in the home can be quite daunting. Don't dismay -- the plumbing tips detailed in this article are sure to help, even if helping means advice on when to call a plumber.
- How to Fix Sinks, Tubs, and Drains: Plumbing issues related to sinks, tubs, and drains, can be fixed by the average homeowner...if you have some tips under your belt to help you identify and fix the problem. Find such tips in this article.
- Plumbing Troubleshooting: Sometimes figuring out what's wrong with your toilet, drain, or other plumbing-related area is half the battle. Find helpful troubleshooting tips here.
- Plumbing Tools: You may already have many of the tools necessary for most plumbing jobs because they are the same tools used for other do-it-yourself projects. Find out about special plumbing tools, such as pipe wrenches, in this article.
Repairing a Flexible Sink Hose
Water dripping off the flexible hose beneath the sink indicates a leak at the hose-to-spout connection, the hose-to-spray-head connection, or somewhere in the hose itself.
|
Step 1: Dry hose thoroughly, and check head connection. If leak is at this point, tighten connection, disassemble and make repairs, or replace head and hose assembly.
Step 2: Check spout connection under sink. Tightening may stop leak here.
Step 3. If leak continues, disconnect hose, apply plumbers' joint compound or wrap plumbers' joint tape around threads, and reconnect hose. The easiest way to spot leak in hose is to inspect it inch by inch under strong light while water is running through it. Look particularly for tiny cracks, chafes, or indications of some mechanical damage. Temporary repairs can be made by wrapping slightly damaged section of hose with vinyl electrical tape, but replacement of the hose will probably be necessary eventually.
Find out how to identify a problem with a sink or tub diverter valve on the next page.
Not what you're looking for? Try these:
- Plumbing: Tackling plumbing problems in the home can be quite daunting. Don't dismay -- the plumbing tips detailed in this article are sure to help, even if helping means advice on when to call a plumber.
- How to Fix Sinks, Tubs, and Drains: Plumbing issues related to sinks, tubs, and drains, can be fixed by the average homeowner...if you have some tips under your belt to help you identify and fix the problem. Find such tips in this article.
- Plumbing Troubleshooting: Sometimes figuring out what's wrong with your toilet, drain, or other plumbing-related area is half the battle. Find helpful troubleshooting tips here.
- Plumbing Tools: You may already have many of the tools necessary for most plumbing jobs because they are the same tools used for other do-it-yourself projects. Find out about special plumbing tools, such as pipe wrenches, in this article.
Checking a Sink or Tub Diverter Valve
Uneven water flow, low pressure when the pressure at other faucets seems all right, or troublesome switching back and forth from spray head to sink spout can be caused by a malfunctioning diverter valve or by a restricted hose.
|
Step 1: Remove spray head at coupling, and disconnect coupling from hose by prying off snap-ring retainer.
Step 2: Turn on water and let strong stream of water flow into hose. If strong stream of water flows out of open end of hose, then you know diverter valve is the source of the trouble. A weak stream flowing from open end of hose may indicate blockage in hose itself. Briefly running water full force may clear hose.
Step 3: If above steps don't locate problem, remove hose from spout attachment, stretch it out straight, and look through it while aiming it toward strong light source. If hose appears to be clear, problem lies in diverter valve. If hose is blocked, clear it with wire coat hanger or length of wire.
Step 4: As needed, replace hose. If you can't get exact replacement, adapters are available for connecting other types and sizes.
If indeed you locate a problem with the diverter valve, check out the next section for tips on how to fix it.
Not what you're looking for? Try these:
- Plumbing: Tackling plumbing problems in the home can be quite daunting. Don't dismay -- the plumbing tips detailed in this article are sure to help, even if helping means advice on when to call a plumber.
- How to Fix Sinks, Tubs, and Drains: Plumbing issues related to sinks, tubs, and drains, can be fixed by the average homeowner...if you have some tips under your belt to help you identify and fix the problem. Find such tips in this article.
- Plumbing Troubleshooting: Sometimes figuring out what's wrong with your toilet, drain, or other plumbing-related area is half the battle. Find helpful troubleshooting tips here.
- Plumbing Tools: You may already have many of the tools necessary for most plumbing jobs because they are the same tools used for other do-it-yourself projects. Find out about special plumbing tools, such as pipe wrenches, in this article.
Servicing a Sink or Tub Diverter Valve
After you've determined there is a problem with your diverter valve, follow these steps to help you get things working again.
|
Step 1: Remove sink spout by loosening screw on top, unscrewing threaded spout ring or nut, and lifting spout out of its socket to expose valve. Some valves are just set in place and can be lifted straight out by gripping them with pliers; others are secured by screw. If there is a screw, turn it enough to free valve. If possible, disassemble valve.
Step 2: Flush all parts with water, and clean all surfaces and apertures with toothpicks. Don't use metal tools, as they could damage the unit.
Step 3: Reassemble and reinstall valve, then test unit. If it still operates poorly, you will probably have to replace valve. Replacement must be exact, so take faucet manufacturer's name and unit model number or old valve with you when you buy new valve.
As you can see, myriad problems can go wrong with your faucet's spray hose. Fortunately, there are myraid solutions, too. Use the tips featured in this article to first help you identify the problem and then help you fix it!
Not what you're looking for? Try these:
- Plumbing: Tackling plumbing problems in the home can be quite daunting. Don't dismay -- the plumbing tips detailed in this article are sure to help, even if helping means advice on when to call a plumber.
- How to Fix Sinks, Tubs, and Drains: Plumbing issues related to sinks, tubs, and drains, can be fixed by the average homeowner...if you have some tips under your belt to help you identify and fix the problem. Find such tips in this article.
- Plumbing Troubleshooting: Sometimes figuring out what's wrong with your toilet, drain, or other plumbing-related area is half the battle. Find helpful troubleshooting tips here.
- Plumbing Tools: You may already have many of the tools necessary for most plumbing jobs because they are the same tools used for other do-it-yourself projects. Find out about special plumbing tools, such as pipe wrenches, in this article.
