How To Fix Pipes

By: Fix-It Club
copper pipes
Kim Steele/Getty Images

­Most plumbing problems occur at or near such fixtures as sinks, tubs, and toilets. Sometimes, however, the pipes themselves are the root of the problem. Pipes can be temperamental -- they can leak, sweat, freeze, or make loud noises.

In the following article, we'll tell you how to deal with all of these difficulties. We'll begin in the next section by addressing leaky pipes and joints.

Advertisement


Not what you're looking for? Try these:

  • Plumbing: Tackling plumbing problems in the home can be quite daunting. Don't dismay -- the plumbing tips detailed in this article are sure to help, even if helping means advice on when to call a plumber.
  • How to Fix a Toilet: Yes, it's a job no one really wants to tackle. And no, you don't have to call a plumber for every toilet problem. Learn how to fix a toilet at HowStuffWorks.
  • Plumbing Troubleshooting: Sometimes figuring out what's wrong with your toilet, drain, or other plumbing-related area is half the battle. Find helpful troubleshooting tips here.
  • Plumbing Tools: You may already have many of the tools necessary for most plumbing jobs because they are the same tools used for other do-it-yourself projects.

Find out about special plumbing tools, such as pipe wrenches, in this article.

How To Fix Leaky Pipes and Joints

There are several ways to stop a leak in a pipe. For a temporary patch, use a piece of heavy rubber and hose clamps (top) or a rubber pad and two plates that bolt together (bottom).

There are all kinds of plumbing leaks. Some can flood your home, while others are not nearly so damaging. Your approach to stopping a leak depends on the type of leak it is. If the leak is at a joint, tighten the joint. If the leak is in a pipe, remove the section that is leaking and replace it with a new section. Unfortunately, this is more easily said than done.

For example, when you turn a threaded galvanized steel pipe to unscrew it from its fitting at one end, you tighten the pipe into its fitting at the other end. With copper pipe, the new section must be sweat-soldered in place. Most pipe replacement jobs are best left to a plumber, but as a do-it-yourselfer, you may consider an alternative: the pipe patch.

Advertisement

You'll find patch kits for plumbing leaks at the hardware store, or you can make your own with a piece of heavy rubber from an old inner tube and a C-clamp. Another possibility is to use a hose clamp with a rubber patch. Factory-made kits contain a rubber pad that goes over the hole in the pipe and metal plates that compress the rubber pad over the hole. A quick and easy way to stop a leak, the patch kit can even be used on a permanent basis if the pipe is otherwise sound.

Other quick and easy temporary measures for stopping pipe leaks include wrapping waterproof tape over the bad spot or rubbing the hole with a stick of special compound. Applying epoxy paste or inserting a self-tapping plug into the hole are other alternatives. When using waterproof tape, be sure to dry the pipe thoroughly before you start wrapping.

Start the tape about 2 to 3 inches from the hole and extend it the same distance beyond. For tiny leaks in pipes, use a compound stick available at most hardware stores. Simply rub the stick over the hole to stop the leak. The compound stick can even stop small leaks while the water is still running in the pipe. Epoxy paste can be applied only to dry pipes, and the water must be turned off.

The problem with all of these solutions is that a pipe that's bad enough to spring one leak often starts leaking in other places too. You may fix one spot only to see the pipe burst somewhere else. Especially in cases where the leak results from corrosion, the whole section of pipe will probably need replacing. This is typically a job for a professional plumber.

Dripping water doeesn't necessarily indicate a leak. Let's move onto how to deal with sweating pipes on the next page.

How To Fix Sweating Pipes

Sometimes there's so much water dripping from a pipe that you're sure there must be a leak somewhere. On closer examination, however, you may discover there is no leak but rather sweating, or condensation, on the pipe.

Sweating occurs when the water inside the pipe is much colder than surrounding humid air. During the summer, the surrounding air is naturally hot; in winter, the air is heated by the furnace. In either case, when warm, humid air reaches cold pipes, drops of moisture form and drip as if there was a tiny hole in the pipe.

Advertisement

One effective way to control the moisture problem of a sweating pipe is to insulate the pipes. There are several types of self-adhesive thick "drip" tape designed to easily adhere to problem pipes.

Before applying the tape, wipe the pipes as dry as you can. Wind the tape so that it completely covers the pipe and the fittings. You should see no further signs of sweating.

On the flip side, pipes can also freeze. Learn about this problem on the next page.

Thawing Frozen Pipes

You may think your entire plumbing system is in perfect working order and there is little or no chance of a pipe bursting and flooding your house. There is one situation, however, you may not have considered. Water that freezes during the winter in an unprotected pipe expands, and that expansion can rupture an otherwise sound pipe.

A frozen pipe is always an inconvenience, but it can actually result in a much more serious situation than just a temporary loss of water. By taking the proper preventive steps, you may never need to worry about thawing frozen pipes, or worse, repairing a pipe that bursts when the water in it freezes solid.

Advertisement

Here's what to do if you wake up some frigid winter morning to find a water pipe frozen solid:Step 1: Open faucet so steam produced by your thawing activities will be able to escape.

Step 2: Start thawing pipe (see pipe-thawing options below) at faucet, and work back toward other end of frozen section. As you melt ice, water and steam will come out open faucet. If you started in the middle, steam produced by melting ice could get trapped and build up enough pressure to burst the pipe.

Pipe-thawing options: There are several things you can do to thaw your home's pipes. Here's a list:

  • Probably the most popular and safest pipe-thawing option is to use hot water. Wrap and secure heavy towel or burlap bag around pipe to concentrate and hold heat against it. Place bucket under pipe to catch runoff water, then pour hot or boiling water over towel.
  • A less messy but far more dangerous heat source for thawing frozen pipes is a propane torch equipped with a flame-spreader nozzle. With this heat source, you must be extremely careful to prevent torch flame from damaging or igniting wall behind pipe. A scrap of fireproof material between pipe and wall is a good precautionary measure, but the way you use the torch is the main element in safe pipe thawing. Keep flame moving back and forth. Never leave it in one spot very long. Be especially careful if you're near any soldered pipe joints. Pass over them very quickly or else they may melt and cause leaks, and you'll find that you have a much more serious plumbing problem on your hands than a frozen pipe. Caution: Never use torch or other direct high heat on plastic pipe.
  • If you want to avoid the messiness of thawing with hot water and the danger of melting soldered joints with propane torch, try heat lamp or hair dryer as heat source. These work less quickly but are much safer.

To thaw a frozen drainpipe, remove trap, and insert length of garden hose into pipe. When you can't push hose any farther, it has probably reached the ice. Raise your end of the hose and feed hot water in through a funnel. This way, the hot water is sure to get to the problem area. You must be careful when using this technique.

Until the ice melts and drains down the pipe, the hot water you pour in will back up toward you. Have a bucket ready to catch the overflow, and be careful not to scald yourself.

Perhaps the most common problem with pipes is noise. In the next section, we'll tell you how to deal with noisy pipes so that you can get some peace and quiet.


How To Fix Noisy Pipes

A pipe banging against a masonry wall can be silenced by wedging a wood block behind it, fastening the block to the wall, and securing the pipe to the wood.

Several different noises can come from your plumbing system. If you hear the sound whenever you turn on the water, the pipes are probably striking against something.

Banging pipes are much easier to cure if you can see them. Turn on the water and start looking for movement. Once you find the trouble, you can stop the pipe or pipes from hitting against whatever is in the vicinity. Even if the moving pipe is between the walls, you may be able to silence it without tearing your house apart. Just place padding or foam insulation at each end where the pipe emerges from behind the wall.

Advertisement

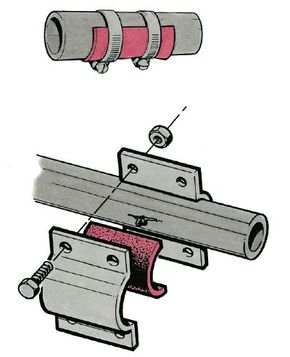
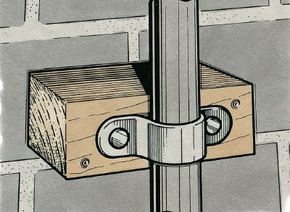
In many cases, the moving pipe is loose within its strap or U-clamp and is banging against the wall it's supposed to be secured to. To eliminate the noise, slit a piece of old garden hose or cut a patch of rubber and insert it behind the strap or clamp to fill in the gap. Pipes that strike against a masonry wall can be silenced by wedging a block of wood between the pipe and the wall. Nail the block to the wall with masonry nails or screws and attach the pipe to the block with a pipe strap.

In a basement or crawl space, galvanized steel pipes are typically suspended from the joists by perforated pipe straps. A long run of suspended pipe may move within the straps, strike against something, and create a racket. A block of wood strategically wedged along the run can eliminate the pipe's movement and the resulting noise. If you secure a pipe, don't anchor it so tightly that it can't expand and contract with changes in temperature. If you place a bracket on a pipe, install a rubber buffer between the pipe and the bracket. You can make such buffers from garden hose, foam rubber, rubber cut from old inner tubes, or even kitchen sponges.

You may find that supply pipes and drainpipes that run right next to each other are striking one another and creating a clatter. One solution to this problem is to solder the two pipes together. Another solution is to wedge a piece of rubber between them. If the vibration and noises are caused by water pressure that's too high, try reducing the water pressure.

If the knocking sound occurs only when you turn on the hot water, it means that the water heater is set too high. The noise is steam rumbling through the hot water system. Turning the heat setting down may silence the pipes. A pipe that's too small to begin with or that has become clogged with scale or mineral deposits can be a big noise problem. It's almost impossible to clean clogged supply pipes, and you must replace pipe that's too small if you want to stop the noise. You can diminish the sound level of clogged pipes considerably by wrapping them with sound-dampening insulation.

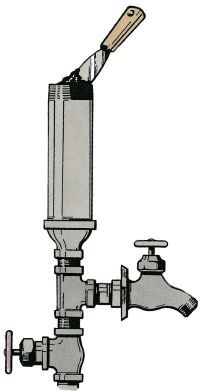
Drainpipes rarely clatter, but they can make a sucking noise as the water leaves the sink or basin. This sound means that a vent, such as the hole at the top edge of a bathroom sink, is restricted, or perhaps there's no vent at all attached to the drain. In either case, you have a potentially serious plumbing problem on your hands because a nonfunctioning or nonexistent vent can eliminate the water seal and allow sewer gas to back up into your home. If possible, run a plumbers' snake through the vent from the fixture or from the roof vent to eliminate any clogging. If there is no vent on the drain, install an antisiphon trap to quiet the noise and to prevent any problem with sewer gas. An antisiphon trap is available at a hardware or plumbing supply store.

The sound of banging pipes is sometimes called water hammer, but water hammer is a very specific noise issue. Find out how to bring it under control on the next page.

How To Stop Water Hammer

An air chamber will not drain properly if it is clogged. Remove its cap and ream out the accumulated scale inside the chamber.

Water hammer is a specific plumbing noise, not a generic name for pipe clatter. It occurs when you shut off the water suddenly and the fast-moving water rushing through the pipe is brought to a quick halt, creating a sort of shock wave and a hammering noise. Plumbing that's properly installed has air chambers, or cushions, that compress when the shock wave hits, softening the blow and preventing this hammering. The chambers can fail, though, because water under pressure gradually absorbs the air.

If you never had hammering and then it suddenly starts, most likely your plumbing system's air chambers have become waterlogged. You can cure water hammer by turning off the water behind the waterlogged chamber, opening the offending faucet and permitting the faucet to drain thoroughly. Once all the water drains from the chamber, air will fill it again and restore the cushion. If the air chamber is located below the outlet, you may have to drain the main supply lines to allow the chamber to fill with air again.

Advertisement

The air chamber will not drain properly if it's clogged with scale or residue from chemicals or minerals in the water. The chamber always should be larger than the supply pipe to preclude such clogging. Since the chamber is simply a capped length of pipe, however, all you have to do to clear it is remove the cap and clean out the residue.

What do you do if there are no air chambers built into your plumbing system? You must do something, because water hammer pressures may eventually cause damage: failure of fittings or burst pipes, for example. Because water hammer is most often caused by water pressure that's too high, the first step is to reduce the water pressure if possible. Sometimes this isn't feasible because a reduction in pressure may result in only a dribble of water at an upper-floor faucet if one on the first floor is turned on.

Where the idea is a workable one, you can reduce pressure by installing a pressure-reducing valve in the supply line that comes into the house. The same purpose is served by installing a globe valve at the head of the affected pipeline. But this too may result in pressure too low for proper operation when other faucets are open.

If pressure reduction is not feasible or is ineffective, install the necessary air chambers to prevent water hammer. If you have no room to make the installation without tearing into a wall, go to a plumbing supply dealer and find out about the substitute devices designed for such problem areas. Many of these devices have a valve that makes it easy for air to re-enter the system.

The next time you hear noises or clatter coming from your home's plumbing system, try the solutions mentioned in this article. The same goes for leaking, sweating, or frozen pipes. If you can solve the problem right away, you can prevent it from becoming more serious.

Plumbing: Tackling plumbing problems in the home can be quite daunting. Don't dismay -- the plumbing tips detailed in this article are sure to help, even if helping means advice on when to call a plumber.

  • How to Fix a Toilet: Yes, it's a job no one really wants to tackle. And no, you don't have to call a plumber for every toilet problem. Learn how to fix a toilet at HowStuffWorks.
  • Plumbing Troubleshooting: Sometimes figuring out what's wrong with your toilet, drain, or other plumbing-related area is half the battle. Find helpful troubleshooting tips here.
  • Plumbing Tools: You may already have many of the tools necessary for most plumbing jobs because they are the same tools used for other do-it-yourself projects. Find out about special plumbing tools, such as pipe wrenches, in this article.