How to Cut Molding

Shallow frame of cut maple molding.
Adding molding to a room is like putting on a nice piece of jewelry to complement an outfit -- it’s a finishing touch that adds instant appeal.­ See more home design pictures.
­iStockphoto.com/Joseph Abbott

­While decorative molding isn't an essential part of the building process, it has an important role in finishing off a room. It can add value and protection to your home, and provide a more finished look.

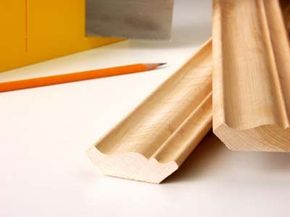
Different moldings serve different purposes. Some moldings surround doorframes and windows. Others run around the perimeter of a room. At the base of the wall, where it meets the floor, baseboards (also called wall boards), shoe molding and quarter-round trim hide the ends of flooring. In the center of the wall, chair rail molding helps protect walls from being damaged by the backs of chairs hitting the wall. Crown molding covers the area where the ceiling meets the wall.

Advertisement

Molding pieces are typically joined together in one of three ways: scarf or spliced joints, coped joints and mitered joints. Scarf joints join two pieces end-to-end, and are typically cut in 45-degree angles to provide an overlap. Coped and mitered joints are used to provide a clean look when two walls meet in corners [source:Anderson].

­As the saying goes, the devil is in the details, which, in the case of molding, is in the corners. Coping, more often used for inside corners, involves manually cutting away part of the molding to provide a tight fit. Mitering requires precise cutting and measuring to ensure a tight fit of the two molding pieces [source: Charles and Hudson].

Consider the angles created when two perpendicular walls meet. The angle formed should be either 90 degrees (for an inside corner) or 270 degrees for an external corner. To make those pieces of molding fit a corner, two pieces of molding need to be cut at 45 degrees so that they match up cleanly at the internal corner, and two pieces cut at 135 degrees would be needed for the external corner.

Remember that not many corners are a perfect 90 degrees. And while baseboard, quarter nose and chair rail molding lie flat against the wall, crown molding does not, so it needs extra effort to cut it correctly.

Read on to learn about the importance of measuring molding before cutting it.


Measuring Molding Before Cutting

First measure where the molding will go. Molding typically comes in 8-foot (2.4-meter) lengths; however, some is available in 10- or 12-foot (3- or 3.7-meter) lengths, so you'll need to choose your molding before you can determine how much you'll need.

It's important to round when measuring. For molding that will go around the room's perimeter, round all measurements up to the next largest foot to allow for cutting and trimming of the pieces. For example, if one wall measures 8'3", round up to 9 feet (2.7 meters) when making your calculations [source: Royal Mouldings].

Advertisement

Be as precise as possible when measuring, and then divide the total by the length of the molding and add 10 percent more to the total to account for bad cuts [source: Stimpson].

Measure each corner wall angle to help calculate the correct miter angle. Some walls meet in unusual angles. It isn't unusual for supposedly perpendicular wall angles to be off as much as 3 degrees. While this may not seem like a big deal, if it's not taken into account before mitering the molding pieces, you can end up with a big gap between the pieces and have to make the cut again.

Before cutting, measure twice and test-cut the angles on scrap pieces of molding. When working on corners, measure the length needed to cut the shortest side of the molding. The top of the molding will be shorter for an inside corner; the bottom of the molding will be shorter for an outside corner. Measure again before making the final cut [source: Louisiana Pacific].

If two pieces are fairly close to fitting together, acrylic caulk can be used to fill the gap. Paint can even help make the gap disappear [source: Anderson].

Sometimes the trickiest part is cutting molding on an angle. Find out how on the next page.

Cutting Molding on an Angle

Before making the first cut, a number of things have to be considered.

What kind of trim are you cutting? Different trims require different positions in the miter box or on the saw:

Advertisement

  • In a vertical position, the back of the molding should be placed against the back of the miter box or saw's fence. This is used to cut baseboard, chair rail, quarter round and splice miters.
  • For a horizontal position, the molding should lie flat on the saw table or miter box, decorative side up. This position is used when cutting window and door casings.
  • A compound position is used for crown molding. Unlike other molding, the back of a piece of crown molding does not lie flat against the wall. Instead, it creates a triangular space between the wall and ceiling. A lower flat edge lies against the wall; an upper edge meets the ceiling. So, when cutting crown molding, it's the edges that rest against the fence and the table base, not the back of the molding. The decorative side should face down, the top of the molding should be on the saw table base and the bottom of the molding should rest against the fence [source: Carter].

Which piece are you cutting? Each molding joint has a left side and a right side. For a left-hand cut, most of the molding will be to the left of blade (when the finished side of the molding is face up, bottom down). For a right-hand cut with the trim in the same position, you're cutting the right side of the joint [source: Royal Mouldings].

What type of joint are you cutting? Spliced joints are 45-degree cuts. Coping joints require both a 90- degree and a 45-degree cut. Depending upon the tool used, mitering can allow more precise cutting. Because crown molding is installed at an angle to the wall, the angle of the molding needs to be taken into account. Detailed charts that specify settings for the saw's bevel angle and miter angle are based on the angles of the walls [source: DEWALT].

To find out the key tools you'll need to cut molding, read on.

Tools Needed to Cut Molding

Following is a list of some of the tools you will need when cutting molding. Each particular project and the depth of the molding will determine the particular tools required, so you may need additional tools depending on your project:

  • Safety glasses
  • Dust mask
  • Tape measure
  • Pencil
  • Level
  • Drop cloth
  • Ladder
  • Caulk and or wood putty -- these work best to fill gaps and nail holes.
  • Hammer
  • Finishing nails
  • Power drill, bits
  • Pneumatic nailer
  • Nail set
  • C-clamp
  • Sandpaper
  • Circular saw

You'll also need a few more items, including glue; some experts recommend gluing together molding joints before installation. If you will be employing the coping technique to join molding, you'll need a coping saw. For 45- or 90-degree angles, you might want a miter box and handsaw.

Advertisement

To determine the angle created by the walls, you'll want an angle gage or 360-degree adjustable protractor. A power miter or compound miter saw will allow for more angle adjustments, some for both the miter and the bevel. Use one that's equipped with a carbide saw blade that has 80 teeth or more. Make sure the saw is square and the table angle gage is accurate. If the gage is off by as little as 3 degrees, you can end up with a big gap in the miter joint. An angled filler strip is designed to fill the space behind crown molding. The filler strip is nailed to the top wall plate that runs horizontally behind the drywall, just below the ceiling. Use the strip to nail the crown molding in place. And finally, you can use some spray furniture polish to lubricate the saw blade and make cutting easier [source: Royal Mouldings, Carter, Anderson, Louisiana Pacific].

Now, you're ready to take on your molding project and even know how to cut it properly. But if you still have questions, visit some of the links on the following page.

Lots More Information

Related HowStuffWorks Articles

  • Anderson, Murray. "Installing Molding Using Mitered and Coped Joints." (Accessed 02/23/2009)http://www.doityourself.com/stry/copingbetterfit
  • Carter, Tim. "Cutting Crown Molding Without Losing Your Mind." Ask the Buillder.com. (Accessed 02/23/2009)http://askthebuilder.com/354_Cutting_Crown_Molding_Without_Losing_your_Mind.shtml
  • Charles and Hudson. "How to Cut and Install Molding for an interior Corner." Charles and Hudson.com. April 2008. (Accessed 2/23/2009)http://www.charlesandhudson.com/archives/2008/04/how-to-cut-and-install-molding-for-an-interior-corner.htm
  • DEWALT. "Pro's Column: Cutting Crown Molding With DEWALT Miter Saws." DEWALT.com. (Accessed 2/23/2009)http://www.dewalt.com/us/articles/article.asp?Site=woodworking&ID=2
  • Louisiana Pacific. "How to Cut LP Moulding." Louisiana Pacific Corporation. (Accessed 2/23/2009)http://www.lpcorp.com/moulding/getinspired/installation/howtocutmoulding.aspx
  • Royal Mouldings. "How to Cut and Install Moulding." Royal Mouldings.com. (Accessed 2/23/2009)http://www.royalmouldings.com/HowToFiles/How%20To%20Install%20Interior%20Mouldings.pdf
  • Stimpson, Jennifer. "Install Easy Crown Molding." This Old House Magazine. March 2009 issue.