How to Do Brick and Concrete Repairs

cement
Easy concrete repairs you can do. Jung Getty / Getty Images

A brick exterior gives many homes -- especially older homes -- a look of distinction and character. And almost every home, even more-modern dwellings, has concrete stairs in the front or back and a concrete driveway or sidewalks.

These very features that can give a home its "personality" are also the areas that may require some repair as years pass, and hiring a professional for these jobs can be expensive. However, with just a few tools, easy-to-access materials and some elbow grease, you can be your own home-maintenance crew.

Advertisement

This article provides the instructions and illustrations you'll need to learn how to do brick and mortar repairs (known as tuckpointing), replace a brick when it comes loose from a wall or chimney, repair crumbling concrete steps, fix a crack in a brick or concrete block wall, and fill pesky potholes in your driveway.

Grab your tool box and click to the next page to begin repairing loose mortar joints between bricks.

For further tips and instructions on how to fix things around the house:

  • Home-Repair Safety Tips: Doing the job yourself doesn't save you money if you end up in the emergency room. Read these tips to make sure you work smart when doing home repairs.
  • Home-Repair Tool Basics: Does your tool box have what it takes? Learn what tools you're likely to be looking for when making repairs around the house.

How to Repair Loose Mortar Joints

Cut out the crumbling mortar, at least 1/2 inch deep, to provide a sound base for the new mortar joints.

Loose or crumbling brick mortar joints can be very expensive to have fixed, but the repair work -- called tuckpointing -- can be done by anyone with a strong arm. Because loose or crumbling mortar lets moisture through, it can result in damage to interior walls as well as hasten the deterioration of sound mortar. For both reasons, tuckpoint as soon as weather permits when you notice damaged mortar joints.

Tools:

  • cold chisel
  • heavy hammer
  • safety goggles
  • garden hose
  • small, sharp trowel
  • jointer or small piece of metal pipe
  • stiff brush (scrub brush)

Materials:

  • mortar mix (available in sacks at hardware stores, just add water)
  • mortar coloring (also available at hardware stores)
  • corrugated cardboard to use in matching color

Time: 1/2 day for small area, more for more serious damageTo begin the project, wearing safety goggles, use the cold chisel and hammer to clean out the old mortar, cutting at least 1/2 inch down into crumbling joints. You must remove all loose mortar so that you have a sound base for the new fill. Clean out the vertical joints first, then the horizontal ones.

Advertisement

Still wearing safety goggles, flush the newly cut joints with the garden hose, using fairly strong water pressure to make sure all loose mortar and dust are removed.

Using a small, sharp trowel, fill the cleaned-out joints with mortar, working first on the verticals and then on the horizontals.

Once the mortar joints are cut and flushed, mix the new mortar. Following the directions on the sack, mix a small amount of mortar and smear it on a piece of cardboard. The mortar will dry very rapidly on the cardboard, letting you see what color it will dry to in the wall. If the new mortar is a different color than the old, add mortar coloring, experimenting with test batches on the cardboard until you have a good match. Then mix the amount of mortar you will need.

Before applying the new mortar to the wall, wet the cleaned joints again, using a heavy mist so that the brick is wet but not streaming. Using a small, sharp trowel, fill the cleaned-out joints with mortar, working first on the verticals and then on the horizontals. Pack the mortar in tightly, making sure there are no gaps or air holes.

Finish each joint as you fill it; don't fill all the joints first and then go back. If the old joints are V-shaped, use the point of the trowel to finish the new mortar. Holding it at a steady 45-degree angle, draw the trowel firmly along each joint as soon as it is filled. Shake the excess mortar off the trowel before you begin to fill the next joint. If the old mortar joints are U-shaped, use a mortar jointer or a piece of small-diameter metal pipe, bent to give you a good grip. The technique is the same: draw the jointer or pipe firmly along the joint to leave a smooth, concave surface.

To make a V-shaped mortar joint, use the point of a trowel. For U-shaped joints, use a mortar joiner or piece of small-diameter pipe.

To prevent the mortar from drying too quickly, wet the new joints down a few times a day for two or three days, using the fine spray of the garden hose. When the wall is completely dry, clean any excess mortar from the bricks with a dry, stiff brush.

Continue to the next page to learn how to make brick wall or chimney repairs when there's not just crumbling mortar but a whole loose brick.

For further tips and instructions on how to fix things around the house:

  • Home-Repair Safety Tips: Doing the job yourself doesn't save you money if you end up in the emergency room. Read these tips to make sure you work smart when doing home repairs.
  • Home-Repair Tool Basics: Does your tool box have what it takes? Learn what tools you're likely to be looking for when making repairs around the house.

How to Replace a Brick

Apply mortar generously to the top and ends of the brick, but don't mortar the back. Set the brick carefully into place in the prepared hole. Press firmly.

A loose or broken brick in a wall or chimney not only looks bad, and it can provide an opening (literally!) for further damage. Act quickly to prevent moisture from entering the wall or chimney. And don't worry -- the repair is an easy one.

Tools:

  • safety goggles
  • cold chisel
  • sledgehammer
  • bucket
  • wide brick chisel
  • wire brush
  • garden hose
  • mixing bucket and stir stick
  • sharp trowel
  • mortar jointer or thin metal rod
  • stiff scrub brush

Materials:

  • mortar mix
  • mortar coloring
  • corrugated cardboard scrap
  • replacement brick

Time: 1 to 2 hoursWearing safety goggles, begin by using a cold chisel and sledgehammer to remove the mortar around the loose brick. Work carefully to avoid damaging the loose brick or surrounding bricks. Lift the loosened brick out from the wall or chimney and set it in a bucket of water to soak.If a loose brick cannot be easily removed, or if the brick is broken, break it up to remove it. Wearing safety goggles, chop out the damaged brick with a wide brick chisel and sledgehammer. But still be careful not to damage the surrounding bricks. Fill a bucket with water and set the replacement brick in it to soak.Still wearing safety goggles, remove all remaining mortar from the hole where the brick was removed; use the sledgehammer and cold chisel to remove large chunks of old mortar and then wire-brush the cavity to remove any debris still adhering to the bricks. Flush the cavity thoroughly with the garden hose.Mix a small batch of mortar according to the directions on the package. To see what color the mortar will be when it dries, spread a little mortar on a scrap piece of corrugated cardboard; as the cardboard absorbs water from the mortar and it dries, the mortar's color will lighten. Add mortar coloring as necessary, experimenting with mortar applied to the cardboard, until the new mortar matches the old. Mix enough mortar to secure the brick, and add coloring in the proportion used in the test batch.Before replacing the brick in the wall, spray the cavity again with the garden hose to dampen it; the cavity should be wet but not streaming. Spread a thick bed of mortar on the bottom surface of the cavity, smoothing it roughly level.

Advertisement

Remove the replacement brick -- salvaged or new -- from the bucket of water and shake it to remove excess water. Apply mortar generously to the top and ends of the brick, but don't mortar the back. Set the brick carefully into place in the prepared hole, pressing it in firmly. It should align with the bricks on each side of it; adjust it to match, and apply more mortar as necessary. Make sure the face of the new brick is flush with the surface of the wall.

When the new brick is firmly in place, force mortar into the top and side joints of the brick to fill them completely. Smooth the mortar all around the new brick, making sure there are no gaps. Scrape excess mortar from the wall with the side of the trowel. Then, using the trowel, a brick jointer, or a thin metal rod bent to form a handle, tool the new mortar joints to match the joints in the rest of the wall.

To keep the new mortar from drying too quickly, spray it lightly with the garden hose several times a day for 2 or 3 days. When the mortar has set completely, use a stiff scrub brush to remove any excess mortar from the face of the wall.

If you can handle repairs with mortar, concrete is the natural next step. On the next page, learn how to repair crumbling concrete stairs.

For further tips and instructions on how to fix things around the house:

  • Home-Repair Safety Tips: Doing the job yourself doesn't save you money if you end up in the emergency room. Read these tips to make sure you work smart when doing home repairs.
  • Home-Repair Tool Basics: Does your tool box have what it takes? Learn what tools you're likely to be looking for when making repairs around the house.

How to Repair Concrete Steps

Chisel out each worn edge to remove crumbling concrete and form a clean,  open angle along the top of the step.

Old houses -- and even middle-aged ones -- often have concrete front or back steps that have felt the wrath of the elements over the years and are crumbling along the edges. It takes time to recast the damaged steps, but it isn't difficult.

Tools:

  • safety goggles
  • cold chisel
  • sledgehammer
  • whiskbroom
  • garden hose
  • hammer
  • sturdy wheelbarrow
  • shovel
  • stiff paintbrush
  • trowel
  • wood concrete float

Materials:

  • boards as long and wide as the steps to be mended
  • bricks
  • boards for sides of form
  • short pieces of 2 × 4
  • 4-penny common nails
  • ready-mix sand concrete mix
  • liquid concrete bonding agent
  • plastic dropcloth

Time: about 1 day; if several steps must be recast, plan on spending more time. In addition, you'll need to spend a few minutes several times each day during the curing period.To begin the project, prepare the edge of each damaged step by chiseling out the crumbling concrete. Wearing safety goggles, use a cold chisel and sledgehammer to deepen and widen the open edge down to solid concrete. Angle the chisel to cut straight back into the riser of the step and to cut sharply back and down into the tread, forming an acute open V along the edge of the step. Clean out the undercut edge with a whisk broom and flush it thoroughly with a garden hose.

Advertisement

Build a form around the step to be recast. Use a board as long and as wide as the front edge of the step is wide and high; set the board across the riser and stack several bricks against it at each end to hold it firmly in place. If possible, the top edge of the form should be level with the sound surface of the step.

Build a form for each step; wedge boards upright at the sides and prop a board flat against the riser.

To close in the ends of the steps, set a board across each side of the chiseled-out step, flush against the concrete and level with the step surface at the top edge. Nail a piece of 2 × 4 across each board along the top of the step and wedge another piece of 2 × 4 under this brace to hold the forms solidly in place.

Prepare ready-mix sand concrete mix according to the directions on the package; pour the dry mix into a sturdy wheelbarrow, add water, and mix it thoroughly with a shovel. When the concrete mix is ready to use, mist the chiseled-out step with the garden hose to dampen the concrete. Working quickly, apply liquid concrete bonding agent to the undercut edge with a stiff paintbrush according to the manufacturer's instructions. Spread the bonding agent evenly into the undercut edge, being careful to cover the entire inside surface. Clean the paintbrush immediately with water.

Fill the boarded-in step's edge cavity with concrete, using a trowel or the shovel to spread it along the edge. Slice through the new concrete with the sharp end of the trowel to remove any air spaces, and pack the concrete firmly into the undercut edge. Level the surface roughly with the trowel to meet the surface of the old concrete.

Smooth the newly poured concrete with a wood float, being careful to hold the float level on the old surface and the new edge. Let the newly poured edge harden for about 45 minutes and then smooth the surface again with the wood float to match the texture of the old concrete. If you want a smoother finish on the recast step, wait until the film of water left on the concrete after the last float-smoothing has been absorbed, then smooth the edge of the step carefully with a clean trowel.

Let the concrete set until the film of surface water left by the final smoothing has been absorbed. Cover the steps with a plastic dropcloth, weighted above and below the mended steps and at the sides. Let the patched edges cure for a week before walking on them. Several times each day during the curing period, lift off the plastic and spray the recast steps lightly with the fine spray of water from a garden hose, then replace the plastic. To keep the new edges from being damaged, leave the forms in place until the concrete has completely cured.

On the next page you'll learn how to repair cracks, both large and small, that appear in brick or concrete block walls.

For further tips and instructions on how to fix things around the house:

  • Home-Repair Safety Tips: Doing the job yourself doesn't save you money if you end up in the emergency room. Read these tips to make sure you work smart when doing home repairs.
  • Home-Repair Tool Basics: Does your tool box have what it takes? Learn what tools you're likely to be looking for when making repairs around the house.

How to Repair Cracks in Brick or Concrete Block

Mask the crack with tape and prop a board across it; pour grout through a tube to fill the crack gradually.

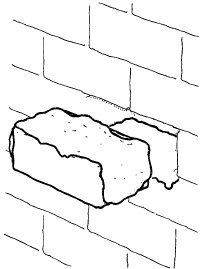
Unless there's a serious structural problem, wide, top-to-bottom cracks in brick or concrete-block walls are easy to fill. And there's no need to be obsessed with perfection. Work through the broken bricks instead of trying to replace them.

Tools:

  • safety goggles
  • cold chisel
  • sledgehammer
  • brick chisel
  • wire brush
  • garden hose
  • mixing bucket and stir stick
  • small sharp trowel
  • wide board to cover crack
  • 2 × 4 prop
  • large funnel
  • rubber tubing to fit over funnel end
  • mortar jointer or thin metal rod
  • paintbrush

Materials:

  • mortar mix
  • Portland cement
  • hydrated lime
  • sand
  • scrap corrugated cardboard
  • mortar coloring
  • duct tape
  • exterior paint or cement paint
  • solvent for paint

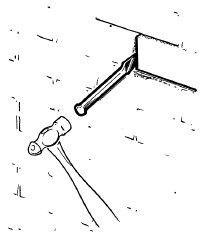
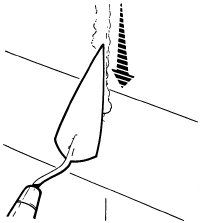
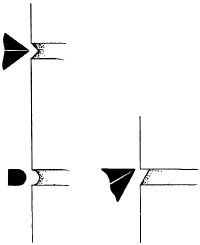
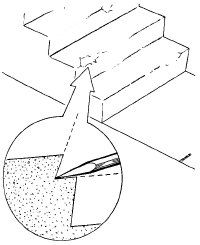
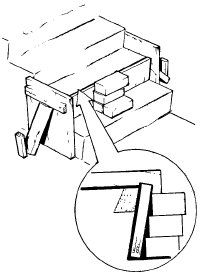
Time: about 3 to 4 hours for cleaning and initial filling; additional time depending on extent of damageWearing safety goggles, begin by cleaning all crumbling brick and mortar from the crack with a cold chisel and sledgehammer. Where the crack runs through a brick or a concrete block, use a brick chisel, angled into the crack, to widen and undercut the break. Enlarge the crack to a consistent width and clean the inside of the crack to its full depth, or as far in as you can reach. Wire-brush the crack, inside and out, to remove debris, then flush it thoroughly with water from a garden hose.Cracks that affect only a single layer of brick can be filled with mortar. Mix a small amount of mortar according to the directions on the package. Spread a little mortar on a scrap of corrugated cardboard, where it will dry quickly and reveal its true color. Add mortar coloring to the mortar as necessary to match the old mortar, experimenting with the cardboard as you add coloring. When the dried test batch matches the old mortar, mix enough mortar to fill the crack and add coloring in the tested proportion.Spray the crack thoroughly with the garden hose. Fill the crack with mortar using a small, sharp trowel to force the mortar into the full depth of the crack. Treat the crack as one long joint, filling cleaned-out joints and the gaps in broken bricks or concrete block evenly all along the crack.When the crack is solidly packed with mortar, finish the surface with a jointer and the trowel. Match the old joints where the crack follows a joint: trowel the mortar to match the surface where the mended surface is block or brick. Let the crack cure thoroughly for at least 1 week. Spray the patched area lightly with the garden hose several times a day during the curing period.When the crack is very wide and deep, fill it with a thin grout mixture. Wearing safety goggles, chisel out, wire-brush, and flush the crack with water to clean it thoroughly. Mix a small amount of filler, using 1 part Portland cement,1 part hydrated lime, and 6 parts sand. Mix the dry materials and add water slowly to form a thin, easily pourable grout. Add mortar coloring, testing the mixture on a scrap of corrugated cardboard, to match the color of the old mortar; then mix a bucketful of grout in the same proportions.Working quickly, spray the inside of the crack lightly to dampen it. Mask the lower third of the crack with duct tape set flat over the opening. Set a wide board flat against the wall to hold the tape in place, and wedge it firmly upright with a 2 × 4.

Advertisement

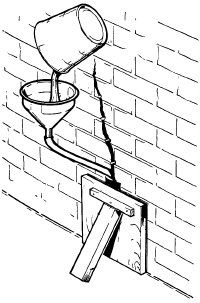
Use a wide-mouthed funnel and a length of rubber tubing to fill the crack; you'll need a helper for this. Push one end of the tubing over the narrow end of the funnel and set the open end into the crack. Hold the end of the tubing at least halfway into the crack and as near the bottom as you can reach over the board wedged against the wall. Pour grout slowly into the funnel to fill the bottom of the crack. Then remove the tubing from the crack. Rinse the funnel, the tubing, and the bucket thoroughly.

Let the partially filled crack set for about 1 day. Then remove the board and the duct tape from the crack. Use a mortar jointer -- or thin metal rod bent to form a handle -- and a trowel to finish the crack, matching both joint and brick or concrete block textures. Then fill the crack further.

Mix a bucketful of grout in the same proportions as before. Working quickly, spray the crack lightly with a garden hose. Mask the crack with duct tape and wedge the board back into place against the wall. Using the wide-mouthed funnel, pour the grout into the crack as before. Let it dry for 1 day and remove the mask; finish the grout to match joints and brick or block.

Repeat the filling and finishing process daily, section by section, until the entire crack has been filled. Be sure to mix and color the grout in the same proportion each time. Let the grout cure thoroughly for at least a week after the final application of grout. Spray the patched area lightly with the garden hose several times a day during the curing period.

Finish either mortar-filled or grout-filled cracks by painting the patch to match the surrounding wall. For a painted wall, touch up the newly filled and cured crack with the same exterior paint used on the wall. To hide the crack in a brick wall, use cement paint the same color as the bricks. Thin the paint and apply it carefully to the crack where it passes through bricks; repeat as necessary until the color is correct.

Continue to the next page to put your concrete skills to work on potholes in your driveway.

For further tips and instructions on how to fix things around the house:

  • Home-Repair Safety Tips: Doing the job yourself doesn't save you money if you end up in the emergency room. Read these tips to make sure you work smart when doing home repairs.
  • Home-Repair Tool Basics: Does your tool box have what it takes? Learn what tools you're likely to be looking for when making repairs around the house.

How to Fill Potholes in Concrete

Fill the hole and pull a 2 × 4 back and forth across the patch to level it; then smooth it with a wood float to finish the surface.

Potholes in the streets are bad enough, but potholes in your driveway are worse. However, although you can't do much about problems with public roads, with just a little time and effort you can keep your driveway pothole free.

Tools:

  • safety goggles
  • cold chisel
  • sledgehammer
  • stiff broom
  • garden hose
  • sponge
  • sturdy wheelbarrow
  • shovel
  • stiff paintbrush
  • trowel
  • 2 × 4 long enough to extend completely over patch area
  • wood cement float
  • push broom

Materials:

  • ready-mix concrete mix (choose sand mix for small holes, gravel mix for large or deep holes)
  • liquid concrete bonding agent
  • plastic dropcloth
  • weights

Time: about 1 day for a good-sized hole, plus a few minutes several times each day during the curing periodBegin the project by removing all the loose pieces of concrete from the hole. Wearing safety goggles, use a cold chisel and a sledgehammer to chop out the crumbling concrete and cut down to sound concrete, roughening the interior surface of the hole. Angle the chisel to undercut the edges of the hole, so that the hole is wider across the bottom than it is across the top. Remove large chunks of broken concrete and sweep out the hole with a stiff broom; flush it thoroughly with water from a garden hose. Then remove standing water with a sponge.Mix ready-mix concrete according to the manufacturer's instructions; use sand mix for small holes and gravel mix for large or deep ones. Pour the dry mix into a sturdy wheelbarrow and add water; mix the concrete thoroughly with a shovel.When the concrete is ready to use, quickly pour liquid concrete bonding agent into the hole. Following the manufacturer's instructions and working quickly, spread the bonding agent evenly over the entire inside surface of the hole with a stiff paintbrush; be sure to coat the undercut corners completely. Clean the paintbrush immediately with water.Fill the prepared hole before the bonding agent dries. Shovel concrete into the hole and trowel it into place, pressing firmly to pack the opening completely full. Mound the surface of the patch slightly above the level of the surrounding concrete and then tamp it firmly down with the back of the shovel. If necessary, add more concrete and tamp again to pack the hole densely.

Advertisement

To level the patch, set a 2 × 4 on edge across the filled hole. You'll need a helper at this point if the patch is a large one. Starting at one end of the filled hole, draw the 2 × 4 in zigzags over the new concrete, pushing and pulling alternately with your helper, one person at each end of the 2 × 4. The smoothed-over patch will have a film of water on its surface.

Let the concrete set for about 45 minutes to 1 hour. When the surface of the concrete is no longer filmed with water, smooth the patch again with a wood cement float. Continue smoothing, using long, even sweeps with the float, until the surface of the patch is filmed with water again.

If desired, finish the surface of the patch with a push broom. Let the patch set after the second float-smoothing until the film of surface water disappears. Then, starting on the old concrete beyond the patch, move the head of the push broom steadily over the filled-in hole and onto the old concrete again.

Let the concrete set until the film of surface water left by the final smoothing has been absorbed. Cover the patch area with a plastic dropcloth, weighted at the edges if necessary to hold it in place. Be careful not to set the weights on the new concrete. Let the patch cure for about a week before walking on it. Several times each day during the curing period, remove the plastic and spray the patched area with the fine spray of a garden hose; recover the patch and reweight the plastic sheet to hold it in place.

For further tips and instructions on how to fix things around the house:

  • Home-Repair Safety Tips: Doing the job yourself doesn't save you money if you end up in the emergency room. Read these tips to make sure you work smart when doing home repairs.
  • Home-Repair Tool Basics: Does your tool box have what it takes? Learn what tools you're likely to be looking for when making repairs around the house.