Windows are often trouble spots. Along with doors, windows are the major source of heat-loss in most homes. They also may stick shut when they're painted or swell shut from humidity. Inside, shades and venetian blinds may not work right, glass gets broken, and screens get torn. In this article, we'll discuss what you can do to keep your windows working properly. One common problem that homeowners or apartment-dwellers will encounter are windows that won't open.
Unsticking a Window
Double-hung wood-frame windows, especially in older homes, often stick. The most common cause is that the window has been painted shut and the paint has sealed it closed. The solution is usually simple: Break the seal, and clear and lubricate the sash tracks.
Advertisement
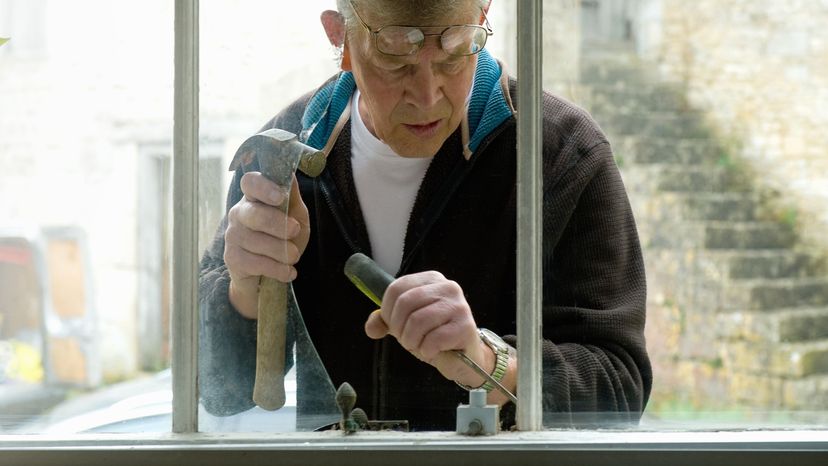
Step 3: If window still doesn't open, check tracks in window frame above sash; they're probably blocked with built-up paint. Using hammer and chisel, carefully clean excess paint out of window tracks. Cut out thickened paint, but be careful not to gouge the wood of the tracks. Smooth cleaned-out tracks with sandpaper on a narrow sanding block, then spray them with silicone lubricant.
Step 5: If window still doesn't open, use small pry bar on it, preferably from outside. Insert flat end of pry bar under sash; set block of scrap wood under it for better leverage. Pry gently at corners of sash and then from corners in toward center. Use pry bar very carefully; too much pressure could damage both sash and frame. If window opens, clean and lubricate tracks with silicone spray. If it still doesn't open, sticking may be caused by extreme humidity, poor construction, or uneven settling. Call carpenter to fix window rather than trying to force it open.
Windows receive a lot of use while protecting your home from the heat and the cold, so from time to time the glass might break or crack. Learn how to handle this type of window repair in the next section.
What You'll Need
Here are the tools to have on hand to unstick a window:
A broken windowpane not only allows the weather into your home, it is also a security hazard. Luckily, broken glass is one of the easiest problems to fix. You can buy replacement glass, cut to measure, at lumberyards and hardware stores. Here's how to replace a broken pane in a single pane (one thickness of glass) window:
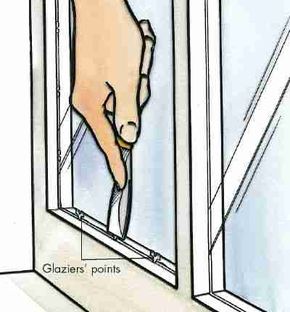
Step 4: Measure frame for new glass. It should be just smaller than opening to allow for expansion and contraction and to allow for imperfections in frame or glass. Measure both ways across opening, from inside edge to inside edge, and subtract 1/16 to 1/8 inch each way. Have double-strength glass cut to these precise dimensions. Purchase enough new glaziers' points or clips to be installed every 6 inches or so around pane.
Advertisement
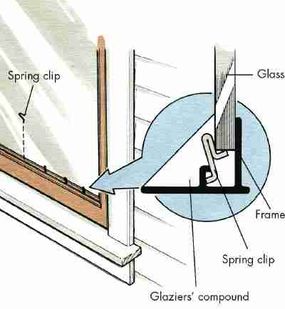
Step 6: To seal the new window pane with glaziers' compound all around the outside edge, roll another cord of glaziers' compound, and press it firmly into the glass-frame joint, all around the pane. Use putty knife to smooth compound all along the joint around the pane, matching putty to other nearby windows. Hold putty knife at an angle to lip of frame, so knife cuts compound off cleanly and evenly along glass. If putty knife sticks or pulls at glaziers' compound, dip blade into linseed oil, and shake off excess. Use long, smooth strokes to keep joint even around pane.
Step 7: With razor blade or glass scraper, carefully remove excess glaziers' compound from both sides of new glass and frame. Let compound dry for about three days.
Step 8: Paint new compound and frame to match rest of frame. Lap paint slightly over edge of compound and onto glass to seal pane completely. Make sure paint is dry before you clean glass.
Additional Window-Repair Tips
No matter what type of window repair you might need to tackle, the additional guidelines below can help you get the job done quicker with less mess.
To prevent a windowpane crack from spreading, score a small arc with a glass cutter just beyond the crack, curving around it. Most of the time crack will travel only as far as the arc.
Before trying to chisel hardened putty from a wooden window frame, brush raw linseed oil over putty. Let it soak in to soften the putty.
Fill a pellet gun hole in a windowpane with clear nail polish or shellac. Dab at the hole; when the application dries, dab again and reapply until the hole is filled. The pane will appear clear.
To cover a clear bathroom window without putting up curtains, make the glass opaque by brushing on a mixture of 4 tablespoons of Epsom salts and 1/2 pint of stale beer.
Window screens sometimes become torn or bent and need to be tended to before they become an eyesore or security hazard. Learn how to repair and replace screens in the next section.
What You'll Need
Here are the tools you'll want to have on hand to replace broken window glass:
Safety goggles
Masking tape
Hammer
Heavy gloves
Chisel or scraper
Linseed oil
Clean cloth
Tape measure
Replacement glass
Glaziers' points or spring clips
Putty knife
Glaziers' compound or putty
Single-edge razor blade or glass scraper
Rust-resistant paint and paintbrush
How to Fix and Replace Window Screens
Pinholes in screening are very simple to fix. But, the type of material used to make the window screen will dictate how you repair the pinholes.
If the screening is metal, use a sharply pointed tool to push the strands of wire back toward the hole; you may be able to close the hole completely. If there's still a hole, apply clear nail polish or household cement over it. Let the sealer dry. Apply additional coats until the opening is filled.
Advertisement
With vinyl or fiberglass screening, move the threads back into place. Otherwise, fill tiny holes with clear nail polish or household cement. Be careful not to let any sealer run down the screen. Nail polish may dissolve some types of screen materials.
To close a large hole, cut a patch from a scrap piece of screening, the same type (vinyl, fiberglass, or metal) as the damaged screening. Don't use metal screening made of a different metal; placing two metals together -- steel to copper, for instance -- can cause corrosion.
A vinyl patch is very easy to install, if you can lay the screen flat. Cut a patch about 1/2 inch bigger all around than the hole, and set it over the hole. Place a sheet of aluminum foil over the patch area, shiny side down, and press the patch firmly with a hot iron, being careful not to touch the screen directly with the iron. The heat will fuse the patch onto the screening. If you can't lay the screen flat, sew the patch into place with a needle and nylon thread using a firm running stitch, but don't pull the thread too tight. Apply clear nail polish over the edges of the patch to keep it from fraying.
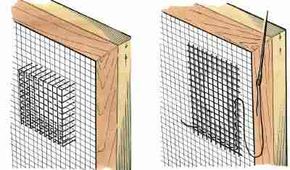
Patch a hole in a metal screen using a larger patch of the same material.
To patch metal screening, cut a square or rectangle about 1 inch bigger all around than hole. Pull out the wires on all four sides to make a wire fringe about 1/2 inch deep around the patch. Bend the fringe wires down sharply at a right angle; use a wood block to make a clean bend on each side of the patch. When the fringe wires are evenly bent, set the patch over the hole in the screen, and press to insert the bent fringe wires through the screening around the hole. The patch should be flat against the screen, covering the hole completely. Fold fringe wires down flat toward the patch's center on the other side of the screen. Then stitch around the entire patch with a needle and nylon thread or with fine wire.
Replacing Window Screens
When a screen has many holes or when metal screening becomes bulged and rusted, consider replacing the screening entirely.
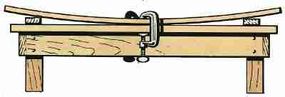
Step 3: Bow or arch the frame for easier installation by weighting or clamping the frame. To use the weight method, set frame the long way across two sawhorses, and hang 10-pound weight from rope around center of frame. To clamp frame into bow, set it on workbench or wide board across two sawhorses. Place C-clamp at center of each long side, holding frame to work surface, and set long piece of scrap wood, such as a 2x4, between frame and work surface at eachend. As you tighten C-clamps, the frame will bow.
Step 4: Set screening across frame, aligned along one unclamped end. Use staple gun loaded with heavy-duty staples to attach screening to wooden frame, placing staples at right angles to frame, about 2 to 3 inches apart. If you're using fiberglass screening, turn cut edge under about 1 inch before stapling it down. When first end is securely stapled, pull loose screening over clamped frame, and stretch it firmly and evenly across to the opposite end. Holding it firmly as you work, staple second end into place, setting staples 2 to 3 inches apart at right angles to frame. Then unclamp or unweight frame; screening should be pulled very tight as it straightens out. Staple two sides into place; trim off any excess screening.
Step 5: Replace molding to cover stapled edges of the screening.
What You'll Need
Here are the tools you'll want to have on hand to replace a wood-frame screen:
Stiff putty knife
Chalk
Scissors
Tape measure
Sawhorses
Weights or clamps
Rope
Scrap boards
Staple gun and heavy-duty staples
Screening
How to Fix Aluminum-Frame Screen
As aluminum (and, increasingly, vinyl) screens grow in popularity, it will be helpful for homeowners to know how to handle and replace them when necessary. The task will be slightly different than a wood-frame screen, but not more difficult.
Look over the screen frame to see if it is in good condition. Be aware that the aluminum-frame screen will require plastic splining, a few inches longer than the diameter of the screen, to replace the old spline.
Advertisement
Step 1: With screwdriver or putty knife, pry up plastic spline that holds old screening in place. Remove the old screening.
Step 2: Lay frame flat, and position new screening over it. Trim edges so screening extends just to outside edges of frame. If necessary, set scrap boards the same thickness as frame under screening to help keep them on same level.
Step 3: Position screening so one end and one side are lined up on outside edge of splining groove in frame. Hold screening carefully in place and, with convex roller of splining tool, force edge of screening into splining groove. Secure other two sides the same way, stretching screening taut as you work.
Step 4: When all four sides of screening are in place, cut off any excess screening. Using concave end of splining tool, drive spline into groove to hold screening in place. Start installing spline at one corner, and work around the frame. Cut off excess splining where ends meet.
Window shades receive a lot of use and sometimes snap all the way up too quickly or fall out of the brackets. Instead of repeatedly replacing shades, learn how to tackle these and other common problems in the next section.
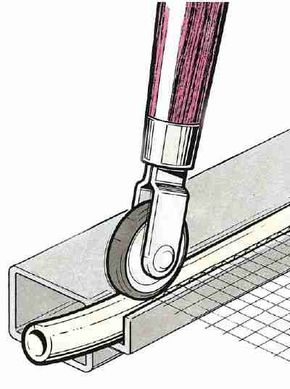
On an metal-frame screen, a plastic spline can hold the screening in a groove. To
install the screening, roll the spline into the groove with a splining tool.
What You'll Need
Here are the tools you'll want to have on hand to replace an aluminum-frame screen:
Every homeowner and apartment-dweller who has ever used window shades is familiar with the many problems that beset them. There's the shade that's so tightly wound it snaps all the way up, the one that's so loose it won't go up at all, and the one that binds at the edges or falls out of its brackets. In most cases, only a simple adjustment is needed to get shades working properly.
A shade that binds is being pinched by brackets set too close together. If the brackets are mounted on the wall or on the outside of the window frame, this is easy to remedy: Tap the brackets slightly outward with a hammer. This technique also may work on brackets mounted inside the window frame. If the shade still sticks, take it down. You'll have to remove some wood from the roller.
Advertisement
Remove the round pin and the metal cap on the round-pin end of the roller. Then sand the end of the roller down with medium-grade sandpaper. Badly binding shades may require further adjustment. If the brackets are mounted on the outside of the frame, you can move one bracket out slightly. Fill the old screw holes with wood plastic. If brackets are inside-mounted, shade will have to be cut down professionally to fit the frame or be replaced.
The opposite problem occurs when the mounting brackets are set too far apart. In extreme cases, the shade may even fall when you try to use it. If the brackets are mounted outside the frame, tap them gently together with a hammer, or move one bracket in closer to the other. If the brackets are mounted inside the frame, you'll have to adjust the space with shims. Take the shade down, and cut a piece of thin cardboard a little smaller than one bracket. Unscrew the bracket, set the shim behind it, and screw the bracket on over the shim. If necessary, add one or more shims to both brackets.
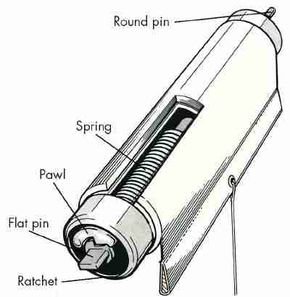
When the shade won't go up or down properly, the roller mechanism is probably at fault. Shades are operated by a strong coil spring inside one end of the roller. The pin that holds the shade up at this end of the roller is flat; this flat pin tightens or loosens the spring when you roll the shade up or down. At the flat-pin end of the roller, the spring is controlled by a pawl and ratchet that stop the movement of the spring when the shade is released. If the shade is too tight or too loose, or if it doesn't stay in place when you release it, there is usually a problem with the spring or with the pawl-and-ratchet mechanism. Unless the spring is broken, this is easy to fix.
If the shade won't stay up, the spring is too loose. Pull the shade down enough to turn the roller a few times; if it's extremely loose, pull it down about halfway. Lift the flat-pin end of the roller out of its bracket. Then roll the shade up by hand, keeping it tightly rolled. Set the roller back on the bracket and try the shade again. If it still doesn't stay up, repeat the procedure.
If the shade snaps up and is hard to pull down, the spring is too tight. With the shade rolled up, lift the flat-pin end of the roller out of its bracket and unroll the shade two or three turns by hand. Replace the roller on the bracket, and test its operation. Adjust it further if necessary.
If the shade won't stay down, the pawl-and-ratchet mechanism may need cleaning. Take the shade down and remove the cap at the flat-pin end of the roller. Vacuum out any obvious dust, and clean the mechanism with a soft cloth. Spray silicone lubricant into the mechanism. Replace the metal cap and rehang the shade.
Venetian blinds are often preferred over shades because they are a long-lasting window treatment. Check the next section for tips on how to keep your venetian blinds working properly no matter how long you use them.
Venetian blinds are one of the most practical and long-lasting window treatments around, but they can develop problems. When the cords break or the tapes look frayed and shabby, you can give your blinds new life by installing replacement cords and tapes, often sold in kits.
Step 1: With blinds down, tilt slats horizontally. Ends of cord are secured to underside of bottom rail. If bottom rail is wood, knotted ends of cord are simply stapled under ends of tapes. If bottom rail is metal, remove end caps and clamps from rail to expose knotted cords. Untie knot on side opposite lift cord, and butt end of new cord to this end. Tape two ends firmly together with adhesive tape.
Advertisement
Step 2: Pull gently on old lift cord to draw new cord up through slats on this side, across top, and through control pulleys. Leave a loop of excess cord for new lift cord, and continue to draw cord down through slats on lift cord side.
Step 3: When taped end of new cord reaches bottom rail, untape old cord, discard it, and cut off any excess cord at starting end. Knot both ends of new cord, and secure them the same way old cord was secured. Replace end caps on bottom rail, and slide equalizer clip off old lift cord and onto new one. Adjust cord with equalizer until blind works smoothly.
Replacing Lopsided or Tilted Cords
It's important to have properly working cords on a venetian blind. Sometimes the cord can become lopsided or tilted after extensive use and affect how the blind functions. Use these directions to replace a tilted cord:
Step 1: Untie or cut off knots at ends of tilt cord, and remove pulls. Tilt cord is simply threaded over pulley and out again; it doesn't connect with lift cord. Remove old tilt cord by pulling it out. Then thread one end of new cord over pulley and feed it in until it comes out over other side of pulley.
Step 2: Slip cord pulls over ends of cord, and knot ends to hold the pulls on.
What You'll Need
Here are the tools you'll want to have on hand to replace the lifting cord on a venetian blind:
To keep your venetian blinds working properly and lasting longer, it's important to clean the slats and replace the ladder tapes when necessary.
Step 1: Take blind down and lay it out flat, all the way open. Untie both ends of lift cord, as above. Pull cord out of blind, and set equalizer clip aside.
Advertisement
Step 2: Remove slats one by one, stacking them in order. If they're dirty, soak them in detergent solution, then rinse and dry them thoroughly on both sides.
Step 3: Pull out hooks that hold tapes in place at the top of blind. (One hook holds tapes on each side.) Position new tapes in top box and slide hook into each pair of tapes, front and back, at sides of box. Slide slats into place between tapes; make sure they're all right side up, facing the right way. Fold ends of tapes under, and fasten them to bottom rail under last slat.
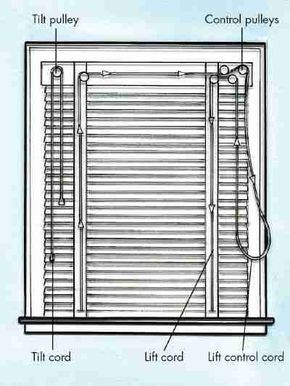
Step 4: Thread lift cord into blind, starting at tilt cord side and working up that side, across top, through control pulley, and down other side. Tapes have woven strips, or ladders, connecting front and back pieces on alternating sides. Insert new cord right at center of tapes, so these ladders are placed on alternate sides of cord. At control pulley, leave long loop of cord for new lift cord, and keep threading cord down through slats on that side.
Step 5: Cut off any excess cord, knot both ends of the cord, and secure ends to bottom rail.
Step 6: Slide equalizer clip onto lift cord, and install new tilt cord, as described previously.
Before rehanging the blind, check the control pulley mechanism to make sure it's working properly. If you can see dirt or lint in the pulleys, vacuum it out, and wipe the mechanism clean with a soft cloth. Then spray a little silicone lubricant into the pulleys to keep them working smoothly.
By following the tips in this article, you will be able to keep your windows looking like new and working properly.