The fastest way to get a new ceiling is to install ceiling tiles directly to an existing drywall ceiling. If the ceiling surface isn't sound or has open joists (a horizontal supporting element that usually runs from wall to wall), staple the tiles to furring strips (thin strips of wood used to support the finished surface of a room). Alternately, you may be able to lower the ceiling with a suspended ceiling system if the ceiling is high enough.
To determine how much tile you need, multiply the room's length by its width to get the square footage, then add about 10 percent for trimming and errors. To figure how many boxes of tile you need, divide the square footage by the number of square feet of tile in a box. If the room is not square or rectangular, draw a sketch of the room on graph paper, using each square on the paper to represent one square foot. Then count the squares to determine how many tiles you need.
Advertisement
Installing Tile With Adhesive
To apply tile directly to the existing ceiling surface with adhesive:
Step 1: To find the center of the ceiling, measure and mark the midpoint of each wall. Stretch a chalk-box line between opposite midpoints and snap the chalk line. Repeat in the other direction. The center is where the lines cross. Use a carpenters' square to make sure the lines form 90-degree angles.
Step 2: Measure the ceiling to determine the width of the tiles that will go around the edges of the room. To calculate the width of the border tiles, note the inches measured past the last full foot in each direction -- 5 inches, for example, from 17 feet 5 inches. Add 12 inches -- the width of one full tile -- and divide by 2. The result is the width of the border tiles at each end of each row of tile laid in that direction. For example, if the inch measurement is 5, border tiles in rows across the direction measured will be 8 1/2 inches wide. Calculate the width of border tiles along both directions.
Step 3: Start in one corner of the room, measuring out the width of the border tiles in each direction and marking these points on the ceiling. Snap a chalk line on the ceiling at a right angle through each of these points, making sure each of the two new lines is parallel to one of the chalk lines across the center of the ceiling.
Step 4: Set the corner tile first. Mark it to the measured size with a pencil. Cut the first tile, face up, with a sharp utility knife and a straightedge. Ceiling tiles are made to lock together, with two grooved edges and two tongued edges. The tongued edges of the starter tile must face toward the center of the room, so cut the grooved edges to trim the corner tile to size. The border tiles along the two starter walls will be trimmed along a grooved edge. The tiles bordering the two far walls will be cut along the tongued edges.
Step 5: Apply adhesive to the back of the trimmed corner tile with a putty knife, putting daubs of adhesive in the center of the tile and about 1 1/2 inches in front of each corner. Place the tile into the corner, tongued edges out, and slide it into position exactly within the two chalked lines. Press it firmly into place.
Step 6: Cut border tiles to work out from the corner tile along the two corner walls. As you work, slide the grooved edges of each tile over the exposed tongues of the last tiles to lock the tiles firmly together. Fill in between the border tiles with full-size tiles in an expanding wedge pattern, gradually extending the rows of border tiles and fanning tiles out to cover the entire ceiling. Note: To work around light fixtures, hold the tile up to the ceiling before applying adhesive. Mark and cut off the portion to be removed, then apply adhesive and slide the tile into place.
Step 7: Continue setting tiles until you reach the far corner of the room. Before cutting border tiles for the two far walls, measure the gap left beyond the last full tile. Mark and cut border tiles along these walls one by one to make sure they fit the gap.
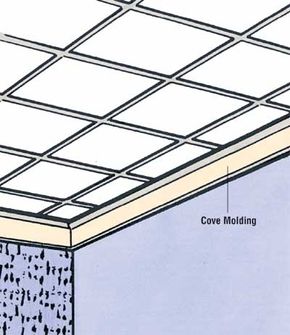
Step 8: Install cove molding along the edges of the ceiling.
Some ceilings are too uneven or badly damaged to install tiles directly on them. You need to use furring strips to even things out. Instructions for doing this are in the next section.
Advertisement