Home-Repair Tool Basics

By: Fix-It Club
Making repairs to your house means having the right tools and materials on hand so you can get right at the job and on with your life. Knowing about the basics will help you in the long run.

Toolbox Necessities
You can build your own basic toolbox to include common repair tools such as:
  • A 14- or 16-ounce hammer
  • Standard and Phillips screwdrivers
  • Pliers
  • An adjustable wrench
  • A basin wrench
  • A 2-inch paintbrush
  • A handsaw or power saw
  • A hand drill or power drill
  • Assorted fasteners
  • Glues and adhesives for wood and plastic

So, what tools will you need? In the coming article, you'll learn about tools that measure, cut, drill, nail, tighten and loosen, hold, clamp, test, paint, and more. Most important, you'll see which ones you really need and how to use them safely.

First, let's talk about quality. The smartest rule about buying tools is to buy good quality. High-quality tools are not only safer to use, but most will last a lifetime with proper care. You can usually identify a quality tool by its machining: The metal parts are smooth and shiny, and the tool is well balanced -- it fits comfortably in your hand. Inferior tools, on the other hand, have defects or rough metal (often hidden by paint) and
exhibit crude machining. Most important, however, is that good tools are safer to use. Cheap tools can break and cause accidents.

You can expect to pay an average of 25 percent more for high-quality equipment, but cheap tools are no bargain -- you get what you pay for, so you may have to replace them more often. Besides, the money you save on your very first do-it-yourself repair may pay for the tools you needed. And, after that, the tools are yours to keep.

Useful tools include measuring tools, saws, drills, fastener tools, and tools for electrical and plumbing repairs. We'll take a look at all of them.

Measuring Tools

Just about every home-improvement project calls for accurate measurements. Not only do you have to know precisely how many feet and inches are involved, but you also need to ensure everything comes out plumb, level, and square. The following are basic devices for measuring and marking:

Tape measure: Flexible tape measures are available in lengths of up to 50 feet; a tape that is 12 to 25 feet is usually considered adequate. You should buy a tape at least 5/8-inch wide so it will stay rigid when extended. Most tapes have an automatic power return that is useful but not necessary.

  Power and Work Tools Image Gallery

Measuring tools come in all shapes and sizes.
©2006 Publications International, Ltd.
These are common measuring tools.
See more pictures of power and work tools.

Square: The standard size for a carpenters' square is 18 to 24 inches (body) by 12 or 18 inches (tongue). The size is important for cutting straight edges on plywood and hardboard.
For small jobs, a combination square is easier to use than a carpenters' square because the combination square is smaller -- typically only 12 inches long. The body of the square slides along the blade and can be set at any point with a thumbscrew. The square's body may incorporate a small bubble level or a scratch awl that can be used for leveling and marking your work. This type of square can also be used as a depth gauge, a miter square, and, with the blade removed, a straightedge and ruler.

A try square looks like a small carpenters' square with a wood or plastic handle. The measurements go across the metal blade, not the handle. This type of square is used to test the squareness of edges in planing and sawing work. It can also be used to check right-angle layouts. Its tongue has a maximum length of 12 inches; it is wide, but it can be used as a straightedge, ruler, and depth gauge.

Level: Two- and three-bubble levels are standard for most leveling needs. The edges of a level can be used as a straightedge. Laid flat against a vertical surface, a level can determine both horizontal and vertical levels -- often needed when hanging pictures. Levels are made of either wood or lightweight metal, such as aluminum. Lengths range to 6 feet, with 30 inches being the most popular size.

Chalk line: A chalk line is used for marking a straight line over long distances, such as for replacing wallpaper or flooring tiles.

Stud finder: A stud finder comes in handy if you need to find the studs behind walls to hang a heavy item, for example.

Handsaws

The measurements have been made and you're ready to start cutting. A wide selection of handsaws are available to match the needs of various cutting jobs. Here's a look:

Crosscut saw: A crosscut saw, as its name implies, cuts across the grain of wood. A crosscut saw has five to ten or more teeth per inch to produce a smooth cut in the wood. It is used for cutting plywood and hardboard panels and for cutting miters (angles).

Handsaws can be used for a variety of tasks.
©2006 Publications International, Ltd.
There are a variety of handsaws from which to choose.

Ripsaw: A ripsaw cuts along the grain of wood, called "ripping." Its teeth are spaced three to five teeth per inch. Because a ripsaw's teeth are wider set than those of the crosscut saw, it can slice through wood like a chisel. The final cut of a ripsaw is rough, and the wood usually has to be sanded to its final measurement.

Backsaw: A backsaw has a reinforced back to stiffen the blade. Its teeth are closely spaced -- like those of a crosscut saw -- so the cut is smooth. A backsaw is used for making angle cuts and for trimming molding. It's designed for use in a miter box; the reinforced back serves as a guide.

Keyhole saw: A keyhole saw has a 10- to 12-inch tapered blade. It's used to cut openings for pipes, electrical boxes, and almost any straight or curved internal cuts that are too large for an auger bit, a drill, or a hole saw. A quality keyhole saw has removable blades with a variety of tooth spacings for cutting such materials as wood, plastic, metal, and hardboard.

Coping saw: A coping saw has a thin blade that is secured with two pins at the ends of the saw. A variety of blades are available, with both ripsaw and crosscut tooth spacing.

Hacksaw: A hacksaw is used to cut metal, plastic, and pipe.

Power Saws

Sometimes a handsaw won't suffice, which is when power saws come into play. Power saws can be intimidating at first, and they should be. Improperly used, they can do damage in a hurry. You should always observe the proper safety precautions. Once you make a few practice cuts, however, you'll soon become comfortable with it. Here are some of your options:

Circular saw: A portable electric tool, the circular saw is the power version of a crosscut saw or ripsaw. The guide on the saw can be adjusted to cut miters and pockets in most building materials. Several blades are available: crosscut, rip, masonry, metal, and plastic. A table is one of the accessories available for a circular saw so it can be mounted to work as a table saw.

Saber saw: A saber saw, also called a jigsaw, consists of a 4-inch blade driven in an up-and-down or reciprocating motion. This portable power tool uses many blade designs for a variety of materials, including wood, metal, plastic, masonry, ceramic, and high-pressure laminate. This is the power counterpart to a keyhole and coping saw; it will make smooth fine-line or contour cuts either with or across the grain.

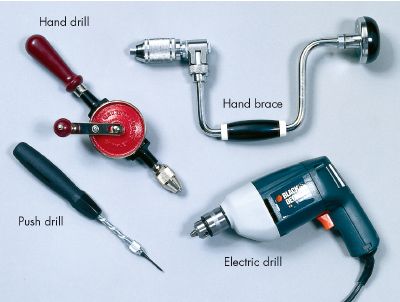
Like measuring tools and saws, drills and fasteners are integral parts of home-repair projects. We'll examine these tools in the next section.

Advertisement

Drills and Fastener Tools

There are many different types of drills and fasteners on the market. Sifting through all of the choices can be confusing, so in this section we'll provide the details you need to pick the right drill or fastener tool.

Drills

Three sizes of chuck to hold drill bits in place are available for power drills: 1⁄4-inch, 3⁄8-inch, and 1⁄2-inch capacity. The two most popular sizes are 1⁄4 and 3⁄8 inch. The 1⁄4-inch chuck has a capacity of 1⁄4-inch drills in metal and 1⁄2-inch drills in wood. A 1⁄4-inch drill can handle only a limited range of drilling operations and shouldn't be used for difficult jobs, but it's the least expensive type of electric drill.

Hand and power drills are vital home-repair tools.
©2006 Publications International, Ltd.
Hand and power drills are vital home-repair tools.

The 3⁄8-inch drill can make 3⁄8-inch holes in metal and 3⁄4-inch holes in wood; a hole saw can also be used with this tool to cut holes up to 3 inches in diameter. Many 3⁄8-inch drills have a hammer mode that permits drilling in concrete along with a reversing feature that is handy for removing screws. A variable-speed drill is also a handy tool to own; the rotation can be started slowly and then sped up. A variety of attachments and accessories are available, including wire brushes, paint mixers, and even a circular saw attachment.

Power drills come in corded and cordless models. Cordless drills, which use an onboard battery and typically include a recharger, are becoming increasingly popular.

How to Choose the Right Drill Bit
The drill bit you choose depends on the drill you're using. The following table will help you pick the correct drill bit.

Drill Bit
Drill Type
Use
 Twist Hand, power, or drill press
Small-diameter holes
in wood and metal
 Spade Power or drill press
Holes up to 11/2 inches
in wood
 Auger Braces
Holes up to 11/2 inches
in wood
 Expansion Brace
Holes up to 3 inches
in wood
 Fly cutter
Drill press
Holes up to 6 inches in wood; smaller holes in other materials
 Hole saw
Power or drill press
Holes up to 3 inches in wood

The two main types of hand drills used are the push drill and the hand brace. Push drills are good for making pilot holes and for setting hinges. A hand brace is particularly handy when working in restricted areas because of its ratcheting mechanism.

Fasteners

Fastener tools are often the first to be selected for the handyman's toolbox. They are simply tools that help you apply fasteners, such as nails, bolts, and adhesives. Fastener tools include hammers, screwdrivers, pliers, and clamps. Here's an overview:
 
Hammers: The most popular hammer is the carpenters' curved-claw nail hammer; 16 ounces is a good size for men and 14 ounces for women. It is steel-headed, wood- or steel-handled, and used for driving nails and other fasteners. The claw at one end of the head is a two-pronged arch used to pull nails out of wood. The other parts of the head are the eye and the face. A flat-face, or plane-face, hammer is good for beginners to use, but it is more difficult to drive a nail flush to the work surface with this hammer.

A rubber mallet comes in handy when you're trying to unstick painted windows or have to do light hammering on surfaces that can be damaged. Other specialty hammers include a ball-peen hammer for working with metal and a mason's hammer for brick and concrete projects.

Screwdrivers: Every toolbox should have one set of high-quality screwdrivers that are only used for tightening and loosening screws. There are many types of screwdrivers, which vary depending on the screw head each is designed to fit. Following are the most popular screw heads:

  • Standard head. Also known as a flat, slotted, or straight screwdriver. Make sure the tip is the correct width and thickness to snugly fit the screw-head slot.

  • Phillips head. Also called cross or X-head screwdrivers, Phillips heads fit into a cross-shape recess in the screw or bolt head.

  • Torx head. Torx head (or similar designs called Robertson) screwdrivers fit into a square or hexagonal hole, which allows more torque for tightening or loosening the fastener.
Wrenches: The purpose of a wrench is to turn a bolt head or nut. Selecting the appropriate wrench depends on the fastener's design and size. It can also depend on how difficult the fastener is to reach. Wrench types include open end, combination, adjustable, and Allen. Here's a tip: When using a wrench, pull it toward you rather than pushing it away. This gives you more control and reduces the chance of injury if the wrench slips.
  • Box end. A box, or closed, end wrench is used where there is room to place the wrench mouth around the fastener. Box end wrenches are available in 6- and 12-point versions to match the number of sides on the fastener. Hexagon fasteners have 6 sides, or points, and are the most popular.

  • Open end. This type of wrench is used for turning fasteners in locations where a box end wrench cannot encompass the fastener.

  • Combination. A combination wrench has ends that perform specific tasks. One end may be open and the other closed, one may be offset and the other straight, or the two ends might be of fractionally different sizes.

  • Adjustable. An adjustable wrench can be used on a variety of fastener sizes. The disadvantage is that it is less stable than a fixed-size wrench and can easily injure you or damage the fastener. An adjustable wrench should be used only if the correct size wrench is not available.

  • Socket. Socket wrenches fit over the fastener, making removal easier and safer than with other wrenches. Sockets come in standard and extended depth; extensions are available to make removing fasteners easier. They are often purchased in sets by drive size.

  • Allen. Called by the Allen brand name, these are used on fasteners with a hexagonal hole in the head. Allen wrenches are available with L- or T-shape handles.
Pliers: Think of pliers as an extension of your fingers, only stronger. They are used to grasp and hold a part. Pliers should not be used as wrenches to tighten or loosen fasteners. Common types of pliers include slip-joint, groove-joint, needle-nose, and locking.
  • Slip-joint. This type of pliers has two settings in the handle to allow for two widths. Once the correct width is selected, the handles are closed together to force the jaw around the part and hold it securely.

  • Groove-joint. Groove-joint pliers are similar to slip-joint except they use an elongated hole in the handle with grooves that allow multiple widths.

  • Needle-nose. This type has jaws that come to a point for securely grasping small parts or wires, especially in tight locations.

  • Locking. Sometimes called by the Vise Grip brand name, locking pliers are adjustable and can be locked to hold a part in place.
Clamps: Clamps are essential for some home-repair projects, like holding parts together while glue dries. Spring clamps, which look like large metal clothespins, are inexpensive and are used for clamping small jobs, such as gluing veneers to core material. C-clamps are also useful and come in a wide range of sizes.

Clamps are essential for home-repair projects.
©2006 Publications International, Ltd.
There are many different types of clamps.

They are made from cast iron or aluminum and have a C-shape body. A screw with a metal pad applies tension on the material being clamped. Because C-clamps can exert a lot of pressure, buffer blocks of scrap wood should be inserted between the jaws of the clamps and the material being clamped. Screw, bar, and strap clamps are used by woodworkers.

Electricians and plumbers, on the other hand, are more inclined to use tools such as continuity testers and pipe wrenches. In the next section, we'll take an in-depth look at the tools of the electrical and plumbing trades.
 

Advertisement

Electrical Tools and Plumbing Tools

Electrical and plumbing systems make up the backbone of your home. Therefore, it's imperative that you know how to make basic electrical and plumbing repairs. In this section, we'll tell you about the tools you'll need to fix your electrical and plumbing problems.

Electrical Tools

How does electricity work? It must have a continuous path, or circuit, in order to flow. Think of it as a two-lane road from point A to point B and back. If one or both lanes are blocked, traffic stops. The flow of auto traffic over a highway is measured with a traffic counter placed across the road. The flow of electrical current is measured by placing an electrical tester at two points in the circuit. Most electrical problems can be solved by using a voltage tester, a continuity tester, or a volt-ohm-milliammeter (VOM), also known as a multimeter or multitester.

Voltage tester: A voltage tester is the simplest of these tools. It consists of a small neon bulb with two insulated wires attached to the bottom of the bulb housing; each wire ends in a metal test probe. This type of tester is always used with the current turned on to determine whether there is current flowing through a wire and to test for proper grounding. It is also used to determine whether adequate voltage is present in a wire. Look for a tester rated for up to 500 volts.

To use a voltage tester, touch one probe to one wire or connection and the other probe to the opposite wire or connection. If the component is receiving electricity, the light in the housing will glow. If the light doesn't glow, the trouble is at this point. For example, if you suspect an electrical outlet is faulty, insert one probe of the tester into one slot in the outlet and the other probe into the other slot. The light in the tester should light. If it doesn't, the outlet may be bad.

To further test the outlet, pull it out of the wall. Place one probe of the tester on one terminal screw connection and the other probe on the other terminal screw. If the tester bulb lights, you know the outlet is malfunctioning -- there is current flowing to the outlet, but it isn't flowing through the outlet to provide power to the appliance plugged into it. If the test bulb doesn't light, there is no current coming into the outlet. The problem may be a blown fuse or tripped circuit breaker, or the wire may be disconnected or broken behind the outlet.
 
Continuity tester: A continuity tester consists of a battery in a housing, with a test probe connected to one end of the battery housing and a test wire with an alligator clip connected to the other end. It is used with the current turned off to determine whether a particular electrical component is carrying electricity and to pinpoint the cause of a problem.

A continuity tester (left) and VOM, or multitester (right).
©2006 Publilcations International, Ltd.
A continuity tester (left) and VOM, or multitester (right).

To use a continuity tester, unplug the appliance and disassemble it to get at the component you want to test. Fasten the clip of the tester to one wire or connection of the component, and touch the probe to the other wire or connection. If the component is receiving electricity and transmitting it, the tester will light or buzz; this indicates that the circuit is continuous. If the tester doesn't light or buzz or it reacts only slightly, the component is faulty. Caution: Do not use a continuity tester unless the appliance is unplugged or the power to the circuit is turned off.
 
Volt-ohm-milliammeter (VOM): A voltage tester and a continuity tester are adequate for many diagnostic jobs, and they are relatively inexpensive. But for more serious electrical and appliance troubleshooting and repairs, invest in a volt-ohm-milliammeter, or volt-ohm meter (VOM). A VOM is battery powered and is used with the current turned off. It's used to check continuity in a wire or component and to measure the electrical current -- from 0 to 250 volts, AC (alternating current, as in houses) or DC (direct current, as in batteries) -- flowing through the wire or component.

A multitester is used with plug-in test leads, which may have probes at both ends or a probe at one end and an alligator clip at the other. An adjustment knob or switch is set to measure current on the scale desired, usually ohms. The dial indicates the current flowing through the item being tested. Caution: Do not use a VOM unless the appliance you want to test is unplugged or the power to the circuit is turned off.

A VOM is useful for testing appliances because it is used while the power is turned off, so there's no danger of electric shock. It provides more precise information than the continuity tester and, therefore, is preferable for testing many components. Learning to read a VOM is very easy, and manufacturers provide complete operating instructions with the meters.

Compressed air: A can of compressed air, sold under a variety of names and brands, is very useful for cleaning appliances and electrical fixtures. Compressed air can remove particles of food or even help dislodge loose parts from a toaster, for example. Some compressed air cans come with an extension tube that fits in the can's nozzle to precisely direct the air. If you cannot find canned compressed air at your hardware or home supply store, try a computer shop where it's sold as a dust remover for keyboards and other electronics.

Electrical contact cleaner: Electrical contact cleaner is simply compressed air with a cleaning agent that evaporates, such as isopropyl alcohol. It is useful for cleaning electric components that have food, grease, or oils on them. It can dislodge foreign elements and clean components. Several brands of electrical contact cleaner are available at larger hardware stores, electronics dealers, and hobby shops.

Plumbing Tools

You may already have many of the tools necessary for most plumbing jobs because they are the same tools used for other do-it-yourself projects. Other special tools include pipe wrenches and various plumbing aids. Check them out:
 
Pipe wrenches: You'll need a medium-size adjustable pipe wrench to tighten and loosen pipes and other plumbing connections. You can purchase one at hardware stores and plumbing-supply houses.


A basin wrench is a specialized tool that allows you to reach tight spots under sinks and basins. The jaws of a basin wrench not only adjust to accommodate nuts of different sizes, but they also flip over to the opposite side so you can keep turning without removing the wrench.

A socket wrench set is useful for removing recessed packing nuts and for use on tub and shower fixtures as well as other do-it-yourself household repairs.

Plumbing tools such as these can be used for most jobs.
©2006 Publications International, Ltd.
Plumbing tools such as these can be used for most jobs.

For changing a toilet seat, you'll need a wrench, or perhaps a deep socket wrench. If you need to remove a toilet for replacement or repair, you may need a spud wrench. Older toilets frequently have a large pipe -- called a spud -- that connects the tank to the bowl. The spud is held to the bowl and tank by extra-large hexagonal slip nuts. A spud wrench is designed to remove these slip nuts. The adjustable type of spud wrench is far more versatile than the nonadjustable type, which has a fixed opening at each end.

Plumbing aids: Plumbers' snakes, or drain-and-trap augers, come in various lengths. A short snake is all that's necessary for most plumbing repairs. A closet auger is a version of the plumbers' snake designed specifically for clearing clogs in toilets. The closet auger is shorter than a regular snake, and it comes encased in a plastic or metal housing with an easy-to-use crank.

Plumbing tends to be a challenging task, whereas painting is something most people can do fairly easily. In the final section, we'll go over the essential painting tools you'll need to get started.

Advertisement

Painting Tools

As with everything else we've discussed so far, a good paint job depends as much on selecting the right tools as on selecting the right paint. With the proper equipment, even inexperienced do-it-yourselfers can do a professional-quality job. Here are some tips that may help you achieve that goal:

Paintbrushes

With few exceptions, paintbrushes fall into two camps: natural bristle brushes, made of animal hair, and synthetic bristle brushes, usually made of nylon. At one time, the naturals were considered the best, but today the synthetics are every bit as good. Besides, you can't use a natural bristle brush with waterbase latex paints because water makes the bristles limp. Consequently, if you're painting with a water-thinned paint, your brush selection is already 50 percent easier.

Paintbrushes can be bristle or foam.
©2006 Publications International, Ltd.
Paintbrushes can be bristle or foam.

Buy the best brushes you can afford. If you have to spend a few dollars more for top quality brushes, it will be worth it in the long run. Quality brushes make any painting task go more easily and quickly, and they can be thoroughly cleaned to look like new for the next job. With a little care, good paintbrushes will last for many years of home maintenance.

Regardless of price, you can distinguish between a good brush and a bad one by examining them closely at the store. Spread the bristles and inspect the tips. The more flags, or split ends, the better the brush and its paint-spreading capabilities. Rap the brush on the edge of a counter; a good brush may lose a few bristles, but a bad one will lose many. Find a brush with long, tapered bristles, particularly on narrow brushes. As a general rule, the bristle length should be about one-and-a-half times as long as the width of the brush (the exception is with wider brushes, often called wall brushes). A 11⁄2-inch-wide brush, for example, should have bristles about 21⁄4 inches long. Bristle length gives you flexibility to paint into corners and around trim. Finally, choose smooth, well-shaped handles of wood or plastic that fit in your hand comfortably.

Paintbrushes come in a wide variety of sizes and types and are necessary for those hard-to-reach spots a paint roller can't reach. Here are some of the main types of paintbrushes:
  • Wall. This type spreads the most paint over the most surface. A 4-inch-wide brush is a good choice, though 31⁄2- and 3-inch wall brushes may be easier to use.

  • Trim. A 2-inch-wide trim brush is ideal for woodwork and for "cutting in" around windows, doors, and corners before painting walls with a roller.

  • Sash. A sash brush has an angled bristle end. Available in 1-, 11⁄2-, or 2-inch widths, the angled sash brush makes close work easier -- especially when you're painting around windows. Used carefully, it reduces the need to use tape to protect window panes.
The same size brushes are also available in foamed urethane. Instead of bristles, they have spongelike heads. They are increasingly popular among do-it-yourselfers, particularly in smaller sizes used for interior or exterior trim painting. Disposable foam brushes come in widths up to 3 inches and are cheap enough to toss out after one use.
 
Paint Rollers

For large, flat surface areas like walls and ceilings, paint rollers will help you get the job done in about half the amount of time it would take with a paintbrush. Most painters use brushes for trim work and around windows and doors, then turn to rollers to fill in the big blank spaces. Rollers for painting flat areas come in varying widths -- from 4 to 18 inches -- but the two most common sizes for interior jobs are 7 inches and 9 inches wide.


Paint rollers intended for wall or ceiling painting have handles made of plastic or wood that may have been hollowed out and machined to accept an extension handle. They also have a metal or plastic frame that is slipped inside a roller cover. Of the two types, the metal-rib version (also known as a bird cage or spring-metal frame) is best because it's easier to clean and less likely to stick to the inside of the roller cover.

Paint rollers, pads, and trays are part of the painting toolkit.
©2006 Publications International, Ltd.
Paint rollers, pads, and trays are part of the painting toolkit.

The type of roller cover you should buy is largely determined by the kind of paint you'll be using, but they are all fiber-covered or urethane-foam-covered cylinders that soak up paint from a tray and then release it when rolled over a flat surface. The rolling action creates a vacuum that actually pulls the paint off the roller. Made of lamb's wool, mohair, Dynel, acetate, or polyurethane foam, most rollers are labeled with the kind of paint for which they are intended to be used. Choose your roller cover accordingly.

The roller package will also identify the length of the roller cover's nap, or pile, which can vary from 1⁄16 inch to 11⁄2 inches. For rough surfaces, use the long naps; choose short ones for smooth surfaces. The pile is attached to a tube that slips over the roller's plastic or cardboard frame.

Paint trays are made of aluminum or plastic and come in standard 7-inch and 9-inch versions. The 9-inch size is most popular because you can then use either a 7- or 9-inch roller. Some trays come with hooks that allow you to attach them directly to a ladder. The trays, of course, are washable and durable. But to make cleanup even easier, buy some disposable plastic tray liners or line the tray with aluminum foil.

That covers the basic do-it-yourself arsenal. With all of the tools we've examined in this article -- and with some old-fashioned elbow grease -- you can make your home look like new.

©Publications International, Ltd.
 

Advertisement

Advertisement

Loading...