No home can function without light. Radovanovic96 / Getty Images
Lamps are simple but essential lighting elements, and because of their simplicity, they can come in almost any form. A lamp adds light, but it can also add a stylish statement to the table or bedside where it is placed.
You can create a perfectly customized lighting look when you make a lamp yourself. Did you know that almost any household container -- from wine bottles to baskets to mason jars -- can be used to create a lamp? If you select a clear container, you can fill it with shells or marbles or even holiday candy for a seasonal accent.
Advertisement
Changing the shade on a lamp is another way to give it a whole new look, and this can be done with little expense when you select fabric and create a slipcover for an old lamp shade. Whether you're ready to change your lamps a lot or a little, this article has just the information you need.
On the next page you'll learn how to transform an ordinary container into an uniquely stylish lamp.
For more information on lighting and electricity, see:
How to Do Home Electrical Repairs: Whether the lights are out, the appliances won't come on, or a switch won't work, use this site to learn how to make simple home electrical repairs.
How Light Bulbs Work: Sure, it lights up when you connect it to a lamp or light fixture, but what goes on inside a light bulb? Find out here!
How Electricity Works: Learn how this mysterious force creates power for everything from toasters to Times Square.
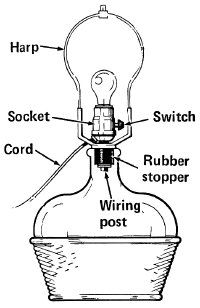
Thread the wiring post through the stopper and plug the stopper in; add a harp and a light bulb.
No home can function without light, and nice-looking fixtures don't have to be expensive. With a hardware-store kit and lamp shade, you can turn any large container into a custom-designed table lamp.
Tools:
pliers
screwdriver
if required, drill
Materials:
bottle, jar, or basket for base
sand or weights
electric candlestick conversion kit (lamp kit) or socket and cord, plug, threaded hollow rod, and brass sheath
lamp harp
lamp shade
light bulb
if required, silicone adhesive
Time: 15 minutes to 1/2 hourFor the base of the lamp, choose any container you like -- a large wine bottle is ideal, especially the thick, rippled-glass kind or a basketed jug. A large jar, a pottery or ceramic jug, milk can, or a woven wicker basket would also make a good base.The base of the lamp must be firmly weighted. If the container is opaque, fill it with sand or weight it with pieces of brick or lead. If you're using a clear container, you can use anything you like to fill it—seashells, pebbles, buttons, matchbooks, layers of sand, dried beans, or whatever appeals to you. Make sure add have enough weight to keep the lamp base steady.The type of container you use dictates the type of lamp kit, or electric candlestick conversion kit, you should buy. For the easiest wiring job, or for solid containers, buy a kit that simply plugs into the top opening of the container -- choose the standard type or the special kerosene-lamp type. With this kind of kit, the cord is attached at the top of the container, so no drilling is necessary. If you're using a container that isn't solid, such as a wicker basket, buy the lamp components separately: a socket and cord, a plug -- the clip-on type is easiest, a threaded hollow rod -- as long as you want the lamp to be high, a brass sheath to cover it, and a lamp harp. This assembly isn't a kit, but it's almost as easy to put together. With the long rod, the cord runs through the rod to the bottom of the base container; you'll have to drill an opening in the bottom for the cord.If you're using a plug-in lamp kit, weight the lamp base before you wire it. Then, following the manufacturer's instructions, assemble the wiring post. The kit includes several rubber stoppers of various sizes; find the stopper that best fits the top opening of your container. Thread the nipple of the wiring post or rod into the center of the stopper and tighten it securely. Screw the brass washer and locknut onto the base end of the rod; screw the lamp socket onto the other end.
Advertisement
Insert the assembled wiring post into the weighted container, socket end up, and push the stopper firmly into place. This completes the wiring of the lamp.
To attach the lamp shade (select any one you'd like to complement your lamp's base), add a lamp harp, which is a screw-on wire attachment. Attach the harp to the socket base as directed by the manufacturer. Then, remove the locknut at the top of the harp, set the lamp shade into place, and replace the locknut. Finally, screw a light bulb into the socket and plug the lamp in.
If you're using a wicker basket and a long threaded rod to wire the lamp, start by drilling a hole in the bottom of the basket for the rod and the cord. If necessary, drill another hole in the basket's cover for the top of the rod to pass through. Drill the holes large enough to accommodate the rod itself on the bottom, and the rod's brass sheath on the top.
To assemble the components, thread the plug end of the cord through the rod and pull it through. Secure the socket at the top of the rod with the locking screws provided. Slip the brass sheath over the rod to butt into the socket at the top.
Tie a loose knot in the cord near the base of the rod to reduce the stress on the cord. Then set the rod into place in the basket and pull the cord out through the opening in the bottom of the basket. To secure the rod at the lamp bottom, apply a bead of silicone adhesive to it at the bottom of the basket. Set the basket's cover over the rod and secure the rod into the opening with silicone adhesive.
To complete the lamp, weight the base as described previously. Be sure to use a weighting material that won't sift out of the basket. Then clip the plug to the end of the cord, as directed by the manufacturer. Complete your lamp by adding a lamp harp, a shade, and a bulb, as directed above.
With this lamp now shining brightly, continue to the next page to learn more about creating lamps. You can build one out of stovepipe!
For more information on lighting and electricity, see:
How to Do Home Electrical Repairs: Whether the lights are out, the appliances won't come on, or a switch won't work, use this site to learn how to make simple home electrical repairs.
How Light Bulbs Work: Sure, it lights up when you connect it to a lamp or light fixture, but what goes on inside a light bulb? Find out here!
How Electricity Works: Learn how this mysterious force creates power for everything from toasters to Times Square.
Advertisement
How to Build a Stovepipe Lamp
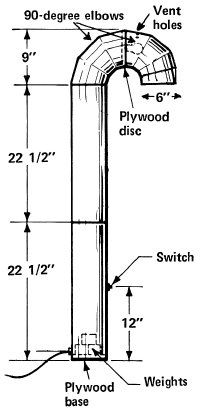
Assemble the pieces of pipe in a candy cane, with the bulb secured at the top; weight the base solidly.
For a bold accent to any room, follow these easy instructions to make this sleek, well-designed reading lamp. The "candy cane" portion is created from sections of stovepipe -- all you add is wiring.
Tools:
measuring rule
pencil
handsaw or saber saw
fine-toothed flat file
power drill
caulking gun
scissors
screwdriver
wire cutters
wire stripper
Materials:
6-inch straight and elbow stovepipe sections
scrap 3/4-inch plywood
construction adhesive
bricks or lead weights
heavy felt
white glue
porcelain lamp socket with screws
newspaper
masking tape
matte black or matte white spray paint for metal
lightweight lamp cord
lamp turn switch
quick-clamp plug
spray metal primer and high-gloss spray enamel
40-, 75-, or 100-watt light bulb
Time: about 2 to 4 hours
Advertisement
When making a stovepipe lamp, you can assemble pieces of pipe in any shape you like. This candy-cane-shaped lamp is 6 inches in diameter and 54 inches high, and is designed for reading or bedside use. You can paint it shiny red or any color you like. For a 54-inch-high candy cane, you'll need two 24-inch sections of straight pipe and two 90-degree elbow sections, plus 12 feet of lightweight lamp cord.
To make the lamp base and the bulb base, cut two discs of scrap 3/4-inch plywood, exactly the same diameter as the stovepipe. Measure the exact diameter of the uncrimped end of one straight section, and the crimped end of one elbow section. Set these sections on a piece of plywood and draw around them; adjust to the measured diameter.
Carefully cut out the two discs with a handsaw or a saber saw. Cut exactly on the traced lines; the discs must fit firmly inside the pieces of stovepipe. Smooth the edges of the discs with a fine-toothed flat file to get a snug fit inside the stovepipe sections.
To make the lamp base, use an electric drill to drill a hole about 12 inches up from the uncrimped end of the straight bottom pipe to accommodate the lamp switch; drill the hole just large enough to accept the shank of your switch. On the other side of the pipe section, about 1 1/4 inches up from the uncrimped bottom of the piece of pipe, drill another hole just large enough to accommodate the lamp cord.
With a caulking gun, apply a bead of construction adhesive all around the cut edge of the plywood base disc. Carefully set the disc into the uncrimped end of the pipe, and adjust it from both ends of the pipe so that it's firmly wedged into the pipe, level and flush with the bottom pipe edge. To finish the outside of the lamp base, trace the section of stovepipe onto a piece of heavy felt, and cut a circle of felt to back the plywood disc. Apply the felt to the outside face of the disc with white glue, and smooth the felt to make a level base. Let the glue and the construction adhesive dry completely, as directed by the manufacturer.
When the base is dry, weight it with bricks or lead weights -- use about 5 pounds of weights to keep the lamp stable. Attach the weights to the plywood base inside the pipe with construction adhesive; make sure you don't block the switch hole or the cord hole.
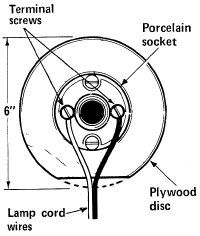
Slice one edge off the top disc; then screw the porcelain socket to it and attach the wires of the lamp cord.
To make the top of the lamp, cut a narrow slice off one side of the other plywood disc, to leave room for the wires to enter the body of the lamp. Attach a porcelain lamp socket to the center of the disc, screwing it firmly in. Then apply a bead of construction adhesive to the cut edge of the disc, except for the sliced-off edge, and set the disc into the crimped end of one elbow section of pipe, socket side out. Make sure the disc is firmly anchored and set straight into the end of the pipe; the bulb will project straight out from the socket into the second elbow section, as illustrated above.
Let the construction adhesive dry, as directed by the manufacturer. When the adhesive is dry, paint the inside of the lamp's bulb end. For a focused bedside light, use matte black spray paint; for more diffused light, use matte white. Set the second elbow section into place over the crimped end of the first one, so that the socket assembly is roughly in the middle of the two curved pieces of pipe, with the bulb socket facing out. Adjust the pieces of pipe to the angle desired, and push them firmly together.
Spread newspaper to protect your work area, and cover the socket opening in the elbow assembly with masking tape. Spray the inside of the assembled curved section with matte black or matte white paint, as desired. Cover the plywood disc and the entire inside surface of the pipe. Let the paint dry completely, as directed by the manufacturer; if necessary, spray again for complete coverage and let the paint dry.
When the paint is completely dry on the elbow sections, remove the masking tape from the socket. Screw a light bulb into the socket and note where the bulb lies inside the curved stovepipe sections; then remove it. Across the top of the stovepipe, above the light bulb location, drill three 3/8-inch holes to dissipate the heat of the bulb.
To assemble the lamp, thread the end of a 12-foot piece of lightweight lamp cord through the cord hole drilled in the bottom straight section, just above the plywood base. Leaving about 8 to 9 feet of cord outside the pipe, tie a loose knot in the cord to anchor it against the drilled hole. The remaining 3 to 4 feet of cord, inside the lamp, will be used to wire the lamp.
Bring the wire up the base piece of stovepipe and across to the drilled switch hole. At the point where the cord passes the switch hole, carefully separate the two insulated wires of the cord for a few inches. Cut one of these wires, and use a wire stripper to remove about 1/2 inch of insulation from the two cut ends; do not cut both wires. Connect the cut ends to the two screw terminals on the lamp switch. Insert the switch into the hole in the stovepipe and secure it with the lock ring provided.
When the switch has been wired in, complete the assembly of the lamp. Set the other straight piece of pipe onto the base piece, uncrimped end down, and push it firmly to join the two pieces securely. Pull the loose end of the wire up through the pipe.
Carefully separate the two insulated wires of the cord for about 6 inches at the loose end. Set the assembled curve of the candy cane onto the straight lamp base, pulling the separated ends of the cord up past the plywood disc through the cut-out area. With a wire stripper, remove about 1/2 inch of insulation from each wire, and connect the stripped ends to the screw terminals of the porcelain socket.
Firmly push the curved part of the lamp onto the straight part, so that the light opening and the switch are on the same side. To complete the lamp assembly, attach a quick-clamp plug to the free end of the lamp cord, as directed by the manufacturer.
Finish the lamp with spray metal primer and then high-gloss spray enamel. Before painting, cover your work surface with newspaper; cover the lamp cord and the switch with masking tape and newspaper. Cover the bulb opening with masking tape, and put a piece of tape over the vent holes on the inside of the top piece of pipe. Apply a light coat of primer and let it dry completely. Apply two or three coats of high-gloss spray enamel, following the manufacturer's instructions, to obtain a smooth finish. Let the paint dry completely; then carefully remove all tape and paper, and screw in a 40-, 75-, or 100-watt light bulb. Let the reading begin!
If you don't need a whole new lamp, but would like to revitalize one you already have, visit the next page for instructions on covering a lamp shade.
For more information on lighting and electricity, see:
How to Do Home Electrical Repairs: Whether the lights are out, the appliances won't come on, or a switch won't work, use this site to learn how to make simple home electrical repairs.
How Light Bulbs Work: Sure, it lights up when you connect it to a lamp or light fixture, but what goes on inside a light bulb? Find out here!
How Electricity Works: Learn how this mysterious force creates power for everything from toasters to Times Square.
Advertisement
How to Cover a Lamp Shade
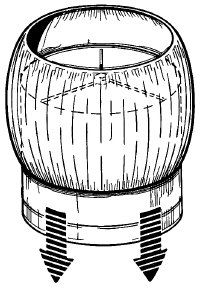
The shirred cover slips on over the lamp shade; elastic cord at top and bottom controls the fullness and holds the cover in place.
Renovate a shabby or dull lamp shade -- or create a customized new one -- with this shirred lamp shade slipcover. You can get just the look you want when you select any lightweight fabric you like.
Tools:
tape measure
sharp scissors
straight pins
sewing machine
steam iron and ironing board
safety pin or bodkin
Materials:
plain lamp shade (no ruffles or pleats)
lightweight fabric
thread
medium-weight round elastic cord
Time: 1/2 to 1 hourTo cover the lamp shade you have in mind, choose lightweight fabric that will fall easily into soft folds. In general, buy 1 yard of 44- or 45-inch fabric; if the shade is more than 15 inches high, add another 2 inches of fabric for each additional inch of height. Also buy 3 yards of medium-weight round elastic. If the lamp shade has fringe or other trim, remove it carefully, without damaging the shade.To begin, measure the height of the shade and add 3 inches. Cut two strips of material to that measurement across the width of the fabric. For example, if the shade is 12 inches high, cut two 15-inch strips across the width of the fabric. Place the strips of fabric with the right sides together at the selvage, pin the selvage ends together, and sew the pinned ends together on a sewing machine; leave a 1/2-inch seam allowance. Remove the pins and open the seamed pieces to form one long strip of fabric.Measure around the bottom of the lamp shade and multiply this circumference by 1 1/2 to find the length needed for this strip of fabric. If the shade measures 50 inches around the bottom, for example, you'll need a strip about 75 inches long to cover it. This is a minimum fullness; if your fabric is quite soft or thin, you may want to use more. Measure and trim the long strip to the required length, cutting from both ends of the fabric to keep the seam evenly centered.When the strip is trimmed to the proper size, fold it in half at the seam, with the right sides together, and stitch the two loose ends together with a 1/2-inch seam. Turn under 1/2 inch of fabric along each long, raw edge of the piece and press it down; turn each folded edge under again 1/2 inch and press. Pin the hems in place and stitch them all the way around, leaving a 1-inch opening in each long hem. Backstitch at the beginning and the end of each hem.Cut a piece of round elastic to the same length as the bottom circumference of the shade. Tie one end of it to a bodkin or a large safety pin and insert it into one of the hems through the 1-inch opening in the hem. Pull the elastic by the bodkin or pin all the way around inside the hem and out again, gathering the fabric onto the elastic as you go. Tie the two ends of the elastic in a square knot and let it slip inside the hem. Then cut another piece of elastic the circumference of the top of the shade; insert it into the other hem of the fabric and tie the ends together the same way.
Advertisement
To use your new lamp shade cover, remove the lamp shade from the lamp. Slip the cover over the lamp shade and adjust the gathered fabric evenly all the way around. If the cover isn't snug enough, retie the elastic to make it tighter.
For more information on lighting and electricity, see:
How to Do Home Electrical Repairs: Whether the lights are out, the appliances won't come on, or a switch won't work, use this site to learn how to make simple home electrical repairs.
How Light Bulbs Work: Sure, it lights up when you connect it to a lamp or light fixture, but what goes on inside a light bulb? Find out here!
How Electricity Works: Learn how this mysterious force creates power for everything from toasters to Times Square.
Advertisement
Cite This!
Please copy/paste the following text to properly cite this HowStuffWorks.com article: