How to Repair Clothes
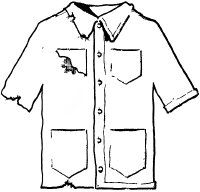
Stains and tears in clothes don't have to mean the end of their utility as school or work clothes -- cover the damage with embroidery, pockets, or appliqués for clothes that look and feel like new.
Tools: sewing scissors, embroidery needle, sewing needles and/or sewing machine, steam iron and ironing board, straight pins, pencil, seam ripper, patterns as needed.
Advertisement
Materials: embroidery thread, matching or contrasting thread; embroidered ribbon, tape, or braid; iron-on patches, embroidered appliqué motifs, matching or coordinating fabrics, paper, suede-cloth.
Time: 15 minutes to 2 hours, depending on effect desired.
For small tears and not-too-bad stains, the simplest solution is embroidery -- a flower, a sun, a star, or any bright design will cover the damage. An equally simple coverup is an edging of embroidered ribbon or tape; you can use braid or ribbon to face a torn pocket, reinforce a raveled-out seam, or disguise a stained hem. For more extensive damage, use appliqués or pockets for patches that are not just fill-ins but imaginative decorating tools.
Before you can decorate to hide the damage, make the necessary structural repairs. If the fabric is torn, stitch back and forth across the tear on a sewing machine or with a running stitch by hand, to hold the torn edges together. Steam-press the mended spot so that it lies flat.
Sewing stores, department store notions departments and even grocery stores sell iron-on patches and small embroidered appliqué motifs. The iron-ons are a good fast answer for children's play clothes -- cut the patch to the shape you want and press it on as directed. For a more finished look on school or work clothes, use individual appliqués; arrange several appliqués to create a new design instead of using one or two for an obvious spot coverup.

Position the embroidered appliqués as desired and pin them into place. Because the edges are prefinished, you can stitch the appliqués on with a straight or a zigzag machine stitch or a backstitch by hand; make firm, close stitches with matching or contrasting thread. If you have a zigzag sewing machine, use the basic stitch set at about two-thirds of its widest width and 20 stitches to the inch or more for an extra-smooth finish. Stitch all around the edge of each appliqué motif.
If you have fabric scraps on hand, you can make your own appliqués. Stars, geometric shapes, and flowers are easy to draw, or look for other simple designs. Make a paper pattern of the design and draw around it lightly on the surface of the fabric; allow a 1/4-inch seam allowance beyond the line. Turn the seam allowance under and press it down all around the appliqué, clipping curves and corners as necessary so that the entire pattern lies flat.
Pin the appliqué into place over the damaged spot or stain; baste it in place if desired. Stitch the appliqué all around with a close machine zigzag stitch, as above, or work a fine, close buttonhole stitch by hand.
Pockets, Patches, and Edging
Patch pockets in a contrasting fabric add a bright touch and cover a damaged spot or stain at the same time -- gingham on denim, solid color on print, or whatever appeals. If you need a pocket to cover a spot on one side of a garment, make it a very bold color or size; or, for a more formal effect, add a matching pocket to the other side to balance the design.
Use a pocket pattern from any commercial pattern for a similar garment, or copy a pocket from another garment. Cut the pockets, hem the top edges, and press the edges under all around. If you're using two pockets, measure carefully to place them evenly on the garment. Pin and baste them into place; use the pattern directions if you've never made a pocket before. Edge-stitch around the pockets with a straight machine stitch or hand backstitch.
A good jacket or sweater lasts for years, but the elbows always go first. You can spruce up a jacket with worn elbows or cuffs, or cover a cigarette burn at the hip, with 1/4 yard of suede-cloth -- it's worth paying for the better-quality suede-cloth. If the jacket originally had patch pockets, remove them carefully with a seam ripper. Use the old pockets as a pattern and cut new suede-cloth pockets to the finished size; leave a hem allowance for the top of the pocket only. If you're adding patch pockets to a plain hipline or over welted pockets, refer to a pattern of a similar design. Like real suede, suede-cloth needs no seam allowance on the edges, but you should hem the top edge of the pockets.
To make elbow patches, cut rectangles of suede-cloth 5 inches by 6 inches, and round off or right-angle the corners as desired. On each sleeve, carefully undo the stitching to detach the sleeve lining at the lower edge of the cuff. Slip one hand between the sleeve and the lining, pull the lining up out of the way, and pin the patch into place on the sleeve, attaching it only to the outer fabric. Make sure you don't catch the lining. With a backstitch or a buttonhole stitch, sew around the patch, securing it only to the outer fabric. When the patch is securely attached, replace the lining and hand-stitch it back around the inside of the sleeve.
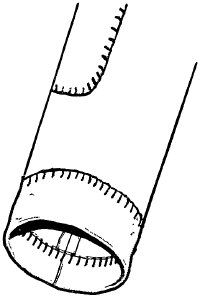
To refinish the worn edge of a jacket sleeve, measure the distance around the cuff and cut a strip of suede-cloth about 2 inches wide and slightly longer than the measured distance. Turn the sleeve inside out and pin one edge of the strip to the turned-up sleeve hem, ¾ inch up from the bottom of the sleeve, starting and finishing at the underarm seam. The remaining width of the strip should be hanging down over the edge of the sleeve. Turn the ends of the strip to the outside of the sleeve and stitch a seam that matches the sleeve seam line to hold the ends of the strip together, making a suede-cloth ring around the inside of the sleeve.
Attach the pinned edge of the strip to the inside hem of the sleeve with a backstitch or a buttonhole stitch. Turn the sleeve right side out and fold the other edge of the strip up over the worn edge onto the outside of the sleeve; attach it with the same stitch used on the other edge. If the sleeve hem is very shallow, you may find it easier to release the lining first and pull it back out of the way, then restitch it over the sewn-in cuff edging.
Nobody wants to wear clothes that have a broken zipper. One the next page, we'll cover how to easily repair or replace a malfunctioning zipper.