Repairing Gaskets, Wiring, Switches, and Thermostats
We will continue our tour through the inner-workings of your major appliances with an examination of three of the most common components. Let's get started with an item you'll find in most machines that use water -- gaskets.
Gaskets
Gaskets do two things: They prevent leaks of water and air, and they increase the efficiency of the appliance. When a gasket fails, it should be replaced as soon as possible. To determine whether a gasket is faulty, inspect it for cracks and tears. It should feel spongy. If the gasket has hardened, it should be replaced. Be sure to replace a faulty gasket with a new one made specifically for the appliance. Do not use a universal, fit-all gasket.
Advertisement
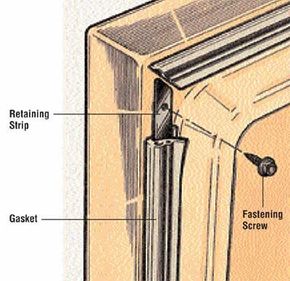
There are two common types of gaskets -- flush-mounted and channel-mounted. A flush-mounted gasket is secured to the door by a series of screws or clips, or held in place by a retaining strip or a panel. A channel-mounted gasket is held in a retaining groove. A splining or gasket tool makes installation easier. Use gasket cement to install either type of gasket if specified by the manufacturer. To replace a gasket:
Step 1: Remove the old gasket. If it's channel-mounted, pull it carefully out of the channel. If it's flush-mounted, remove the fasteners, retaining strip, or panel to release the gasket.
Step 2: Clean the gasket area thoroughly with warm water and liquid detergent, or with mineral spirits, if necessary. Dry the door.
Step 3: Install the new gasket, smoothing it evenly into place and easing it around corners. Use gasket cement if specified by the manufacturer. If you're installing a channel-mounted gasket, press it into place with a splining tool. Make sure the gasket is properly and smoothly positioned, with no part sticking up or curled under.

Step 4: Replace the fasteners or the retaining strip or the panel and its fasteners. Remove any excess gasket cement with mineral spirits, but be very careful not to damage the appliance's finish.
Wiring
Many appliance repair tasks involve wiring or connecting wires to install a new electrical component. The electrical wires in appliances may be connected in one of several ways, including the basic screw-terminal connection, the push-in terminal, and sometimes the sleeve-type lug terminal. Wires may also be joined with the solderless connectors called wirenuts. Components that have many wires -- washer timers, for instance, which control several operating cycles -- are often connected in a wiring harness: a group of wires enclosed in a plastic sleeve. Each type of wire connection, for each individual wire and each wire of a harness, must be properly made when you install a new component. Before you disconnect any wiring in an appliance, make sure you know how it's attached. When you install the new component, attach its wires the same way.
Switches
Switches operate by making contact with the conductor of an electrical circuit. When an appliance is plugged in, it's connected to a circuit in your home. Power runs through the wires of the circuit to the appliance. When the appliance's on/off switch is turned on, the conductors of the appliance cord are moved into contact with the circuit conductors, and electricity flows through the switch to operate the appliance. The current flows in a loop through the appliance, making a complete circuit back through the switch to the line wires. Other basic appliance components are variations of switches. Rheostats, thermostats, solenoids, and timers, for example, are all switches or secondary switches. These components operate inside appliances to turn on motors, open and close valves, control heating elements, and turn on different parts of the appliance during different cycles, such as the rinse and spin cycles of a washer. There are several common types of switches -- push buttons, toggles, rockers, slides, throw switches, and so on.
All switches consist of electrical contacts in a mechanical housing. Switch failure can be caused by problems with either the contacts or the housing. When a switch malfunctions, turn it to the ON position and watch to see if the contacts are moved into position so that they touch. If the contacts are not operating properly, the switch housing is faulty, and the switch should be replaced. If the switch's mechanical operation is all right, its contacts may be dirty or misaligned. If the switch has terminal screws, they may be loose. If the contacts are dirty or corroded, rub them gently with a fine emery board and then with a soft cloth. If they're misaligned, bend them gently back into place. Tighten any loose terminal screws. If the contacts or screws are badly corroded, the switch should be replaced. To determine whether a switch is working properly:
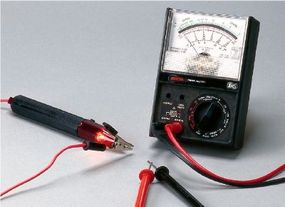
Step 1: Disassemble the appliance to test the switch with a continuity tester or a VOM set to the RX1 scale. For a full explanation of continuity testers and VOMs, click here.
Step 2: With the appliance unplugged, hook the clip of the continuity tester to one lead of the switch and touch the probe to the other; or touch one probe of the VOM to each terminal.
Step 3: Turn on the switch. If the switch is functioning, the continuity tester will light or buzz, and it will stop glowing or buzzing when the switch is turned off; or the VOM will read zero. If the tester doesn't light or buzz, or the VOM reads higher than zero, the switch is faulty and should be replaced. (Note that some switches should have a higher reading than zero, as detailed for each appliance.)
Step 4: Replace a defective switch with a new one of the same type, and connect it in exactly the same way the old switch was connected.
Thermostats
A thermostat is a switch that controls temperature in a heating element or a cooling device. Thermostats used in appliances may use a bimetal strip, bimetal thermodiscs, or a gas-filled bellows chamber to control the electrical contact. Faulty bimetal-strip and thermodisc thermostats should be replaced. Gas-filled thermostats can sometimes be professionally repaired. If repair is possible, it is much less expensive than replacement. To determine whether a thermostat is functioning:
Step 1: Disassemble the appliance to access the thermostat, and test it with a continuity tester or a VOM set to the RX1 scale.
Step 2: With the appliance unplugged, hook the clip of the continuity tester to one lead of the thermostat and touch the probe to the other; or touch one probe of the VOM to each terminal. The continuity tester should light or buzz; or the VOM should read zero.
Step 3: Turn down the temperature control dial; you'll see the contact points open at the thermostat. The tester should stop glowing or buzzing when the contacts open.
Step 4: If the thermostat is faulty, replace it with a new one. Follow the manufacturer's instructions.
As we mentioned in the introduction, most major appliances have two types of parts -- mechanical and control. Up to now we have covered only mechanical parts. In the next section, we will start to learn how to repair control devices.