How to Repair an Electric Can Opener
Canned foods bring ease and convenience to meal preparation. In seconds, an electric can opener will present a variety of prepared fruits, vegetables, and even main dishes stored in cans. Some models also open bottles or sharpen knives.
Of course, trying to open a can with a defective can opener will tempt you to order take-out food. Fortunately, electric can openers are simple appliances that can be easily maintained and repaired.
Advertisement
How Electric Can Openers Work
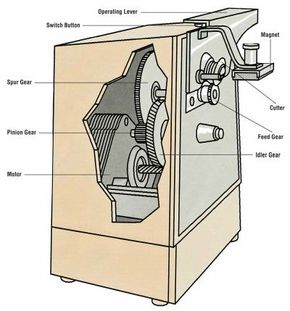
The electric can opener is activated by an operating lever. The lever is lifted, and the edge of a can is placed between the feed gear and cutter. A magnet grips the top of the can.
When pressed down, the lever activates a switch that turns the motor on. The motor passes power through gears to turn the small feed gear and rotate the can. As it is rotated, the cutter cuts through the edge of the lid. When the can is removed, the lid stays attached to the magnet.
Many problems with electric can openers can be resolved before they occur by periodic cleaning and lubrication of the drive wheel and cutter. Unplug the can opener from the wall receptacle, clean the parts with a toothbrush and mild detergent, wipe clean, and lubricate with a light oil or white lubricant. Wipe away excess lubricant to ensure it doesn't transfer to food or other components.
How to Repair a Can Opener
Can openers are simple to fix. Typical repairs include servicing a switch, a gear, a grindstone, or a motor.
Servicing the Switch: An electric can opener is turned on and off with a contact switch activated by the appliance's operating lever. A defective switch may prevent the appliance from working at all. Here's how to service the switch:
Step 1: Remove the can opener's cover so you can watch how it activates.
Step 2: Press the lever down to make sure it makes contact with the switch. If not, check for and remove any obstruction, or realign the lever so that it makes contact.
Step 3: If the switch still doesn't work, unplug it and test it with a continuity tester or multitester.
Step 4: If the contacts are corroded, use emery paper clamped in pliers to clean them. If a contact is broken or the switch is defective, replace it.
Step 5: Remove and mark all wires, unfasten the switch, and remove it from the housing. Replace it with a switch identified as a replacement part for your appliance.
Servicing the Gears: Gears translate the motor's power into torque that turns a can. This requires a feed gear at the edge of the can and at least one other larger gear inside the appliance. To check and replace gears:
Step 1: Inspect the feed gear and clean or replace if worn or broken.
Step 2: Check internal gears by opening the appliance case and carefully removing gears. Teeth may be missing or warped, or the gears may simply need lubrication with a white lubricant. If the gears need to be replaced, make sure the replacement gears match exactly in every measure, including width, circumference, and number of teeth.
Step 3: If a replacement to a broken gear cannot be found, consider using a plastic or metal glue, as required, to repair the break. When done, carefully reassemble the gears and case, then test the appliance.
Servicing the Grindstone: Some electric can openers will include a built-in grindstone that sharpens the blade as it is being used. Other electric can openers also serve as knife sharpeners, using their motors to power one or more small grindstones for the job.
The most common cause of problems with these grindstones is that stone shavings and other debris obstruct operation.
This situation can cause the motor to burn out or the motor's fuse to blow. The best way to avoid this problem is to periodically clean the grindstone and the area around it.
Once worn or damaged, the grindstone must be replaced with one of the same size. Some models use a screw or clip to retain the stone on the shaft. Others will require that the
stone and shaft be replaced at the same time. Depending on the grindstone's function on your can opener, you may elect
to disconnect or not use it.
Servicing the Motor: Electric can openers and other small appliances that don't require extensive power use a shaded pole motor. It has fewer parts than a universal motor and is less costly. To test and replace an electric can opener's motor:
Step 1: Unplug the appliance, open it up, and find the fuse on the motor.
Step 2: Place one continuity tester probe to one side of the fuse and the second probe on the other side of the fuse. If the continuity light doesn't illuminate, the fuse is blown and must be replaced.
Step 3: Attach a continuity tester or multitester across the two wires on the field coil winding. If the circuit is open, replace the motor as a unit. You can get one of the exact size and rating from an appliance-parts store.
Step 4: Always check the bearings for wear that will cause the shaft to wobble. Remove the rotor to check for damage or excessive wear.
Do you have a garbage disposal that you want to, well, throw in the garbage? Don't toss it just yet. See the next page for repair tips.