How to Repair Loose or Broken Chair Parts
All types of wooden furniture have their own individual structural problems. With common sense and a few particulars, you can keep all your wooden chairs in good repair. Here's how to replace loose or broken chair parts:
Loose Joints
Seat frames are held by mortise-and-tenon joints (a prong or tongue or wood secured in a hole in the joinining piece) or doweled joints (pegs of wood hold the pieces together) supported by triangular glue blocks notched to fit the legs. If you catch a loose joint in time, repair it with glue. If the joint is broken, you'll have to disassemble it and replace the dowels. The triangular glue blocks will probably be glued and screwed to the frame, and the dowel joint might even be supported with hidden nail or screw fasteners. Separate the joint carefully with an old screwdriver or a stiff-bladed putty knife, then replace the dowels. Make sure the joint is clean and dry before you reassemble it.
Advertisement
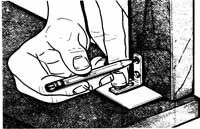
Sometimes you can use a mechanical fastener -- an angle brace or a chair leg brace -- to mend the frame. This, of course, really depends on the value of the furniture. Do not lower the value of an antique with a piece of metal. Metal reinforcements are useless unless the joint is tightly fitted together, but they can be used to make a firm joint even tighter. Fasten the braces with brass screws, and make sure the screws are long enough.
Fasten the metal angle to one side of the chair frame; predrill the screw holes. Insert a piece of thin cardboard under the opposite part of the angle, then drill the screw holes for that side. Drive in the screws fairly tightly, remove the cardboard, and finish tightening the screws. When the screws are final-tightened, the angle will pull the joint tightly together to bridge the gap left by the cardboard.
Loose Legs, Rungs, and Spindles
Loose legs, rungs, and spindles can sometimes become loose on wooden chairs that are used excessively. But those problems can often be repaired.
Loose rungs or spindles -- and, where no bracing is used, loose legs -- can sometimes be mended by forcing glue into the joints. But a part mended this way may work loose again. For a more permanent repair, carefully separate the part from the frame. If both ends are loose, remove the entire piece. For very stubborn joints, twist the part slightly to break the glue bond; if necessary, use self-locking pliers. Pad the part to prevent damage to the wood from the pliers.
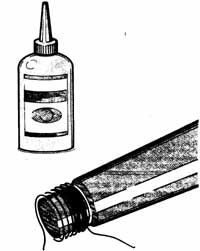
Remove the old adhesive completely from the part and from its socket. Glue does not bond well to old glue. Be careful not to remove any wood from the end of the part or it won't fit right. After removing the old glue, test each end of the part in its socket. If the ends fit snugly, apply glue to the socket and reinsert the loose part. Clamp the reglued joint, and let it dry completely.
If the part is loose in its socket, you'll have to enlarge it to make a firm joint. If the tenon end is cracked, you'll have to reinforce it. Apply a thin coat of glue to the tenon, and wrap it tightly with silk thread. If necessary, apply more glue and cover the tenon with another layer of thread. Let the threaded tenon dry for a day, and then glue the reinforced end firmly into the socket. Insert it carefully so you don't disturb the thread. Clamp the joint, and let it dry completely.
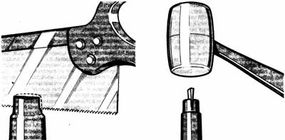
Very loose legs or rungs can be wedged to fit if the tenon is sound. Clamp the part in a vise or have a helper hold it, then saw very carefully into the center of the tenon end. The cut must be square and centered, roughly the depth of the part that fits into the socket -- about 3/4 inch. For small parts, use a hacksaw or a coping saw to make the cut; for thicker parts, use a backsaw or combination saw.
From a piece of soft wood -- pine quarter-round, if you have it -- cut a thin wedge to fit the width and depth of the saw cut in the tenon. The object here is to spread the saw cut slightly with the wedge, thus enlarging the tenon to fit the socket. When you're satisfied that the wedge is the right size, very carefully tap the wedge into the saw cut. When the tenon is slightly enlarged, stop pounding and trim off any excess wood from the wedge with a utility knife or pocketknife. Be careful not to pound the wedge too far; excessive wedging will split the tenon.
To test the wedge, insert the end of it into the saw cut and tap it down with a screwdriver handle. If you see the wood on both sides of the cut start to spread, the wedge is too wide. Finally, apply glue and reassemble the joint as above.
You may not be able to disassemble the piece of furniture for this wedging procedure. In this case, there are two more ways to do the job. If the joint is extremely loose and appearance is not important, remove as much adhesive as you can. Make several thin wedges from molding -- pine lattice is a good selection. Dip the ends of the wedges in adhesive and drive the wedges with a hammer around the loose part between the part and the socket. Then, with a utility knife, trim the ends of the wedges flush with the surrounding wood surface. Equalize the pressure from the wedges as you drive them in; unless you place them carefully, the wedges can throw the part out of alignment, further weakening the joint.
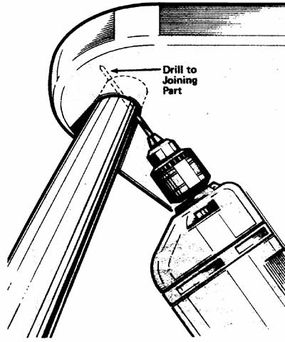
Where appearance is more important, drill a 1/16-inch hole through the side of the joint and the loose part. Then make a metal pin from a 10d common or finishing nail. Cut off the head of the nail with a hacksaw. Apply a drop or two of glue to the drilled hole, and drive in the nail. Countersink the pin with a nail set or another 10d nail, and fill the hole with wood filler.
Broken Back Rails, Spindles, and Slats
On chairs with horizontal rails across the back, the rails are mortised into the side posts; on chairs with vertical spindles or slats, these parts are mortised into a curved or straight top rail. Rails, spindles, and slats can all be replaced easily, but replacement may be fairly expensive -- don't bother if the chair isn't worth the investment. To replace a broken or missing part, have a millwork or woodworking shop custom-make a new part.
First, disassemble the chair back. It will probably be joined at the legs, seat, and rail. Carefully pry the joints apart, removing any nails or screws. Disassemble only the joints involved in the repair. It usually isn't necessary to completely disassemble the piece to get at the part. If you aren't sure you'll be able to reassemble the chair, number the parts as you take them apart.
Take the broken part and a similar undamaged part to the millwork or woodworking shop for duplication. Carefully clean the old adhesive from the joints. Then reassemble the chair with the new part, gluing each joint. Clamp the chair with strap clamps until the adhesive dries, and then refinish the chair completely.
Outdoor chairs made with wooden slats can be repaired the same way, but the slats can usually be replaced with wide moldings or thin boards. To replace a broken slat, cut and shape a piece of wide molding or a board to fit the frame. If the slats are fastened with screws, drill screw holes in the new slat and attach it with the old screws or matching new ones. If they're fastened with rivets, drill the old rivets out and replace them with self-tapping or panhead sheet metal screws.
Broken Nonstructural Rungs and Spindles
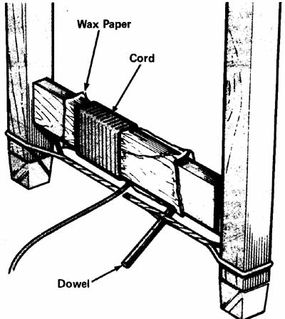
Splits and breaks in nonstructural rungs and spindles can be repaired with glue. Separate the broken ends of the part, and apply glue to each piece. If the part is only cracked, force glue into the crack with a glue injector. Join the pieces carefully, pressing them firmly together, and remove any excess glue. Wrap a piece of wax paper around the part, and then wrap the mended break firmly with a piece of cord to keep the part aligned properly. Clamp the chair firmly with a strap clamp or a rope, and let the glue dry completely.
Broken Arms, Legs, and Other Structural Parts
Where strength is important, the broken part must be reinforced. The best reinforcement is a dowel (wooden peg) pinning the broken pieces together. Use 1/8-inch to 3/8-inch dowel, depending on how thick the broken part is; drill the dowel holes with a bit the same size.
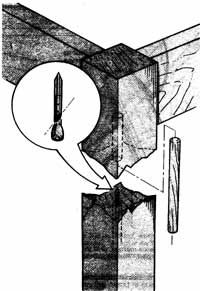
Separate the broken ends of the part. In the center of one end and at a right angle to the break, drill a 1-inch-deep hole, the same diameter as the dowel. This hole marks the dowel location. Cut off the head of a 16d nail, and insert the nail in the hole, point out. The point of the nail should protrude only slightly above the broken surface. To mark the dowel location on the other piece of the broken part, match the pieces and press them firmly together. The point of the nail will leave a tiny hole in the matching piece. Then drill straight into the second piece, about 1 inch deep.
Measure the dowel holes, and cut a piece of dowel 1/4 inch shorter than their total depth to allow for glue buildup. Score the sides of the dowel with pliers and round the ends slightly with sandpaper or a file. This improves glue distribution and makes insertion easier. Apply glue to one end of the dowel, and insert it into the hole in one end. Then apply glue to the protruding dowel and to the face of the break, and push the other piece of the broken part onto the dowel. Match the parts perfectly, wipe off excess adhesive, and clamp the mended part as above.
Where doweling isn't possible or where you want to provide extra strength, use a steel mending plate to reinforce the break. Mending plates can be used on any flat surface.
Glue the break as above, and let it dry completely. Then add a mending plate long enough to span the break and narrow enough to be inconspicuous. Use a plate with screw holes beveled to accept flathead screws.
Place the mending plate on the inside or least obvious face of the mended part. If appearance doesn't matter, secure the plate directly over the break, using flathead brass screws. For a less conspicuous repair, mortise the plate into the wood. Carefully trace the outline of the mending plate onto the wood with a scratch awl or a sharp nail. Score the wood along the outline with a series of straight-down chisel cuts as deep as you want the mortise -- about 1/4 inch for most plates. Allow space to cover the plate with wood filler. Cross-score the wood at right angles to the outline; then turn the chisel over, bevel side down, and remove the excess wood in the scored outline, working with the grain of the wood and removing only a little wood at a time.
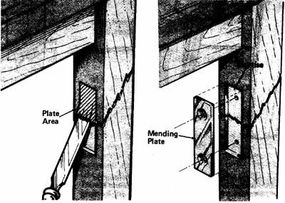
When the bottom of the mortise is as smooth and level as you can make it, test the plate for fit and make any necessary adjustments. When the plate fits exactly, drill pilot holes for the screws and coat the mortise with a thin layer of glue. Dip the screws in glue, position the plate in the mortise, and drive the screws firmly in. Let the glue dry for several days, and then cover the mending plate evenly with wood filler or a veneer patch. Finish the filler to match the wood.
The seat is the part of a chair that suffers the most wear and tear, which means it also is the most likely candidate for repairs. We'll cover various seat repairs in the next section.