How to Make Paper Costumes for Kids

Add a prince or princess crown to your collection of costumes.

Kids love to dress in costume. Superhero, space alien, princess, or wacky creature -- costumes for kids add to the enjoyment of pretending. Wouldn't it be great to have a whole collection of different costumes, ready when you are, to help make any make-believe game more fun?

Making paper costumes is an easy way to increase your costume wardrobe. They're easy to create (just have a grown-up handy), and look so great, you may be surprised that you made it yourself. The following articles have ideas for creating paper costumes for kids:

Advertisement

Creepy Eye Goggles

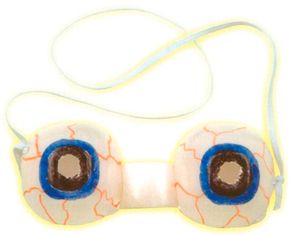
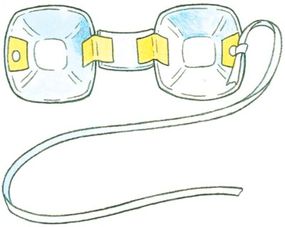
All eyes will be on you, but your eyes will look really creepy when you wear these goggles. Learn more here.

Prince or Princess Crown

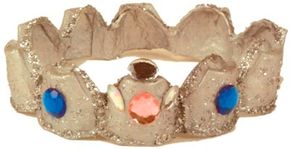
Who knew an egg carton could look so glamorous? The crown you make is fit for any prince or princess. See how to make it.

Get started making a paper costume with creepy eye goggles. Keep reading to find out how.

For more fun crafts and activities, check out:

Advertisement

Creepy Eye Goggles

The "eyes" have it -- these are creepy!

All eyes will be on you when you wear Creepy Eye goggles. Whether you're going for a "monster" look or want to show how tired you are, these goggles will definitely make your eyes look creepy.

This is a good project for kids and grown-ups to work on together -- the craft knife is best left to adults, but kids will love using the markers to make really creepy eyes.

Advertisement

What You'll Need

Foam egg carton

18 inches elastic cording

Scissors

Ruler

Craft knife

Permanent markers: black, blue, red

Masking tape

Paper punch

How to Make Creepy Eye Goggles

Step 1: Cut 2 cups from an egg carton, and trim the edges so they are even. Ask a grown-up to cut a 3/8-inch hole in the center of each cup using a craft knife.

Step 2: With permanent markers, draw a black circle around the eye holes, a blue circle around the black, and squiggly red lines coming out from the center.

Step 3: Cut a 1×3/4-inch piece from the curved part of another egg cup to make the bridge between the eyes. Place the bridge on your nose so you can figure out where to attach the eye goggles to make them the right distance apart. Tape the eyes to the bridge.

Use masking tape to reinforce the punched holes.

Step 4: Put a small piece of masking tape inside each eye, opposite the bridge. Punch a hole through the tape and the egg cup at this spot on both sides. Tie one end of the elastic cording through the hole. Place the goggles on your face, carry the elastic around your head, and tie it at the other side.

When you want to feel a little like royalty, make a princess (or prince) crown. Keep reading to find out how.

For more fun crafts and activities, check out:

Advertisement

Prince or Princess Crown

Make a crown that's worthy of royalty.

Any kid can feel like royalty in a prince or princess crown. This is a great craft activity for a birthday party -- or for any time. You may be surprised that a plain egg carton can look so special.

For this craft, you'll want to use a paper/cardboard egg carton, not the foam kind. When you add some sparkle -- paint, glitter, and "jewels" -- it becomes a headpiece worthy of any prince or princess.

Advertisement

What You'll Need

Paper egg carton

Silver acrylic paint

Silver glitter

Faux gems

Scissors

Craft glue

Clothespin

Paintbrush

How to Make a Prince or Princess Crown

Step 1: Remove the lid of the egg carton; discard it. Cut the carton in half vertically, and trim the edges to make them as smooth as possible. Cut one half in half lengthwise, leaving two rows of half-cups. Glue the two rows of half-cups together to form one long row of half-cups. Use a clothespin to hold the cups together until the glue sets.

Step 2: Wrap this length around your head, and cut off the extra cups at the end. (If it only takes 10 cups to reach around your head, cut off 2 cups from the end, and discard them.)

Step 3: Using the extra half-cups not used in step 2, cut a small piece from between two cups. Join the line of cups from step 2 into a circle, and glue the extra piece between the two end cups to splice them together. Use a clothespin to hold the circle together until the glue sets.

Glue the half-cups in a circle that fits your head.

Step 4: Paint the inside and outside of the crown silver. Let dry. Apply glue around the edges of each bump, and sprinkle glitter onto the glue. Let dry. Glue faux gems around the crown as desired.

For more fun crafts and activities, check out:

Advertisement

Advertisement

Loading...