Science Projects for Kids: The Moon

Use binoculars to study the moon.
©2007 Publications International, Ltd.

Earth's natural satellite is waiting to be discovered in these science projects for kids: the moon. With just a few simple materials, kids can learn more about the phases of the moon, how the moon moves, and what it looks like. They can even write an imaginative story about what they see instead of the man in the moon.

Follow the links below to find science projects for kids: the moon that you can do with kids:

Advertisement

The Toad in the Moon

Make up your own story of who -- or what -- is in the moon.

Phases of the Moon

Become the Earth in this active model showing how the moon moves.

Explore the Moon with Binoculars

"Travel" to the moon and explore its features.

Moon Models

Make models with two friends to understand the phases of the moon.

Do you see the man in the moon -- or the toad? Or the girl? Go to the next page to learn how you can write your own account.

For more fun science projects for kids, check out:

Advertisement

The Toad in the Moon

Make a story for the shapes in the moon.
2007 Publications International, Ltd.

Is that the man in the moon -- or the toad in the moon? Lots of stories try to explain the shadows on the moon. Now, with this science project for kids, it's their turn to make up a legend.

People in different parts of the world have had different ideas about just who, or what, is "in the moon." In the United States, we look at the shadows on the full moon and say it is "the man in the moon."

Advertisement

In Germany, people say that man was sent there for something he did wrong. In Africa, the Masai people say it's "the woman in the moon." And in China, they say it's a rabbit or a toad.

What You'll Need:

  • A clear night
  • Binoculars
  • Paper
  • Pen or pencil

Step 1: Take a good look at the full moon. What do you see there?

Step 2: Write a story telling who -- or what -- is in the moon, and how it got there.

Step 3: See what stories your friends can tell.

Learn more about the phases of the moon by becoming the Earth in an active model. Go to the next page of science projects for kids: the moon to find out how.

For more fun science projects for kids, check out:

Advertisement

Phases of the Moon

Make the phases of the moon easier to understand by making a model. In this active science project for kids, your child has the chance to play the Earth.

What You'll Need:

  • Pencil
  • Plastic foam ball
  • Lamp without a shade
  • Dark room

Step 1: Stick a pencil into a plastic foam ball. The ball stands for the moon. Use the pencil as a handle.

Advertisement

Step 2: Darken the room, and turn on a lamp that doesn't have a shade.

Step 3: Put the lamp at eye level in the middle of the room. Now face the lamp. The lamp is the sun, and you are the Earth!

Step 4: Hold the plastic foam ball directly between you and the light. The side of the ball that is facing you will be dark. This is called the new moon.

Step 5: Turn in place while you hold the ball at arm's length. You might want to hold the ball above your head so the light can always reach it as you turn.

Step 6: Watch the ball. It will go through the phases of the moon as different sides of the ball are hit with light. When you are between the lamp and the ball, with the light shining completely on the ball, the ball will look like a full moon.Go to the next page of science projects for kids: the moon to find out how you can "travel" to the moon with just your binoculars.

For more fun science projects for kids, check out:

Advertisement

Explore the Moon with Binoculars

©2007 Publications International, Ltd. Use binoculars to study the moon's features.
2007 Publications International, Ltd.

Explore the moon with binoculars, and learn more its features in this science projects for kids: the moon. You'll be amazed what you can see by simply looking at the moon on a clear night!

What You'll Need:

  • Clear night
  • Binoculars
  • Paper and pencil

Step 1: Choose a clear night with a full or nearly full moon. (The moon will rise shortly after sunset.)

Advertisement

Step 2: Sit comfortably outdoors in a place where you can see the moon.

Step 3: Use binoculars to look closely. What features to do you see?

How many large craters do you see? Can you count the small craters? You should be able to spot Tycho crater near the southern pole and Copernicus crater near the equator and slightly west of center.

Both of these craters have long, radiating, extending lines that you should be able to see through your binoculars. These rays were caused by material flung out when the crater was created by a meteor impact.

Look for the flat plains called "seas" (which don't hold water). These may have been created years and years ago when huge meteorites struck the moon and blew away huge basins that soon filled with liquid lava. The three most visible seas (or maria, as they are often called) are the Sea of Showers near the northern pole, the Sea of Serenity near the equator and to the east, and the Sea of Tranquility, just south of the Sea of Serenity.

Step 4: Draw your own moon map. Start with a large circle, then fill in all the craters and seas that you observe.

Step 5: Label the larger features. You can use other reference books to find names for the smaller features. If you prefer, pretend that you are the first person to explore the moon and name the features yourself!

Keeping reading on the next page to learn how you can two friends can act out the phases of the moon.

For more fun science projects for kids, check out:

Advertisement

Moon Models

Model the phases of the moon.
©2007 Publications International, Ltd.

Learn what causes the phases of the moon by making moon models with two friends in this science project for kids: the moon.

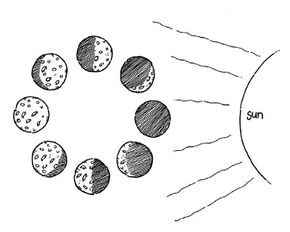
Many people think that the moon's phases are caused by the shadow of the Earth moving across the face of the moon, but that isn't true. When the earth's shadow blots out the moon, we call this a lunar eclipse. To find out what really causes moon phases, do this simple demonstration with two friends.

Advertisement

What You'll Need:

  • Two friends
  • Flashlight
  • Softball or similar-sized ball

Step 1: Decide which of you is taking what part in the models. One person, holding a flashlight and standing near a garage in the dark will be the sun. A second person, standing a few feet away, will be the Earth. The third person, the moon, will carry a softball "in orbit" around the Earth.

Step 2: Have the "moon" stand directly between the "Earth" and the "sun."

The "Earth" should see the unlit side of the moon. This is what happens when we see a new moon. We're seeing the "night side" of the moon.

Step 3: Ask the "moon" to move left of the "Earth." Now the Earth should see the sun side of the softball lit up and the other side in shadow. This represents a "first quarter" moon, which is really a half-moon.

Step 4: Have the "moon" stand in back of the "earth." Enough light should reach the softball to light up the whole side that faces the "Earth." This represents a full moon.

Step 5: Ask the "moon" to move to the right of the "Earth." Again, the "Earth" should see half the ball lit up and half in shadow. This represents the last quarter moon. Like the first quarter moon, this is really a half-moon.

Step 6: Track the actual moon for a month. This is easy to do when the moon is full, because it rises just after sundown, but after that, the moon rises and sets later. Do you ever see the moon in the day? Can you figure out why?

For more fun science projects for kids, check out:

ABOUT THE DESIGNERS

Explore the Moon with Binoculars by Maria Birmingham, Karen E. Bledsoe, and Kelly Milner Halls Moon Models by Maria Birmingham, Karen E. Bledsoe, and Kelly Milner Halls

Advertisement

Advertisement

Loading...