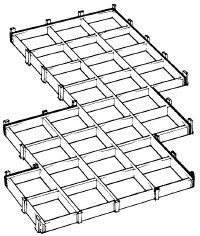
When the patio area is firmly framed in, you're ready to pour the concrete. Because the patio will probably -- unless you live in a very warm area -- be exposed to freezing and thawing, you must use machine-mixed concrete; hand-mixed concrete is not as strong. The easiest way to work is to rent a portable cement mixer with a 3-cubic-foot capacity -- one mixer load will mix just enough concrete to fill one grid unit of the patio, 4 inches thick. Depending on the size of the patio, you can schedule the pouring to suit yourself and to make best use of the mixer; pour one 3-foot-square section at a time, as few or as many as you like.
To mix the concrete, it's easiest to use sacks of premixed gravel-mix concrete -- 41/2 sacks of concrete mix make up one mixer load, or one 3-foot-square unit of the patio. If you have the storage space, and the patio is a big one, it's cheaper to mix your own concrete; use a mixture of one sack of Portland cement, 21/2 cubic feet of sand, and 3 1/2 cubic feet of coarse aggregate to each 5 gallons of water. Get operating instructions for the portable cement mixer from the rental agent. You'll also need a wood float to smooth the surface of the concrete.
Work section by section to pour the patio. About 1 hour before you mix the cement, soak the gravel base with the fine spray of a garden hose, to keep the concrete from drying too quickly. Protect the top edges of the wood frame around each unit with 2-inch-wide masking tape.
Load the cement mixer and add water as directed, using about half of the ingredients for one mixer load. Start the mixer, add the remaining ingredients, and mix the concrete for the full time specified by the rental agent -- at least 3 minutes. Then, working quickly, empty the prepared concrete out of the drum -- if possible, directly into the prepared frame; otherwise, into a wheelbarrow.
Spread the concrete into the corners of the unit with a shovel, jabbing the shovel through the concrete to eliminate air holes. Smooth the top surface of the unit as evenly as you can; it should be slightly overfilled, and about 4 inches thick.
With a helper, level the surface of the newly poured concrete. Use a 6-foot piece of 2 × 4 to strike off the unit; with each person on one side of the square, set the 2 × 4 on edge across the frame and pull it in a zigzag across the wet concrete. This sawing-across process removes excess concrete and levels the surface of the unit.
As soon as the concrete is leveled, smooth the surface with a wood float. Push and pull the float across the wet concrete to smooth the surface thoroughly and to bring a sheen of water to the top.
When the surface of the unit is smooth and evenly water-sheened, stop working and let the concrete stand. Wait until the water sheen disappears from the surface -- as little as 10 to 20 minutes in hot, windy weather, as long as 4 to 5 hours in cool weather.
As soon as the sheen disappears, trowel the concrete smooth with a steel trowel; press firmly, and work evenly over the entire surface. For a nonslip finish on the concrete, lightly pull a damp push broom across the troweled surface.
After finishing the surface of the unit, cover it with plastic sheet film and weight the plastic down. Let the concrete cure for at least 1 week. During the curing period, wet the concrete once or twice a day with the fine spray of a garden hose; replace the plastic after soaking the concrete.
Depending on how you schedule the pouring, pour individual units of the patio to allow for easy access. For a large patio, you may find it easier to work in alternate squares. Let each unit cure completely before walking on it; wait 1 week more before putting furniture on the new concrete. Remove the protective masking tape after the curing period.
Your new patio is now ready for entertaining a crowd, or just relaxing by yourself. And you can take pride in the fact that you built it yourself.
For information on accessories for your new patio, try the following links: