In this article, we'll teach you how to stencilfaux wallpaper that's better than the real thing.
In this article, you will learn how to stencil walls and floors to decorate your home. With just a few easy steps, you can personalize and reinvigorate your home decor.
The required skill level for these projects ranges from advanced beginner to intermediate. Four projects are included:
Delta Ceramcoat acrylic paint: Wedgwood Green, Dusty Plum, Dusty Purple, Blue Wisp, Avalon Blue
Americana acrylic paint: Hauser Dark Green
5/8-inch stencil brush
3/8-inch stencil brushes, 5
Instructions
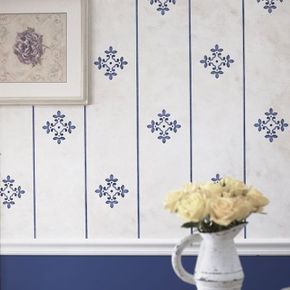
Step One: To prepare the wall, basecoat with latex paint. Before stenciling the flowers onto the wall, first trace all the patterns onto a sheet of paper and photocopy them. Make as many copies as you think you will need (the number of flowers you intend to stencil onto the wall). Cut out each design (you don't have to be too meticulous -- a rough outline will do the job).
Plan your layout by taping the copies to the wall. Turn the patterns in various directions to avoid a repetitive look, and move them around on the wall until you're happy with the design. Leave at least 6-1/2 inches empty along the bottom for the border.
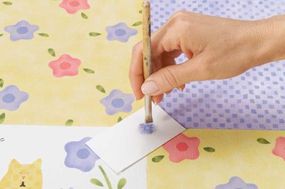
Step Two: Working on one flower at a time, hold each stencil over its paper copy. Tape one edge of the stencil in place, and remove the copy. Secure the other edge of the stencil.
Step Three: Stencil the designs as follows: Small Ivy Sprig: Basecoat the ivy Wedgwood Green with a 5/8-inch brush, and shade some of the edges with Hauser Dark Green. Also use Hauser Dark Green for the stems.
Five-Petal Flowers: Stencil the leaves Wedgwood Green using the 5/8-inch brush, and use Hauser Dark Green to shade some of the edges. Stencil the stems Hauser Dark Green. Basecoat two of the flowers Dusty Plum, and shade them with Dusty Purple. Base the third flower Blue Wisp, using Avalon Blue for shading.
Small Flower Curl: Stencil the stems and leaves as you did for the Five-Petal Flowers. Basecoat the flowers Blue Wisp, and shade them with Avalon Blue.
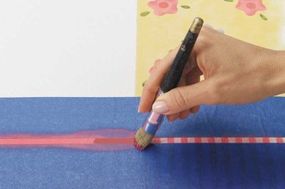
Step Four: To create the border, use a pencil and ruler to measure and mark a line 6-1/2 inches up from the floor or molding. Mask the upper edge with low-adhesive tape. Paint this border a shade darker than the rest of the wall. Let dry, and leave the tape in place.
Step Five: Create the border's two stripes by placing a strip of tape 1/4 inch below the upper edge of the border and another strip 3/8 inch above the molding. Paint the stripes Dusty Purple. Let dry, and remove the tape.
Step Six: Use a level and pencil to measure and mark a faint pencil line horizontally through the center of the border. This will provide a guideline for the ivy placement.
Step Seven: Position the stem of ivy stencil A at the beginning of the pencil line, and angle the leaves upward so the top leaf is about 1/4 inch from the top stripe. Stencil this ivy as you did the ivy in step three. Remove the stencil.
Step Eight: At the end of stencil A, position ivy stencil B on the pencil line. Angle the leaves down this time, with the bottom leaf in this group about 1/4 inch from the bottom stripe. Remove the stencil.
Stencil and connect the vinesof ivy across the border.
Step Nine: Repeat steps seven and eight until the border is complete.
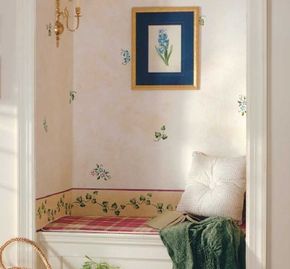
Flowers & Ivy Nook Variations
Flowers & Ivy Nook Variations
Design your own custom wallpaper and border with this stencil combination. Or consider this pattern for built-in shelves, a pantry, or a small hallway. For a brighter palette, work the stencils in cheerful spring shades. Extend the charm by stenciling a flower or two onto a mirror, throw pillow, or coordinating floorcloth.
To learn another vine stencil, flutter to the Garden Butterfly Border in the next section.
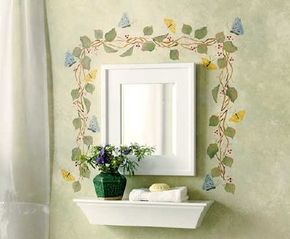
Step One: Use a pencil, ruler, and level or plumb line to indicate where the border will be stenciled. Make sure the lines are parallel to the mirror frame.
Step Two: Center the grapevine stencil on the pencil line, and tape it in place. Stencil the vine Amber using a 1/2-inch brush, then add Bark Brown shading with a 1/4-inch brush anywhere a twig disappears behind another. Repeat all the way around the pencil line.
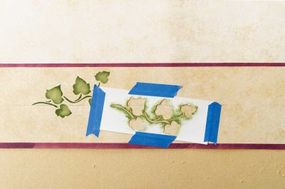
Step Three: Working in groups of three, indicate the placement of leaves around the grapevine. Use the three different leaf shapes, and vary the placement so as not to create a pattern.
Step Four: Position and adhere the leaf stencils one at a time. Mark the registration points. Use a 1/2-inch brush to stencil the leaves Colonial Green, making them darker at the stem and around the edges. With a 1/4-inch brush, add tints of Paprika. Next, use a 1/4-inch brush to subtly shade with Basic Black. Let the colors blend gently, and avoid making each leaf exactly alike.
Step Five: For each leaf, align the registration marks of the second overlay, and tape it down. Stencil each leaf detail Colonial Green, and shade with a tiny bit of Basic Black.
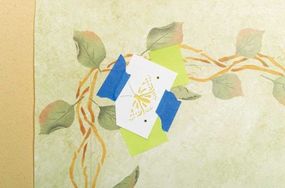
Step Six: Position the butterflies between the leaves, balancing the blue and yellow. Make a light pencil mark to indicate placement.
Step Seven: Adhere the small butterfly stencil to the wall where indicated, and mark the registration points. Stencil this butterfly Goldenrod, then remove the overlay and wipe clean. Position the second overlay, and stencil the wing detail Amber. Stencil the body and antennae Basic Black. Repeat for all of the small butterflies.
Position the butterfly along the vine.
Step Eight: For all of the large butterflies, use Cottage Blue and a
1/2-inch brush on the first overlay. Mark the registration points before removing the stencil. Then position and tape down the second overlay, and stencil all of the detail Basic Black.
Step Nine: Plan where you will stencil the berries. Position and tape down the berries stencil, and apply Garnet Red with a 1/2-inch brush. Repeat around the vine.
Garden Butterfly Border Variations
This stencil pattern can be interpreted with as much or as little freeform style as you choose. Fashion a unique vine with just the leaves and berries, and accent it with a single butterfly. Bring a rainbow of color into your room with multiple colors of butterflies. On the back of a chair, across a pillowcase, or along the edge of a shower curtain, let your imagination lead the way.
The next project gives a classy, sophisticated look floor to ceiling. Learn about the Faux Wallpaper stencil on the next page.
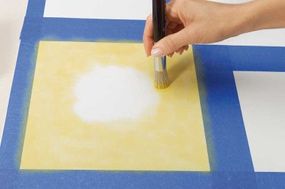
Step One: To prepare the wall, basecoat with latex paint. For greater depth and visual interest, lightly sponge another shade of paint over the first to create a mottled effect.
Step Two: Use a plumb line and level to plot out the stripes ahead of time, ensuring a straight, professional look. It's best to mark the entire wall before you actually start stenciling, so corrections can be made before paint is applied. Measure and mark the spacing for each stripe, and mask the stripes off with painter's tape. (Our stripes are 1/4 inch wide and are set eight inches apart.)
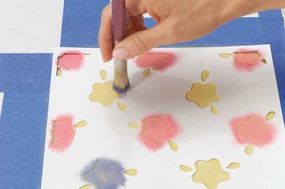
Step Three: You may find it helps to use graph paper to plan the spacing of the motifs. Determine the distance between the motifs (ours are 20 inches apart vertically, and the height is staggered every other row). Make a light pencil mark on the wall where each motif will be placed.
Step Four: Once you're happy with the placement, begin stenciling. Shade the edges of the motifs with a darker paint for a more dimensional look.
If you have a fancy for felines, you'll love the Kitty Floorcloth in the final section.
DecoArt Americana acrylic paint: Hauser Light Green, Soft Black
Delta Ceramcoat acrylic paint: Medium Foliage Green, Bahama Purple
Plaid Apple Barrel Colors acrylic paint: King's Gold
1-inch stencil brush
1/2-inch stencil brushes, 3
1/4-inch stencil brushes, 4
1/8-inch stencil brushes, 3
Spray or brush-on acrylic varnish
Instructions
Step One: Measure and mark a 4-inch border around the edge of the canvas. Divide the area inside this border into fifteen 8-1/4-inch squares in a 3x5 grid.
Step Two: To mask off the 7 squares that will be painted yellow (refer to above project photo), unroll the painter's tape, cutting off 8-1/2-inch strips as you go. Place the lengths of tape along the lines marked on the canvas and press firmly, overlapping at the corners. At this time, mask off a 4-inch square in each corner of the border as well.
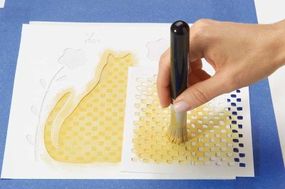
Step Three: Starting at the outside edges of each square and working inward in a smooth, circular motion, stencil these 11 squares Buttercup with a 1-inch brush.
Work inward in a smooth, circular motion.
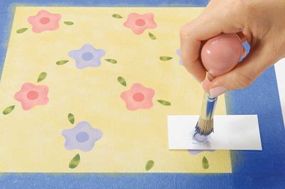
Step Four: Position the floral stencil in the first yellow square; tape in place. Using a 1/2-inch stencil brush, stencil every other row of flowers Pink. Apply two coats for complete coverage. Stencil the remaining flowers Blue Bonnet with a 1/2-inch brush; repeat. Stencil the leaves Hauser Light Green with a 1/4-inch stencil brush. With a 1/8-inch brush, add a dab of Medium Foliage Green on the tip and base of each leaf. Repeat in all yellow squares.
Add the pink, blue, and greensto the remaining flowers and leaves.
Step Five: Position the circle stencil in the center of each flower, and, using a different 1/4-inch brush for each color, stencil Bright Pink on the Pink flowers and Bahama Purple on the Blue Bonnet flowers.
Stencil a circular dab of color inside each flower.
Step Six: Remove tape from all yellow squares.
Step Seven: Mask off the two squares to be painted purple (refer to photo). Stencil both squares Blue Bonnet with a 1/2-inch brush with the same technique used in step three.
Step Eight: Position the checkerboard stencil in the top left corner of either of these squares; stencil Bahama Purple with a 1/4-inch stencil brush. Reposition the stencil, aligning it with already-stenciled checks, and repeat. Repeat in second square; remove tape.
Step Nine: Next, mask off the border. (Mask off the four corner squares to protect them.) Stencil the border Pink with a 1/2-inch stencil brush. Position the stripe stencil so the stripes are perpendicular to the edges of the canvas. Using a 1/4-inch brush, stencil the stripes Bright Pink. Reposition the stencil all the way around the border, using the last stenciled stripe as a guide. Leave the tape in place; it will serve as 1 edge of the stripe between the border and the center of the floorcloth.
Step Ten: Place another line of tape all the way around the border 1/4 inch to the outside of the tape from step nine. Stencil this stripe Bright Pink with a 1/4-inch brush.
Stencil the stripe Bright Pink.
Step Eleven: Center the cat design stencil in a white square with the cats' heads toward the inside of the mat; tape in place. Stencil the cats Buttercup with a 1/2-inch brush. Leave stencil in place; let dry to touch. Position the checkerboard stencil over the large cat. Stencil King's Gold with a 1/4-inch brush. Repeat on the small cat.
Position the checkerboard stencil over the large cat.
Step Twelve: Stencil the flowers Blue Bonnet with a 1/4-inch brush; repeat. Stencil the flower stems and leaves Hauser Light Green with a 1/4-inch brush. Shade the stems and leaves with Medium Foliage Green on a 1/8-inch brush. Stencil the outside stripes of the bees King's Gold with a 1/8-inch brush and the wings, heads, body stripes, and antennae Soft Black with a 1/8-inch brush.
Step Thirteen: Center the facial feature overlays on each cat, and stencil the eyes and mouth Soft Black and the nose Bright Pink.
Step Fourteen: Repeat steps 11-13 in each white square. Let dry; remove all tape.
Step Fifteen: Position the button stencil at the corner of 1 of the squares. Stencil Bahama Purple with a 1/4-inch brush; repeat for complete coverage. Repeat button in all 4 corners of all squares.
Step Sixteen: Center the "x" stencil in each button; stencil Blue Bonnet with a 1/4-inch brush.
Create the "x" stencil in each button.
Step Seventeen: Follow manufacturer's instructions to seal the floorcloth with spray or brush-on acrylic varnish.
Bright Ideas
Create a riot of texture and color, or stencil a single cute motif. All or parts of this stencil would look great as framed wall art. Stencil just the cat design onto white matte board, and embellish a frame with flowers, stripes, checks, or buttons. Imagine a series of pictures hung in a row -- each with a different-color cat and a uniquely embellished frame.
Preprimed canvas is easy to crease or bend, and these creases can be permanent. Handle with care! Work on a large, flat surface (either a work table or the floor), and as always, make sure the surface is protected with newspaper or an old cloth.
Advertisement
Cite This!
Please copy/paste the following text to properly cite this HowStuffWorks.com article: