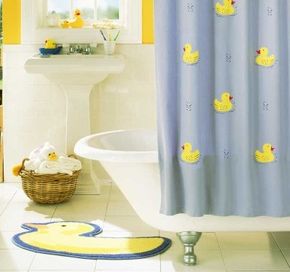
With the information in this article, you can complete stencilprojects like the Rubber Duckie Shower Curtain.
Did you know that you can add your own personal, creative touch to furniture, walls, pillows -- just about anything? With stencils, you can do all that, and more.
Stenciling is an age-old technique in which paint is applied to a surface through a cut-out template. Designs may be repeated or used alone to achieve a consistent pattern with a handmade feel.
Modern twists to the traditional craft have opened the door to even greater personal style and artistry. With these simple step-by-step techniques, walls and accessories can be transformed to suit your taste, creating exciting, fresh designs that bring ho-hum rooms to life.
Another bonus of stenciling is that you're able to create one-of-a-kind looks without spending a lot of money. There's no limit to what you can do with stencils!
Successful stenciling requires the right tools. Keep reading to learn which tools you'll need to start stenciling.
Most stenciling supplies can be found at local craft and hobby stores, though you might need to check a hardware or home improvement store for tools such as a level, plumb line, or tape measure if these items aren't already stocked in your toolbox.
A wide variety of detailed stencils, high-quality brushes, and other accessories can be found in stencil catalogs as well as online.
Advertisement
Stencils
Stencils are typically made from a stiff plastic called Mylar (a material that's sturdy enough for repeated use and that cleans up easily), though brass, coated paper, and acetate can also be used. They come in two basic types: single overlay and multiple overlay. This simply refers to the number of stencils required to get a complete image.
A single-overlay stencil is made up of one layer. These designs are usually simple and have obvious spaces, called bridges, between each part of the image. The bridges create distinct shapes that make up the design; without them, you would see just one big shape and no details.
Although pictures that are created with a single-overlay stencil will never be completely realistic, these are good stencils for the beginner. They are easy to apply, allowing you to develop a working technique. As your skills advance, you can make even single-overlay stencils look more complicated by blending colors, free-handing details, and masking off areas to separate colors for a more realistic effect.
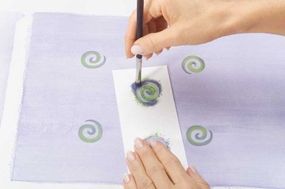
Color is added one layer at a timewith a multiple-overlay stencil.
Multiple-overlay stencils allow for more realism because painted areas butt right up against each other rather than being separated by bridges. One single design is cut on multiple stencil sheets, as the name implies, with different areas on each overlay. Color is added one layer at a time until the image is complete. The size and detail of the image determine how many layers there are to the stencil. The overlays are matched up with registration marks.
When marking registration points, make a markthrough each hole on the first overlay.
Registration marks are small holes in the sides of the stencil; make a pen or pencil mark through each hole on the first layer, then line the holes up with the marks on subsequent layers.
Using a variety of paint brushes and applicators willhelp you achieve different looks.
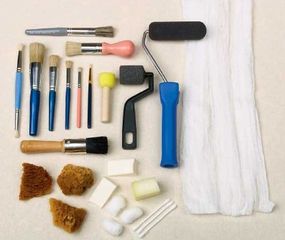
Brushes and applicators
Stencil brushes, the most common applicators, have short, stiff bristles of uniform length and come in a variety of sizes. Handles range from straight wood to plastic bulbs; find what's comfortable for you. You will need several brushes, ideally one for each color used. This keeps colors from becoming muddy and also speeds things up because you won't have to clean your brush between colors.
Match the size of the brush to the size of the area to be painted: Ideally, the brush should be about half the size of the area to be painted. This helps contain the paint in the correct areas without you having to mask the rest of the stencil.
If the whole design will be stenciled in one color, use a bigger brush, which allows you to work more quickly. But if you need to apply a specific color to one tiny area, use a smaller brush to keep the paint where you want it. Also use smaller brushes for adding shading and highlights.
To obtain different looks, experiment with other kinds of applicators. Sponges, which give a less filled-in look, may be cut down to a workable size. Rollers can speed up the project greatly, but they don't allow for subtle shading or detail. Cotton swabs, cotton balls, cheesecloth, sponge brushes, and spray paint provide unique looks as well.
You can use a variety of paints when working with stencils.
Paint
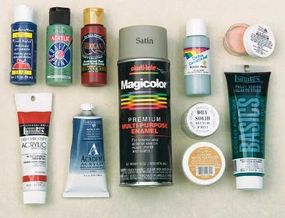
There are two basic kinds of paint used in stenciling: acrylic and oil. Acrylic paint cleans up with soap and water and comes in a wide variety of colors that can be easily mixed to make others. Acrylics dry quickly, so paint doesn't smudge easily. Shading is created by adding other colors on top of the base-coat rather than blending the colors.
However, because acrylic paint is very liquid, it is easy to get too much paint on the brush, causing seepage under the stencil. To keep brushes workable while stenciling with acrylic paints, load them with gel-blending medium and work them on paper towels to clean and soften.
Oil paint comes as crèmes and crayons. These take longer to dry, making them ideal for blending and creating smudgy shadows. They're less likely to run under the stencil because of their solid state, but they come in a smaller number of colors and cleanup is more difficult, requiring mineral spirits or brush cleaner.
You will need to stencil with oil-base paints on an object that has an oil-paint base-coat. Try to be as precise as possible when stenciling with oil paints, but if you do notice any smudges, you can do touch-ups with a white art gum eraser.
Tricks of the Trade
If you can't find the color you want in a fabric paint line, add a textile medium to regular acrylic paint
Advertisement
Adhesive
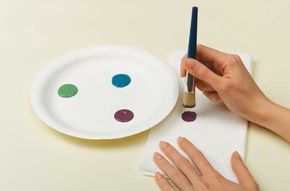
Paint colors should not touch on the palette; use apaper towel to offload excess paint.
Adhesive spray or painter's tape holds the stencil in place. Most of the time, tape is the easiest way to adhere a stencil. It's also useful for masking off areas of the stencil you don't want to paint yet. Low-adhesive tape works best, because it adheres well yet won't mar the surface or pull off the paint when it's removed. Keep plenty of low-adhesive tape on hand for every stenciling project.
Although re-positionable adhesive spray is a little more expensive, messier, and smellier than tape, certain situations call for its use. On a smooth, slick surface, for instance, spray adhesive can be helpful in keeping paint from seeping under the edges of the stencil. Spray adhesive is also ideal for stenciling on tricky or hard-to-reach areas such as ceilings or curved surfaces.
Advertisement
Tricks of the Trade
If you don't have painter's tape on hand, you can make standard masking tape a little less sticky by sticking it to your shirt before putting it on the stencil.
Before using a spray adhesive, make sure your work area is well ventilat
Palette
When stenciling with oil-base paints, you'll work out of the crème pots they come in. But when working with acrylics, you'll need to place the colors on a palette. Palette paper is sold in craft and art stores for this purpose, but paper or foam plates work just as well. You can also try a piece of mat-board or cardboard or even an ice cube tray. Just make sure that whatever you use is big enough to keep the colors separated.
Other tools
Depending on the project, there are a few other items that prove indispensable when stenciling. It would be wise to keep all of them on hand.
Advertisement
Art gum eraser. This is useful when working with stencil paint crèmes. Because these paints dry slowly, minor smudges and mistakes are easily wiped away with a white art gum eraser.
Artist's brushes. Use these small, thin brushes to add details like shadows or leaf veins.
Index cards. These make handy masking tools for small spaces.
Level. This common tool helps keep a border straight.
Paper towels. Use them to wipe excess paint off brushes, to protect surfaces, and for general cleanup. It's a good idea to always keep a roll nearby while you're working.
Pencil. Use a pencil for marking level lines and registration marks.
Tape measure. Keep one on hand, or a ruler if you prefer, to determine the amount of space available for the stencil when planning projects.
Before you start your stencil project, you'll need to complete a very important step -- picking out the design you'll paint. Keep reading to learn about choosing a stencil design.
With proper preparation and the correct type of paint, almost any surface can be painted. Paint manufacturers are coming out with new formulas all the time, making it easier to carry a decor theme through on almost any item you wish. Here are a few of the different surfaces (other than walls!) you might paint on.
Glass and ceramics. Use paint meant for glass and tile. It comes in transparent colors for a stained-glass look as well as opaque shades. When stenciling glass dishware, paint the bottom of the plate or the outside of glasses rather than the surfaces food will come in contact with. Follow manufacturers' directions for setting the paint.
Fabric. Paints designed specifically for fabric will stay soft and wear better than regular paints. To stencil on fabric, use spray adhesive to adhere the stencil, and tape the fabric down well to your work surface. Put a piece of cardboard or waxed paper under the fabric or between the layers of a shirt to prevent the paint from soaking through. Build up color slowly, as the paint can wick under the stencil if you use too much. Follow manufacturers' directions for heat-setting the paint and washing the fabric.
Paper. Consider using inks or pigment dyes instead of paint to apply a stencil on paper. These are drier and won't soak into the paper as much. If you must use paint, try painting a base-coat first to stabilize the surface. Then stencil as usual.
Metal. There is a line of paint designed for use on metal without priming, but if you need a color not available in this metal paint, remember to prime the surface first. Otherwise, the paint won't stick.
Wax. To stencil on candles or soap, start with a special conditioner, then use paint developed specifically for this surface and follow manufacturers' directions.
Advertisement
Choosing a Stencil Design
The Sports Fan Chalkboard is a great sports-themed stencil.
Stencils come in a wide variety of sizes, shapes, and styles. The stencil designs in this article are just a starting point as far as stencil design goes.
Commercially available stencils mimic all kinds of animals, plants, flowers, architectural details, and much more. Start by deciding what type of image you're interested in, and then take a look at the style and scale of your options.
Advertisement
Size
The stencil needs to be the right size for your project. A two-inch-wide stencil wouldn't carry enough weight for a border at the top of a 12-foot wall, but it might be just right to trim a pillow. A 20-inch spot motif would be way too big for use on a wastebasket, but it can top off a window quite well.
Shape
Long, narrow stencils are usually meant as borders rather than center medallions. Many stencils are fluid in their shape: You can rearrange the elements to create a new shape and thus a new use for the stencil.
Style
The style of the stencil is another checkpoint in choosing a design. Before you begin, make sure the design you choose works with the style of the room.
Before you start painting, you need to plan all aspects of your stencil project. Check out the next section to learn about planning a stencil pattern.
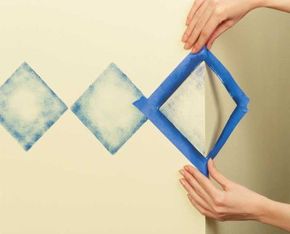
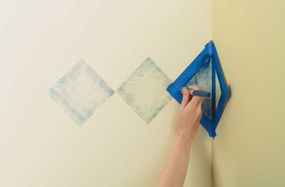
To stencil an outside corner,wrap the stencil around the corner,releasing the first side as you tape down the second.
It takes more than a little planning to make a stencil look as though it was designed just for your space. The basic rules for planning out your stencil pattern are the same for all types of surfaces.
1. Begin by deciding where you want to stencil.
You might want a border in your room, but do you want it at the top of the wall, above the baseboard, or at chair-rail height? Or, you may have the perfect toy chest on which to stencil, but should you run the stencil vertically or horizontally?
Advertisement
Make sure you have a basic idea of what you want the finished product to look like before you begin. It's a good idea to draw the design out on a piece of paper first to test different looks.
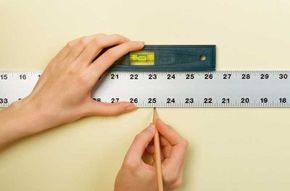
2. Measure the space where the stencil will go.
Measure the length of the stencil design, also called a repeat. How many repeats of the design will fit in your space? To find out, divide the length of the space by the length of the design. Don't be discouraged by the math; this is easier than it sounds. For example: The wall is 60 inches wide, the stencil repeat is 12 inches. Five repeats will fit on the wall.
Unfortunately, the math won't always yield a whole number. Most of the time you'll wind up with a fraction of a repeat. While that's not a big deal in a large wall border, it will stand out on a small project. Be creative in getting the stencil to work: Stretch or shrink the design by adding or removing space between repeats.
3. Before you begin, do a test to make sure everything will fit.
Make samples of your design on a piece of paper, and tape them into position. Step back and judge the scale of the stencil for the space. Then check to see how adding or removing space between repeats affects the look of the design. Once you're happy with the way the design is planned out, you're ready to paint.
Problem areas
Unfortunately, not every area to be stenciled is a straight, smooth expanse. The space might suddenly become narrower than the stencil, the repeat of the design may fall in a corner, or the surface may be curved, preventing you from stenciling in a straight line.
Ceilings
The ceiling of a room is just like a fifth wall and may be stenciled in the same way. Spray adhesive is a good idea for this surface because without it, gravity will cause the center of the stencil to sag.
Narrowing space
The best way to deal with a narrowing space is to stop the design and restart where the space returns to the normal width. Fill in the narrow space with elements from the original stencil or with a coordinating, but narrower, stencil.
For an inside corner, mask off the second wall andlet that part of the stencil hang freewhile you work the first wall.
Corners
Corners
Both outside and inside corners can be tricky. Even if you try to plan the space so the repeats don't fall in corners, continuous-line stencils, like vines, might have to go through, inside, or around a corner.
For an outside corner, adhere the stencil and work toward the corner, with the excess stencil extending past the corner. Once you've finished with the first side, carefully fold the stencil around the corner, releasing the first side as you tape down the second. Then continue with the rest of the design.
Inside corners are tougher but not impossible. First, mask off the adjoining wall with a strip of vertical tape. Then, much as with outside corners, tape the stencil down and work the first wall, painting into the corner with the rest of the stencil hanging free.
Use less paint, a gentle touch, and don't worry if the image doesn't get completely filled in. Then move the stencil to the second wall, leaving the first side loose while you finish stenciling. You can go back later with an artist's brush to fill in details if you like. As long as you don't smear the image or leave globs of paint, admirers will be fooled into thinking the corner is perfect.
Curved surface
It's hard to keep a straight line when the stencil won't lay flat on a curved surface. Work the stencil in small sections, readjusting every few inches to keep the image on your guideline. This will provide the illusion of a straight line.
Painting is the best part of the stenciling process. Keep reading to find out what to do before, after, and while you paint.
While stenciling is not difficult, it does require knowledge of a few basic techniques. It's a good idea to take the time to practice the techniques listed here on a piece of poster board or cardboard before painting on the real surface.
This is also the time to test the colors you've chosen and experiment with highlighting or shading. Once you're confident in your skills, move on to your project.
Advertisement
Getting ready
The first step in any painting project is to make sure the surface is properly prepared. Generally, this means that it is clean, dry, and in good repair, but some surfaces, such as metal or plastic, may require special preparation or priming.
In addition, before you pour that first drop of paint:
Mark guidelines to help keep the design level on the wall or the same distance from the edge of the table. You can't always count on the ceiling or the edge of the stencil to be your guide. They may look straight, but they often aren't! Place a level on the wall to make sure your guidelines are straight, and make a light pencil mark or run a strip of tape to mark the guideline.
Pick a starting point. On a wall, this should be the most inconspicuous place unless you've carefully calculated whole repeats. With accessory projects, you might start on the back of the piece or in the center so the ends come out the same on both sides.
Adhere the stencil to the location of the first repeat using either stencil adhesive or tape. Mark the registration points if you're using a multiple-overlay stencil.
If you have a single-overlay stencil with multiple colors, mask off nearby areas you don't plan to paint yet. Either tape over the open spaces or hold an index card to mask as you paint. This will keep colors from straying.
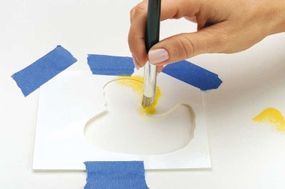
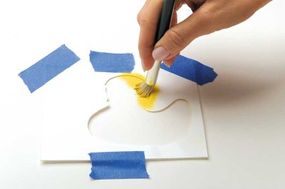
Prepare your palette. Pour just a small amount of each color, leaving plenty of room between colors so they don't run into each other. If using crème pots, follow the directions on the pots to remove the skin and reveal the paint.
Choosing colors
Different colors can make a design look entirely different. A rich navy blue and warm brick red may bring a calm, classic feel to a design, while lime green and fuschia will make it eclectic and funky. Make sure your color choice achieves the effect you want before you begin painting.
Loading the brush
Proper loading of paint is crucial to a successful project. Too much paint on the brush causes paint to seep under the stencil, ruining your work. It's always better to start light and build up the color.
To get just the right amount of paint on the stencil brush, dip the flat tip into the paint, then swirl the brush on a paper towel to remove most of it. The brush should feel dry to the touch and shouldn't leave paint if you gently touch your hand with it. If it feels wet, swirl it on the paper towel again to remove more paint.
Applying paint
There are two basic techniques you can use with a stencil brush. Each gives a slightly different look, and you might find one easier to do than the other.
To stipple paint, hold the brush perpendicular to thesurface and tap up and down repeatedly.
Stippling. Hold the brush perpendicular to the surface, and tap up and down with the brush to apply color. The effect is that of lots of little dots created by the bristles of the brush. With stippling, the stencil is less likely to move around so you're less likely to get paint under the edges. However, when working on a large project, it can get tiring.
To swirl paint, let the brush rest on the surface,and swirl it around in a circular motion.
Swirling. This technique is generally used with stencil crèmes, not acrylics. To create a smooth finish, hold the brush perpendicular to the surface, letting it rest just on the surface, and swirl it in small circles to color in the area. Take care not to push the paint under the edges of the stencil. With swirling, there will be some buildup of paint around the edges.
Shading
For either of the two methods, when working with just one color, start on the outside edges of the opening and work into the center. This creates a dark, shadowed edge and light, highlighted center, adding depth to the piece without additional colors. Darken the color by applying more pressure to the brush, not more paint.
Use a darker color when shading.
When using more than one color, start with the lightest color first to fill in the space and create the highlight. Then use a darker color worked from the outside edge into the center. You can then dry-brush a darker color on a different brush to create a shadow effect on the very edges. For realistic shading, a light touch and little paint are needed.
Moving on
When you've finished the design, carefully remove the stencil from the surface to avoid smudging any wet paint. Move the stencil over, line it up with your guidelines, and re-adhere to start the next repeat.
When working with multiple-overlay stencils, it's a good idea to work the entire area with the first overlay and then go back with the next layer, and then the next. This allows the paint to dry before the next stencil goes over it, eliminating the risk of smudges. Acrylic paints, however, often dry quickly enough that it's possible to complete the entire image at one time before moving on to the next repeat.
Overlapping components
When part of a design seems to "disappear" behind another part, always stencil the object in front first. This keeps ghost images and paint ridges from being visible underneath. After stenciling the first object, cover it with the dropout piece from your stencil and tape in place. This allows you to stencil images "behind" the already-stenciled object without worrying about paint drips or overlap ridges.
Cleaning up
Take some time to step back and admire your artistic endeavor, but the work isn't quite over yet! Proper cleanup will keep your materials in good shape for your next stenciling project.
To preserve the life of brushes and stencils, clean them thoroughly after every use. Acrylic paints clean up with soap and water, whereas oil paints need mineral spirits or brush cleaner. Oil soap, which is formulated for use on wood, is great for cleaning brushes because it won't dry them out.
Some plastic stencils just require a soaking in water to remove acrylic paint; others need to be scrubbed gently. Try an all-purpose cleaner, using a toothbrush or sponge very gently for any scrubbing. (Because the bridges of some stencils are quite delicate, use a soft touch when scrubbing.) Mineral spirits remove adhesive from the backs of stencils.
Protecting your work
A clear coat will keep your work fresh for a long time -- especially if it's in a high traffic area or if it will be handled frequently. Furniture, floor-cloths, and floors need extra protection, so several coats of sealer are necessary on those areas.
Clear coats range from matte to gloss; decide how shiny you want the surface to be. You can also choose between brush-on or spray. The clear coat will change the color and appearance of the surface slightly, so apply it to the entire surface. Make sure to apply sealer, especially spray sealers, in a well-ventilated area.
Can't find the stencil design you want? Make your own. Learn how in our final section.
Make your own stencil by using a transparent material.
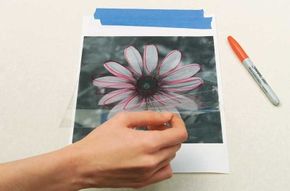
Sometimes you just can't find the stencil you want, or the perfect design is not scaled correctly for your space. Now what? You don't have to settle for something that's not exactly right. It's not difficult to make your own stencils.
Almost any kind of clear plastic will make a good stencil because it won't absorb paint and you can see through it to trace the design. The thinner the plastic, the more careful you need to be when cutting out the design, stenciling, and cleaning the template.
Advertisement
Buy blank sheets of Mylar at a craft and hobby store; also check the quilting section for large sheets of template plastic. You can also use overhead acetate or X-ray film for making templates.
Another option, though not as durable as plastic, is paper. Cardstock and poster board are rigid and strong enough for accurate stenciling but not flexible enough for bending at corners. You can also treat just about any thick paper with linseed oil to make it waterproof.
Designing the stencil
Sketch, trace, or computer-draft the design you want, then use a photocopier to enlarge or reduce it until it is the right size.
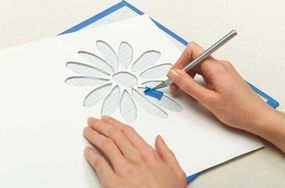
Decide if this design works best as a single- or multiple-overlay stencil. With a single overlay, you'll have to plan for bridges between major areas of the stencil to make the shapes distinct. For example, train tracks would require bridges between the tracks and the side rails. The more complicated the image, the more bridges you will need.
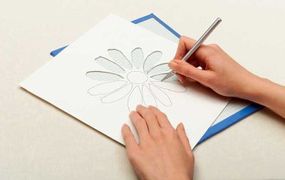
Go with multiple overlays for a more realistic finish or if the image is quite detailed. Place a piece of tracing paper over the image, and trace all the parts to be cut out. Then number all the areas for the first overlay with a "1", keeping in mind that images on the same overlay cannot touch each other.
Number areas for the next overlay with a "2", and so on until all the areas have been numbered. This tells you how many overlays you will need. Be sure to include dots in the corners for registration points so you will be able to line up the multiple overlays later.
Making the stencil
If using a transparent material, lay your design underneath and trace it onto the stencil blank using a permanent marker. Tape the copy and your blank down to keep them from sliding around. When using opaque material for your blank, place carbon paper between the design and the blank, with the carbon side on the blank and the design on top, then trace the lines. Leave at least an inch of blank material around the outside of the design.
Cut your stencil in one fluid lineto achieve a smooth edge.
To cut the stencil, you'll need a sharp craft knife or an electric stencil cutter, which makes quick work of cutting plastic blanks. Work on a surface that won't be damaged by the knife or the heat of the cutter; a sheet of glass is ideal.
Try to cut in one continuous line; the piece should just fall out when you're done. If it's still hanging on, take your blade back through the line to get a smooth edge; don't try to pull it, or you'll get a ragged edge. It will take some practice, so don't be discouraged if your first efforts don't look like commercial stencils.
Test your practice designs to see how closely they create the image you want. When you're satisfied, go ahead and start stenciling!
To repair a paper stencil, use tape and a craft knife.
Miscellaneous tips
Repair. Stencils sometimes tear, but repairs are easily made. For plastic stencils, you'll need transparent tape and a craft knife. For paper stencils, use masking tape and a craft knife. Tape the top and bottom of the damaged areas, sticky sides together, then cut away the excess tape.
Storage. Stencils should be stored flat. Under-bed boxes and dresser drawers are good places for flat storage; you can hang large stencils on pants hangers in a closet. Don't roll or bend a stencil in any way, or it won't lie flat the next time you want to use it.
Whether you're decorating the walls of a room or personalizing a set of dishes for a special gift, stenciling is a wonderful way to express your creativity and add a special touch to the objects in your life.