Easter Crafts

Easter crafts for kids bring a dash of creativity to the celebration. Get ready for some craft projects that will have you decorating eggs, crafting cute little Easter critters, and playing Easter games.

In this article, you'll find clear instructions for Easter craft projects both adults and children will enjoy -- both the making and the finished works of art!

Advertisement

Pebble and Sprout Garden

Kids will enjoy watching the sprouts grow in this easy and fun garden. And they can design it and "plant" it themselves.

Cracked Pictures

Don't throw away those shells after you've eaten your Easter eggs. Instead, use them for this fun craft project.

Egg-streamly Silly Basketball

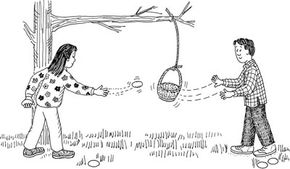
Let the kids use up that Easter candy energy, while you burn off those Easter dinner calories with this very silly game.

"Bonny" Bonnets

Jelly Bean Game

Bunny Box

Sleeping Chicks

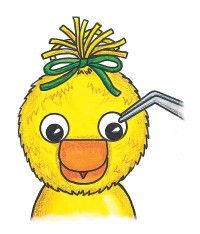
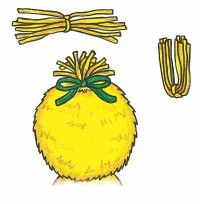
Make these cute Easter chicks once you've opened all your plastic eggs. They're so cute, you'll want to keep them around all year long!

Mr. Funny Bunny

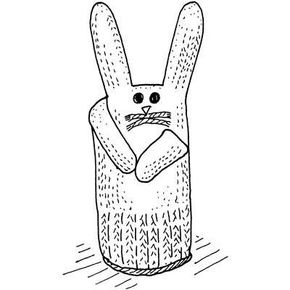
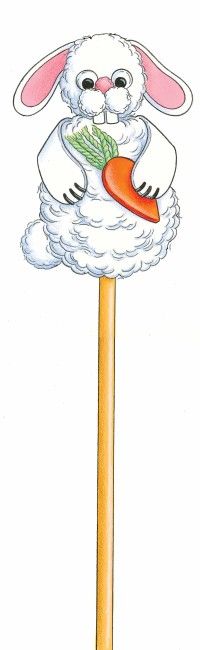
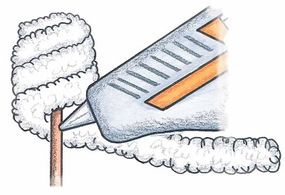
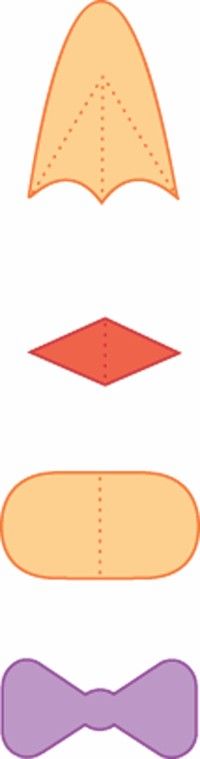
This Easter craft project combines sewing with other craft techniques to make a fun Easter toy.

Twig Easter Basket

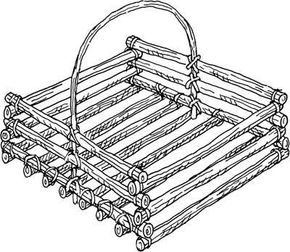
Send the kids outside to gather the twigs to make these pretty baskets for Easter.

Beautiful Bonnet

Stained Glass Easter Basket

Beautiful Button Quilt

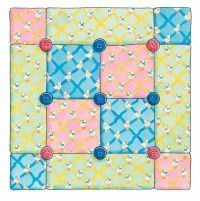
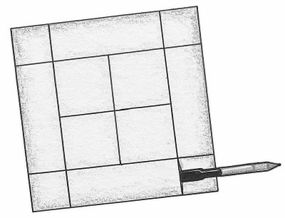
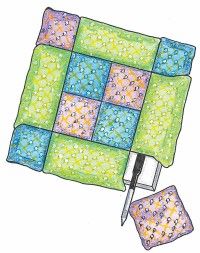
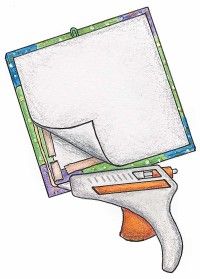
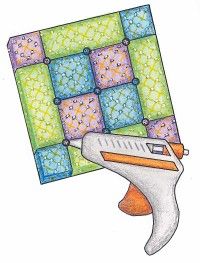
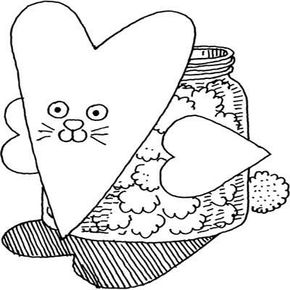
Make this pretty little quilt to cover an Easter bunny toy with or to hang on your wall in celebration of spring.

Bunny Plant Poke

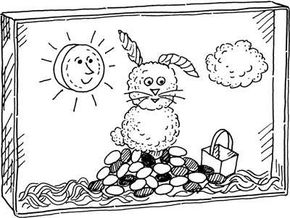
This decoration would make a great gift for any green thumb you know, and they might even keep it on display past the Easter season!

Egg Critter

Spring Bunny

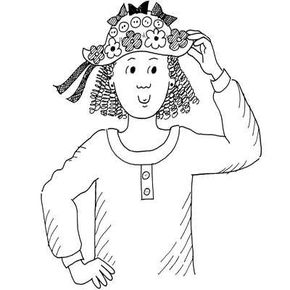
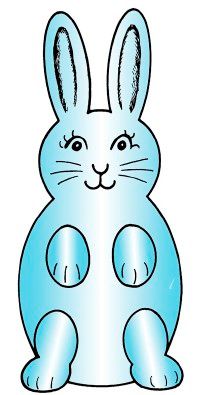
Here's another fun bunny your kids will like to make for Easter -- what kid doesn't like to make paper springs?

Doily Baskets

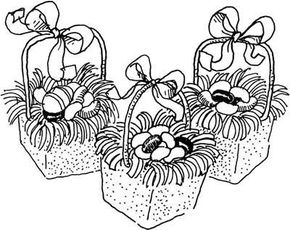
Make a batch of these baskets to decorate an elegant table for Easter dinner, or use them as a way to present special Easter treats.

Spring Place Mats

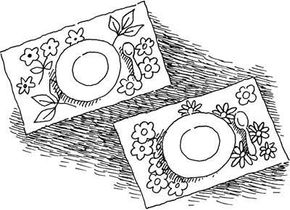
Bring the outdoors in and celebrate Easter with these pretty place mats using dried pressed spring flowers.

Mini-Easter Basket

Funny Bunny

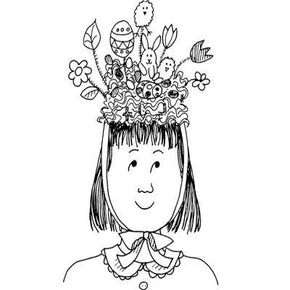
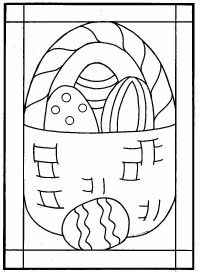
Here's an Easter craft project that is simple enough for most kids. Check out our easy instructions.

Bunny Easter Basket

Woven Basket

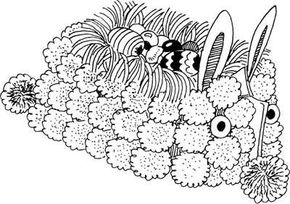
Have your older kids make these pretty baskets for the Easter holiday. They can decorate the dinner table with them, but they'll want to decorate their rooms with them afterwards.

Bunny Bag

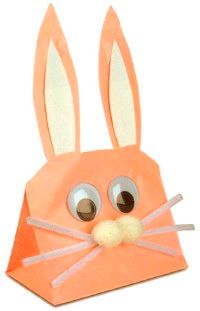
Put treats and other Easter surprised in this whimsical Easter bag.

Stained Glass Easter Basket

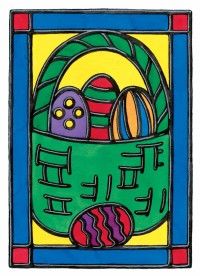
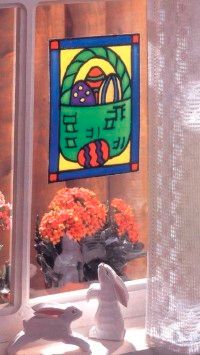
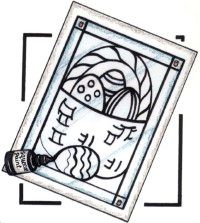
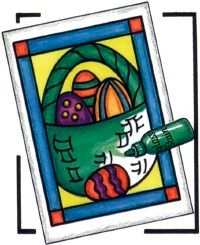
All the colors of spring appear in this gorgeous and easy-to-make stained glass project.

For more fun activities and crafts for kids, see:

Advertisement

Pebble and Sprout Garden

Have springtime right on your table with this Pebble and Sprout Garden Easter craft project!

What You'll Need

Beet and carrot tops

Advertisement

Knife

Pie plate

Pebbles

Water

Small plastic figurines

Ask an adult to cut the tops from the largest, fattest beets and carrots you can find. The tops should be at least 1 inch long. If there are any greens sprouting from them, cut these off, too.

Next, fill a pie plate with pebbles, leaving 1 inch of space at the top. If possible, use all white pebbles or alternate circles of white and dark pebbles for a pretty look. Place the carrot and beet tops on the pebbles with the cut sides down. Add water until it covers the bottom of the vegetables. Stand small plastic figurines in between the pebbles to make a funny springtime scene.

Put the arrangement in a place that gets good light but not direct sun. Check the water level each day to make sure the vegetables are always touching the water. In a week, you should see little green sprouts growing from the top of each carrot and beet. You may want to change the water and wash the pebbles after a few weeks. Your arrangement will last a little over a month.

To decorate for Easter, you can complement the Pebble and Sprout Garden with our fun Cracked Pictures. Learn how to make these on the next page of this article.

For more fun activities and crafts for kids, see:

Advertisement

Cracked Pictures

Make beautiful mosaics from Easter eggshells with our Cracked Pictures craft project!

What You'll Need

Leftover Easter eggshells

Advertisement

Colored markers

Construction paper

Glue

Wash and dry the shell bits. It is good if you have an assortment of shapes and sizes. A lot of the shells will still have their color, but if you use plain eggshells, paint them with colored markers.

Draw the simple outline of an animal, person, or some favorite object on a piece of construction paper. You might want to use a darkish piece of paper to contrast with your shells.

Glue the shells into the outline. Glue them close together so no paper shows through. When you have filled in the outline completely, let the glue dry. Color in the details, such as faces, with markers.

For a more active endeavor to celebrate Easter, play a game. Learn how to play Egg-streamly Silly Basketball on the next page.

For more fun activities and crafts for kids, see:

Advertisement

Egg-streamly Silly Basketball

Egg-streamly Silly Basketball Easter Craft

Egg-streamly Silly Basketball is a fun game to play with one or more friends on an Easter afternoon.

What You'll Need:

Rope

Advertisement

Large Easter basket

Tree

Plastic Easter grass

3 plastic Easter eggs for each player

Tie one end of the rope to the basket's handle. Tie the other end to a tree limb. Mark a line 3 to 6 feet from the basket. One player starts the basket swinging. The players then try to toss their eggs into the moving basket. Who can get the most eggs in?

When you have mastered the art of Egg-streamly Silly Basketball, challenge your friends to a game of "Egghead." Make a mark on the ground. Toss the plastic egg from your mark. If you make it in the swinging basket, your friends must make it from the same mark. If they miss, they have an E. Keep playing until someone spells "Egghead." For tie-breakers, try special shots, like over the shoulder or between the legs.

Kids will enjoy these games even more if they can get dressed up beforehand. Have them make the "Bonny" Bonnets on the next page and then wear them while they play.

For more fun activities and crafts for kids, see:

Advertisement

Bonny Bonnet

Bonny Bonnet Easter Craft

For a festive Easter craft project, make this "Bonny" Bonnet. When you wear it, everyone will want one of their own!

What You'll Need:

Empty berry basket

Advertisement

Ribbon

Easter grass

Jelly beans

Silk flowers

Tissue and construction paper

Chenille stems

Scissors

Glue

Markers

Pom-poms

Wiggle eyes

Feathers

It wouldn't be Easter without beautiful Easter hats. Make a special hat of your own -- it can be silly, pretty, or both.

An empty berry basket is the base of the hat. Turn it upside down, and tie ribbons at the bottom of 2 opposite sides. Glue Easter grass all over the

basket. Let it dry.

To decorate your hat, glue on jelly beans and silk flowers. You can also glue rabbit and egg cutouts to chenille stems and twist them around the basket in various places. The chenille stems will make your cutouts stand up out of the Easter grass.

Be creative and make your Easter bonnet full of surprises. Is that a yellow pom-pom chick hiding in the grass?

If you have jelly beans left over after making the "Bonny" Bonnets, you can use them to play the Jelly Bean Game. Learn how on the next page.

For more fun activities and crafts for kids, see:

Advertisement

Jelly Bean Game

Tired of hunting Easter eggs? Bitten the head off each and every chocolate bunny? Then it's time for ... the Jelly Bean Game!

What You'll Need:

3 foam egg cartons

Advertisement

Bottle cap

Tape

Red, yellow, and green jelly beans

2 plastic spoons

Wash and dry the egg cartons and the bottle cap. Cut the tops and flaps off the egg cartons. Tape the egg cartons together, side by side the long way. When finished, you should have egg cups that are 6 rows across and 6 rows deep. Put a jelly bean in each egg cup -- mix the colors randomly. Mark a starting line on the table with tape -- about 2 feet away.

Holding the bottom of the spoon with your right hand on the table (left, if you are left-handed), put the bottle cap into the bowl of the spoon and press down. Try to flip the bottle cap into an egg cup. If it lands in an egg cup, you get to keep the jelly bean from that cup. Red jelly beans are worth 10 points, yellow jelly beans are worth 5 points, and green jelly beans are worth 1 point.

When all the jelly beans have been won, count them up, and see who has the most points. If you eat the jelly beans before the game is over, you lose the points!

For another fun project with jelly beans, make a cute Bunny Box. Learn how on the next page.

For more fun activities and crafts for kids, see:

Advertisement

Bunny Box

Bunny Box Easter Craft

With this Easter-themed craft project, make a shadow Bunny Box with a cotton-ball bunny standing on a hill of jelly eggs.

What You'll Need:

Shallow box (such as a shoe box lid)

Advertisement

Paint

Paintbrush

Colored cellophane Easter grass

Glue

Jelly beans

Cotton balls

White tissues

2 wiggle eyes

Construction paper

Scissors

Jar lid

Self-stick picture hanger

Start with a shallow box such as a handkerchief or tie box, or the lid of a shoe box. Paint the outside of the box a pastel Easter shade. Let the paint dry. Paint the inside a pretty sky-blue color.

Glue a layer of cellophane grass along the bottom and sides of the box. Glue jelly beans inside the box to make a hill shape.

To make your Easter bunny stand on top of the hill, stack two cotton balls, add a tiny puff for the rabbit's cottontail, and glue them down. Twist tissues into 2 floppy ears, and glue them down as well. You can glue on tiny wiggle eyes, construction paper whiskers, nose, and mouth. You might want to give your Easter bunny a big smile or cut its mouth in an O shape, as if it were surprised.

Fold construction paper into a basket shape, glue on a strip for a handle, and place it at the bottom of the jelly bean hill, as if it had rolled down. Paint a jar lid to look like a bright, smiling sun, and glue it on. Press a self-stick hanger onto the back of your box, and hang it for all to see.

You can complement your Bunny Box with our cute Sleeping Chicks. Learn how to make them on the next page.

For more fun activities and crafts for kids, see:

Advertisement

Sleeping Chicks

Make a little cradle for a sleeping baby chick!

For a fun Easter craft project, make these cute little Sleeping Chicks and tuck them into their egg cradles.

What You'll Need:

Plastic eggs

Advertisement

Glue

Yellow poms

Wiggle eyes

Construction paper

Scissors

Scraps of cloth

You can use the plastic egg halves that held your Easter candy for lots of crafts. You can even turn a plastic egg into a tiny cradle!

Put a little dab of glue on the bottom of one half of a plastic egg, and set it inside the other half so that one is horizontal and one is vertical. This is your cradle and canopy.

Use yellow poms and wiggle eyes to create a cute baby chick.

Glue 2 wiggle eyes onto a yellow pom. Cut out a tiny orange construction paper beak, and glue this on the pom to make a baby chick. Glue on a little circle of fabric to make a baby cap, and set your little chick in its egg cradle. Use a small scrap of fabric or another piece of tissue as a baby blanket, and tuck your chickie in.

Baby having trouble getting to sleep? Gently rock its cradle! Don't stop with the Sleeping Chicks, though. Check out our Mr. Funny Bunny project on the next page.

For more fun activities and crafts for kids, see:

Advertisement

Mr. Funny Bunny

Mr. Funny Bunny Easter Craft

This Mr. Funny Bunny will stand up on your table or on the dresser by your bed. Try out this fun Easter craft project.

What You'll Need:

Old knit glove

Advertisement

2 small safety pins

Fiberfill

Felt

Scissors

Sand

Sealable plastic bag

Needle

Thread

Glue

Cotton ball

Yarn scraps

Fabric paint

Fold the middle finger of the glove over the back of the glove. Reach up inside the glove with a safety pin. Push the pin through the fabric from the inside and pin the finger to the back of the glove. Stuff the rest of the glove with fiberfill all the way to the cuff, so that the fiberfill holds the cuff open.

Cut a circle of felt just bigger than the hole in the cuff. Put 1/8 cup sand in the sealable bag, and push it into the glove under the fiberfill. Use the needle and thread to stitch the circle of felt onto the cuff.

Pull the thumb and the little finger forward until the tips touch to make the bunny's arms. Pin the bunny's hands together (from behind) with a safety pin.

Glue a cotton ball to the tip of the folded-down finger behind the bunny. Glue on yarn whiskers. Use fabric paint to draw the rest of the face.

You can make a basket for your Mr. Funny Bunny to sit in, or to keep your Easter eggs in. See the next page for instructions on making a Twig Easter Basket.

For more fun activities and crafts for kids, see:

Advertisement

Twig Easter Basket

Twig Easter Basket Easter Craft

Make an Easter basket strong enough to hold all the eggs you can find with this craft project!

What You'll Need:

Small green (not dry) branches

Advertisement

Small saw

Twine

Cool-temp glue gun

Gather some branches that are 1/4 to 1/2 inch thick. Cut eighteen 9-inch branch pieces, and 1 thin, bendable 18-inch piece.

Stack your sticks as if you were making a log cabin. Lay 2 branches parallel to each other, and then 2 branches across the ends of those. Using a piece of twine for each corner, wrap and tie the sticks at each corner as you go.

Make a stack of 3 sticks on each side. Slide the six remaining 9-inch sticks through the lowest space and across to form the bottom of the basket. Tie the sticks in place with twine, then glue them to keep them more firmly in place.

Bend the 18-inch branch into a U shape, and tie it to the basket for a handle. Use the glue gun to glue the handle in place.

Use the basket for an Easter egg hunt, or fill it with flowers and put it on your table for a centerpiece.

For another fun Easter craft project, try making a Beautiful Bonnet. Find instructions on the next page.

For more fun activities and crafts for kids, see:

Advertisement

Beautiful Bonnet

Beautiful Bonnet Easter Craft

Have you ever wished you could make your own Easter bonnet just the color and shape you wanted? You can with this unique craft project!

What You'll Need:

White paste

2 pieces of wallpaper or wrapping paper with a design

4 sheets of newspaper

Heavy scissors

A bowl the size of your head

Ribbons

Artificial flowers

Buttons

Find wallpaper or wrapping paper that is the color you want your bonnet to be. You will need 2 pieces about the size of half a sheet of newspaper.

Spread paste on the back of one piece of wallpaper. Press a piece of newspaper down on it, and smooth it with your hands. Repeat with each piece of newspaper. Paste the final piece of wallpaper down with the print side up.

While the paste is still wet, cut a big circle out of the paper. Press the center of the circle over the bowl, and shape it into a hat. Turn the brim up, and brace it while it dries. When your bonnet is dry, decorate it with ribbons, flowers, buttons, and bows.

For a nice Easter decoration for your house, try making a Stained Glass Easter Basket. Learn how on the next page.

For more fun activities and crafts for kids, see:

Stained Glass Easter Basket

The Stained Glass Easter Basket is beautiful and fun to make.

Here's an Easter basket you can use over and over -- and the Easter bunny never needs to refill it! Learn to make this fun holiday craft project.

What You'll Need

Tracing paper

Pencil

Masking tape

5x7 inches clear shrink plastic

Poster board or cardboard

Black dimensional paint

Paintbrush

Various colors glass stain

Print out and copy the pattern below onto tracing paper.

Use this pattern to copy on to tracing paper.

Roll 4 pieces of masking tape into loops with the sticky side out; place them on the 4 corners of the tracing paper without covering any of the pattern. Set the piece of shrink plastic on the pattern with the edges properly aligned, and press down firmly until the tape holds the plastic in place. Place the shrink plastic and pattern on the poster board to protect your work surface.

Beginning with the horizontal line at the top of the pattern and working your way down, carefully trace the pattern onto the shrink plastic with the dimensional paint. It is important that all the lines and corners are solid so the different areas of the pattern are separated. If the paint smears, use a damp paintbrush to wipe away the smear. Let dry.

Remove the pattern from the shrink plastic, and set the plastic back on the poster board. Figure out what color scheme you would like to use before you begin to stain the shrink plastic. To prepare the stain, gently tip the bottles back and forth without shaking them (this prevents bubbles from forming).

Apply 1 color of stain to 1 area of the shrink plastic, using the bottle nozzle to move the stain into the corners. Press any bubbles against the edge of a black paint line. Apply enough stain so it's bright in color but not so much that it runs over the dimensional paint lines. Repeat with the other colors to fill in the other areas. Let dry.

Apply to a window, and let the sun shine through your basket of colorful Easter eggs! For a cute Easter craft project to hang on the wall instead of the window, try our Beautiful Button Quilt. See the next page for instructions.

For more fun activities and crafts for kids, see:

Beautiful Button Quilt

Use pastel spring colors to make this pretty quilt as a fun craft project to celebrate Easter -- and the whole season!

What You'll Need:

7-1/2-inch square foam board, 1/2 inch thick

Ruler

Pencil

Craft knife

Fabric punch

Fabric: two 2-3/4-inch squares and two 3-inch squares blue print; two 2-3/4-inch squares and two 3-inch squares pink print; and four 3x5-inch pieces green print

Scissors

Masking tape

4-inch length matching satin ribbon, 1/8 inch wide

Low-temperature glue gun and glue sticks

7-1/4-inch square white poster board

9 matching buttons, 1/2 inch diameter

Measure and mark lines on the foam board with the pencil as shown. Ask an adult to score the lines about 1/8 inch deep with the craft knife. Then run the fabric punch along the scored lines to make them slightly larger.

Make lines on the foam board to lay the grid.

Set a 2-3/4-inch square of fabric on the foam board, centered over one of the inner squares made by the scored lines. Using the flat side of the fabric punch, carefully poke the fabric into the middle of each of the 4 scored lines of the square to hold the fabric in place. Continue pushing the fabric into the scored lines all the way around the square.

Use scissors to snip off any fabric edges that are too long to tuck in. Put the remaining fabric pieces into the foam board in the same way (see the illustration for placement). The outside edges of the 8 pieces of fabric on the sides of the foam board will be loose.

Places the fabric pieces on the foam board.

Working with the corner pieces first, carefully fold the loose edges of fabric around the back of the foam board and tape them securely. Fold the ribbon in half to form a loop, and glue the two ends to the back of the foam board for a hanger. Glue the poster board onto the back of the foam board so the fabric edges are covered.

Glue the poster board on to the foam board.

Glue the buttons onto the front of the foam board as shown.

Glue the buttons on the front of the foam board.

Give this beautiful quilt to your mom as a Mother's Day gift, or hang it on the wall as an Easter decoration. Another Easter decoration you can make as a craft project is our Bunny Plant Poke. Check out the instructions and illustrations on the next page.

For more fun activities and crafts for kids, see:

Bunny Plant Poke

Create this adorable Bunny Plant Poke.

This cute Easter bunny will be right at home among your potted plants. Make this easy craft project for the holiday.

What You'll Need:

18-inch wood dowel, 5mm

White jumbo loopy chenille stem

Ruler

Poms: 1 white, 2 inches; 2 white,

1/2 inch each; 1 pink, 1/4 inch; 1 white,

1 inch

Low-temperature glue gun and glue sticks

Pencil

Tracing paper

Scissors

Felt: 3-1/2x5 inches white, 2x2 inches pink

2 wiggle eyes, 10mm each

Tweezers

Black dimensional paint

Small wood teardrop cutout

Paintbrush

Orange acrylic paint

9 inches green yarn

Download the Bunny Poke Plant Patterns in PDF format, and print them out for use as described below.

Spiral-wrap the white chenille stem around 3 inches of one end of the dowel, spot-gluing every inch.

For the bunny's head, glue the 2-inch white pom on top of the chenille stem. To make the cheeks, glue two 1/2-inch white poms side by side toward the bottom of

the head.

Trace the teeth from the pattern, and cut them from the white felt; glue just under the cheeks. For the nose, glue the pink pom to the top middle of the cheeks. Use tweezers to glue 2 wiggle eyes above the cheeks.

Wrap and glue the chenille stem.

Using the pattern, trace and cut out 2 white felt ears, 2 pink felt inner ears, and 2 white felt paws. Glue the inner ears to the white ears; glue to the top of the bunny's head. Glue the 1-inch white pom to the bottom left side of the body for the tail. Make toe lines on the bunny's paws with black dimensional paint. Let dry. Glue the paws to the bunny's sides, attaching the points at the neck.

Paint the wood teardrop orange; let dry. Cut the green yarn into three 3-inch lengths. For the carrot top, align the ends of two lengths of green yarn and tie the third length around the middle of them. Fold up all the ends and glue the knotted end to the back top of the carrot. Glue the carrot in the bunny's left paw.

Insert the dowel into a potted plant for a very bunny Easter decoration! See the next page for instructions to make an Egg Critter to keep the Bunny Plant Poke company.

For more fun activities and crafts for kids, see:

Egg Critter

Make an Egg Critter with these colorful parts.

This little egg ­critter will liven up your Easter.

­

Note: Adult help needed

What You'll Need:

Tracing paper

Pencil

Scissors

2x3 inches white poster board

Felt: 2x4 inches orange, 3/4x1-1/4 inches red, 1x2 inches purple

Low-temperature glue gun and glue sticks

Orange dimensional paint

2-inch yellow plastic egg

2-inch yellow pom

Yarn: 14 inches yellow, 12 inches green

Ruler

Tweezers

2 wiggle eyes, 10mm each

Craft feathers (assorted colors): three 4 inches long, two 2 inches long

Print out, trace and cut out the patterns shown on this page.

Make 2 feet out of poster board and 2 out of orange felt using the pattern. Glue 1 felt foot to 1 poster board foot. Squeeze orange dimensional paint lines on the felt foot according to the pattern; let dry. Repeat for the other foot.

Position the feet (felt side up) about 1/4 inch apart on your work surface. Glue the yellow plastic egg (rounded side) to the feet.

To make the egg critter's head, glue the yellow pom to the top of the egg.

For hair, cut five 2-inch lengths of yellow yarn, and align the ends. Wrap the remaining 4-inch length of yellow yarn around the middle of the 2-inch lengths; tie a knot. Fold this piece in half; trim the ends to make them even.

Glue the knotted end to the top center of the head. Wrap the middle of the length of green yarn around the bottom of the yarn hairs and tie a bow. Trim the tails.

Make the feathers and a bow for the head.

Using the patterns on this page, trace and cut out the beak from orange felt and the tongue from red felt. Glue the tongue to the inside center of the beak, and fold the beak across the middle as shown on the patterns. Glue the outside of the fold near the bottom of the head.

Use tweezers to glue 2 wiggle eyes to the head, just touching the sides of the beak.

Carefully place the eyes on the face.

Use the pattern on this page to trace and cut a bow tie from purple felt, and glue it to the egg critter just under the beak.

For the tail feathers, glue 4-inch feathers to the lower back of the egg. Glue the 2-inch feathers to the sides of the body for wings.

Now your Egg Critter is ready for fun! For another fun Easter critter, see the craft project on the next page -- our Spring Bunny!

For more fun activities and crafts for kids, see:

Spring Bunny

This adorable bunny is sure to delight children.

Make a funny bunny with paper springs, and watch it wiggle, wave, and hop to life.

What You'll Need:

Construction paper

Ruler

Blunt scissors

Transparent tape

Markers

Craft glue

Cotton ball or white pom-pom

Cut two 1×8-inch strips of construction paper. Tape one end of each strip together into an L-shape. Fold the bottom strip back over the top strip. Fold the other strip back over the last strip. Continue folding the strips back and forth to make a spring. When you get to the end of the strips, tape the ends together to hold them in place. Make 3 more springs.

Draw a bunny shape on a piece of construction paper. Draw in the bunny's features. Glue each spring to the bunny's body for arms and legs. Draw 2 paws and 2 feet on a piece of construction paper and cut them out. Glue the paws and feet to the spring ends. Glue a cotton ball or pom-pom to the back of the bunny for the tail. Place your spring bunny in an Easter basket, or hang it on the wall.

See the next page for another Easter craft project that kids will enjoy -- our Doily Baskets!

For more fun activities and crafts for kids, see:

Doily Baskets

You can use these delicate baskets to hold Easter candy or a special Easter gift. Kids can do this fun Easter craft project too.

What You'll Need:

Square or rectangular doilies

Transparent tape

Construction paper

Blunt scissors

Craft glue

Green plastic grass

Fold in the 4 sides of a doily. Stand the sides up, pinching the corners in as you unfold the sides. Hold the pinched corners in place with tape.

Cut a strip of construction paper to make a handle for the doily basket. Cut and glue pieces of doily lace to the handle. Tape the ends of the handle to the inside of the basket.

Fill your basket with some green "grass" and holiday goodies. These lacy baskets also make great party favors. Make one for each guest and fill it with treats.

The Doily Baskets would look pretty on a table with our Spring Place Mats. Learn about these on the next page.

For more fun activities and crafts for kids, see:

Spring Place Mats

Spring Place Mats Easter Craft

These Spring Place Mats make great gifts for grandparents and people in

nursing homes, or use them yourself at mealtime. This craft project is great for Easter time.

Note: Adult help needed

What You'll Need:

Dried, pressed spring flowers, including stems and leaves

Clear vinyl adhesive paper

Yardstick

Scissors

If you can't find dried flowers at your local craft store, dry your own! Place spring flowers between 2 pieces of white paper, and put the paper inside the pages of a thick book for a few weeks. When the flowers are completely dried, use them for this project.

For each place mat, measure and cut 2 pieces of clear vinyl adhesive paper into rectangles that are approximately 12x18 inches. Peel the backing off 1 piece of paper, and lay it sticky side up on the table. Place the dried flowers on the sticky side of the paper. Press everything flat with your fingers. Some flowers will work better if you remove the petals and use the petals individually.

Peel the backing off the second piece of adhesive paper. Carefully place it sticky side down over your arrangement. Don't worry about lining up the edges exactly. (TIP: Have an adult help with the contact paper. You can each hold 2 corners, and it will be easier to place without causing wrinkles.) Press everything down as flat as possible, and your place mat will look beautiful. Trim the edges with scissors.

Set your Easter dinner table with these placemats as a pretty and functional decoration. Then add the Mini-Easter Baskets described on the next page.

For more fun activities and crafts for kids, see:

Mini-Easter Baskets

Mini-Easter Baskets Easter Craft

These mini-Easter baskets are a holiday craft so simple, you'll want to make plenty to use as table decorations and to give to your friends.

Note: Adult Help Needed

What You'll Need:

Cardboard egg cartons

Scissors

Pencil

Ribbon or chenille stems

Paints and paintbrushes (optional)

Easter grass (or shredded green construction paper)

Easter candy

Separate the individual egg buckets of an egg carton with scissors; an adult may need to help you do this. Use a sharp pencil point to poke a hole on 2 opposite sides of each bucket.

Cut a piece of ribbon, and tie each end through a hole to create a handle for the basket. Instead of ribbon, you could use chenille stems for the handle; attach each end of the stem to a side of the basket. Add a bow to the top of the handle. Paint the baskets, if you'd like. Fill the basket with Easter grass and Easter goodies.

Have your kids make mini Easter bunnies to go with these Mini-Easter Baskets. See the instructions for Funny Bunnies on the next page.

For more fun activities and crafts for kids, see:

Funny Bunny

Funny Bunny Easter Craft

Turn a baby food jar into a "Funny Bunny" with this fun Easter craft idea!

What You'll Need:

Baby food jar

Cotton balls

Construction paper

Scissors

Markers (optional)

Glue

Fill a baby food jar with cotton balls. Cut out a large heart that is a little taller and wider than the front of the jar. You can draw a face on this heart, if you'd like. Cut out a medium heart that is about 1 inch larger than the base of the jar. Cut out 2 small hearts that are about the size of a penny.

Glue the large heart to the front of the jar. The top of the heart should extend beyond the top of the jar and look like ears. Glue the medium heart to the base of the jar so the top of the heart extends beyond the front of the jar. The top of the heart that sticks out from the base will look like feet. Glue small hearts on the sides of the jar for hands. Glue a cotton ball to the back of the jar for a tail.

If your kids enjoy this project, they'll probably love the one on the next page -- a Bunny Easter Basket!

For more fun activities and crafts for kids, see:

Bunny Easter Basket

Bunny Easter Basket Easter Craft

This cute Bunny Easter Basket looks just like the Easter Bunny!

What You'll Need:

1 pint milk carton

Scissors

White and pink cotton balls

Craft glue

Construction paper

Easter grass

Easter goodies

Open the spout of an empty, clean pint milk carton. Lay the carton on a table with the spout side on the table. Cut out the side that is now on the top of the carton. You now have a rectangular hole.

Glue white cotton balls all over the remaining milk carton; be sure to cover it completely. The opened spout of the milk carton is the nose of the rabbit. Place a pink cotton ball on the spout for the nose and add a pink one in the back for a tail.

Cut out 2 paper eyes, and glue them just above the spout. Cut out 2 long ears, and glue them on either side of the carton -- your rabbit can be a flop-earred bunny with ears that hang down or the ears can stand up.

Place Easter grass in the hole, and fill the bunny with goodies.

For another fun Easter craft project, make our Woven Basket, using the instructions on the next page.For more fun activities and crafts for kids, see:

Woven Basket

Give your kids a chance to try weaving with this easy Woven Basket craft project. Then let them dress it up and fill it to celebrate Easter!

What You'll Need:

Masking tape

17 tan chenille stems, 6mm each

Scissors

8 light brown chenille stems, 6mm each

Craft foam

Pencil

Glue

1 pink chenille stem, 6mm

Place a piece of masking tape sticky side up on your work area. Stick 12 tan chenille stems side by side so 1 inch of each is stuck to the tape. Turn the tape upside down and stick it to your work surface, holding the chenille stems in place.

Cut 6 light brown chenille stems into thirds (each piece will be 4 inches long).

To weave the 4-inch brown stems into the tan stems, start on the right side of the tan stems. Place the end of the first brown stem under the first tan stem. Push the brown stem through so the end goes over the second tan stem, under the third, over the fourth, and so on through all 12 tan chenille stems. The brown stem will extend about 1/2 inch beyond the tan stems on both sides. Gently slide the woven brown stem up to the tape.

For the second row, again start on the right of the tan stems. This time, place the end of a brown stem on top of the first tan stem, and weave it under the second, over the third, and so on. Gently slide it up to the first brown stem. Continue weaving in this manner until all 18 brown stem pieces are in place. Fold both ends of all the brown stems under, securing them in place.

Loosely fold the ends of the tan stems opposite the tape. (Do not press down yet.) Remove the tape. Place a tan chenille stem where the tape was, and fold the ends of the 12 tan stems over it, holding it in place. The long tan stem should extend 1 inch beyond the weaving on 1 side and 5 or 6 inches on the other side.

Fold the long end of the tan chenille stem over so it meets itself.

Bend the ends of the woven piece to meet each other, forming the basket. (The folded ends should be on the inside.) Slip the folded chenille stem under the loosely bent ends, and press the ends firmly down over the tan stem.

Make sure the edges of the basket align. Twist the ends of the tan stem together, and fold the ends to the inside of the basket.

Trace around the bottom of the basket on craft foam. Cut out this circle just inside the line, and glue it to the bottom of the basket. Set this aside.

With the remaining 6 chenille stems, make 2 braids, using 2 tan and 1 brown chenille stem for each braid. Glue the first braid around the top edge of the basket, and glue the ends of the other braid onto opposite sides of the top edge of the basket, looping it across to form the basket's handle.

Bend the pink stem into the shape of a bow, and tie or glue it to the handle.

You'll be feeling very bunny when you carry the bag you learn about next.

For more fun activities and crafts for kids, see:

Bunny Bag

Fill this Bunny Bag with treats galore!

Celebrate spring by filling a bunny bag with special treats for a special person.

What You'll Need:

Small pink paper bag

White paper

2 white poms, 1-inch

3 white chenille stems

2 wiggle eyes, 35mm

Small treats and candy

Tools:

Pencil

Scissors

Craft glue

Lay the bag flat on your work surface. Sketch an outline of the top of a bunny's head, including ears. Cut it out, cutting through both layers of the bag.

Draw the center of the ears on white paper. Cut out, and glue in place.

Glue the poms side-by-side in the middle of the face. Cut each chenille stem in half, and tuck three pieces under each pom to form whiskers. Glue in place. Glue the wiggle eyes above the nose, and let dry.

Fill the bag with small treats. Glue it closed along the top of the head and ears.

Keep reading to learn how to brighten your home with Easter-themed stained glass.

For more fun activities and crafts for kids, see:

Stained Glass Easter Basket

Stained Glass Easter Basket

This colorful stained glass Easter basket will brighten up the holiday.

What You'll Need:

5×7-inch piece of clear shrink plastic

8×10-inch piece of cardboard

Black dimensional squeeze paint

Glass stain: red, green, blue, yellow, purple, orange

Trace the pattern you can download here onto a 5×7-inch piece of typing paper. Roll four 1-1/2-inch lengths of masking tape into loops with the sticky side out, and place them on the four corners of the typing paper; do not cover any of the pattern with the tape.

Set the piece of shrink plastic on the pattern with the edges properly aligned and press down firmly until the tape holds the shrink plastic in place. Place it on the cardboard on a flat surface.

Beginning with the horizontal line at the top of the pattern and working your way down, carefully trace the pattern onto the shrink plastic with the squeeze paint. It is important that all the fines and corners are solid so the different areas of the pattern are separated. If the paint smears, use a damp paint brush to wipe away the smear. Let dry.

Trace the pattern onto the shrink plastic.

Remove the pattern from the shrink plastic, and set the shrink plastic on the cardboard. Figure out what color scheme you would like to use before you begin to stain the shrink plastic. To prepare the stain, tip the bottles back and forth gently without shaking (this prevents bubbles from forming.) Squeeze stain from the bottle onto one area of the shrink plastic, using the bottle nozzle to move stain into the corners.

Stain the shrink plastic carefully.

Push any bubbles that do form over to a squeeze paint line and press the bubbles against the edge. Apply enough stain so that it's bright in color, but not so much that it runs over the squeeze paint lines. Stain the remaining areas in the same way. Let dry.

For more fun activities and crafts for kids, see:

ABOUT THE AUTHORS:

The following crafts were designed by Lisa Lerner and Kersten Hamilton:Pebble and Sprout GardenCracked PicturesEgg-streamly Silly Basketball"Bonny" BonnetsJelly Bean GameBunny BoxSleeping ChicksMr. Funny BunnyTwig Easter BasketBeautiful Bonnet

Advertisement

Loading...