Free Knitting Patterns for Beginners
When you first start out knitting, you may not be ready for elaborate Aran sweaters or other technically demanding projects. You may not even want to take on long, time-consuming projects. That's why we have assembled some easy-to-make project patterns that will help you learn and perfect some of the basic techniques. And maybe one day, you'll be able to knit that sweater without even giving it a second thought.
Pot holders are usually a
favorite with knitting novices.
See more pictures of
knitting patterns.
Free Herringbone Belt Knitting Pattern
You choose the colors, and you choose how to wear it.
Free Cell Phone Cozy Knitting Pattern
Don't want scratches all over your new cell phone? Knit it a cozy.
Free Eyeglass Case Knitting Pattern
This hardy case will keep your glasses safe.
Free Striped Wine Sack Knitting Pattern
A great way to wrap up a gift for your favorite wine lover.
Free Lace Hand Towel Knitting Pattern
The prettiest hand towels are not the hardest to knit.
Free Designer Dishtowel Knitting Pattern
So easy to knit that you'll soon have enough to give away.
Free Americana Pot Holder Knitting Pattern
These pot holders are worthy of any chef's kitchen!
Free Padded Hanger and Sachet Knitting Pattern
Tired of old hangers? Give them a makeover with this easy project.
Free Checkered Pot Holder Knitting Pattern
Can't get enough of the pot holders? Here's another great pattern.
Free Zigzag Throw Knitting Pattern
This chenille throw is so cozy that you won't want to give it away.
Free Felted Christmas Stocking Knitting Pattern
Get in the spirit of Christmas and make one for someone special -- or make enough for the entire family.
Are you ready to start knitting? Click on the next page and learn how to knit a herringbone belt.
For more helpful knitting tips and interesting patterns, try:
- Free Knitting Patterns
- Free Baby Knitting Patterns
- Free Clothing Knitting Patterns
- Free Knitting Patterns for the Home
- Free Accessory Knitting Patterns
- Free and Easy Knitting Patterns
- How to Knit
- Knitting Instructions
- Easy Baby Knitting Patterns
- Free Baby Toys Knitting Patterns
- Free Baby Sweaters Knitting Patterns
- Free Knitting Patterns for Baby Blankets
- Free Baby Bootie Knitting Patterns
- Free Socks Knitting Patterns
- Free Mitten Knitting Patterns
- Free Hat Knitting Patterns
- Free Scarf Knitting Patterns
- Free Pillow Knitting Patterns
- Free Purse Knitting Patterns
Free Herringbone Belt Knitting Pattern
This
stylish belt is simple to knit, with a combination of knits, purls, and slipped
stitches that, combined with the suedelike yarn, creates an interesting
texture. Close the belt by knotting the long fringes together around your
waist.
A belt is always a great accessory,
so why not knit your own?
Size
Width: 1.75 inches
(4.4cm)
Length: 34 inches (86.5cm), not including fringe
What
You'll Need
Yarn: Worsted
weight yarn, about 120 yards (110m)
We used: Berroco Suede Tri-Color (100% nylon; 120 yards [111m] per 50g ball): #3797 Django, 1 ball
Needles: US size 8 (5mm)
Notions: Size H/8 (5mm) crochet hook; tapestry needle
Gauge
24
stitches and 55 rows=4" (10cm) in pattern
Note: All stitches are slipped purlwise.
Making the Belt
With
crochet hook and tapestry needle, cast on 204 stitches using the crochet chain
cast-on method.
Row
1 (right side): Slip 1 with yarn in front, with yarn in back knit 2, *slip 2
with yarn in front, with yarn in back knit 2; repeat from * until 1 stitch
remains, knit 1.
Row
2: Slip 1 with yarn in front, purl 1, *slip 2 with yarn in back, with yarn in
front purl 2; repeat from * until 2 stitches remain, purl 1, with yarn in back
knit 1.
Row
3: Slip 3 with yarn in front, *with yarn in back knit 2, slip 2 with yarn in
front; repeat from * until 1 stitch remains, with yarn in back knit 1.
Row
4: Slip 1 with yarn in front, purl 3, *slip 2 with yarn in back, purl 2; repeat
from * until 4 stitches remain, slip 2 with yarn in back, with yarn in front
purl 1, knit 1.
Rows
5-12: Repeat rows 1-4 twice.
Row
13: Slip 3 with yarn in front, *with yarn in back knit 2, slip 2 with yarn in
front; repeat from * until 1 stitch remains, with yarn in back knit 1.
Row
14: Slip 1 with yarn in front, purl 1, *slip 2 with yarn in back, with yarn in
front purl 2; repeat from * until 2 stitches remain, purl 1, with yarn in back
knit 1.
Row
15: Slip 1 with yarn in front, with yarn in back knit 2, *slip 2 with yarn in
front, with yarn in back knit 2; repeat from * until 1 stitch remains, knit 1.
Row
16: Slip 1 with yarn in front, purl 3, *slip 2 with yarn in back, with yarn in
front purl 2; repeat from * until 4 stitches remain, slip 2 with yarn in back,
with yarn in front purl 1, with yarn in back knit 1.
Rows
17-20: Repeat rows 13-16.
Rows
21-23: Repeat rows 13-15.
Bind off while working row 16.
Weave in loose ends.
Make
the Fringe
Make
14 fringes as follows: Cut fourteen 24" (61cm) strands of yarn. Place belt
flat on table with right side facing. Beginning at one of the short edges,
*insert crochet hook from back to front into the edge of the belt. Fold one
strand in half and hold cut ends together to create a loop. Place loop on hook
and pull it halfway through the knitted piece. With hook still in place, pull
cut ends of fringe through the loop to make knot. Pull fringe ends to tighten.
Repeat from * 6 more times, spacing fringe evenly along belt's edge. Repeat
fringing at opposite end of belt. Trim all fringes to 11" (28cm) in
length.
For more helpful knitting tips and interesting patterns, try:
- Free Knitting Patterns
- Free Baby Knitting Patterns
- Free Clothing Knitting Patterns
- Free Knitting Patterns for the Home
- Free Accessory Knitting Patterns
- Free and Easy Knitting Patterns
- How to Knit
- Knitting Instructions
- Easy Baby Knitting Patterns
- Free Baby Toys Knitting Patterns
- Free Baby Sweaters Knitting Patterns
- Free Knitting Patterns for Baby Blankets
- Free Baby Bootie Knitting Patterns
- Free Socks Knitting Patterns
- Free Mitten Knitting Patterns
- Free Hat Knitting Patterns
- Free Scarf Knitting Patterns
- Free Pillow Knitting Patterns
- Free Purse Knitting Patterns
Free Cell Phone Cozy Knitting Pattern
Keep
your cell phone in good shape while giving it a unique look with these knitted
cozies. We've included patterns for two popular cell phone models -- a flip phone
and one with a
display window.
Making a cell phone cozy will keep
your phone safe and secure.
Backstitch
Binding off -- BO
Casting on -- CO
Knit 2 together -- k2tog
Mattress stitch
Stockinette stitch -- St st
Weaving in yarn tails
Size
Blue
cozy: 21/2x3 inches (6.5x7.5cm)
Pink
cozy: 23/4x33/4 inches (7x9.5 cm)
14 stitches=4" (10cm)
What You'll Need
Yarn: 30 yards (27m) boucle yarn for each cozy
We used: The Plymouth Italian Collection Firenze Boucle (30% wool, 30% acrylic, 40% nylon): #442 pink, 1 skein (for pink cozy); #418 blue, 1 skein (for blue cozy)
Needles: US size 7 (41/2mm)
Notions: Tapestry needle; 5/8" (1.5cm) button (for blue cozy); long sewing pins with large colored heads; sewing needle and thread to match; 2 stitch holders; 1/2" (1.3cm) snap (for pink cozy)
Note: Because different models of cell phones have different measurements, adjust the stitch counts accordingly. Use your gauge as a guide.
Making the Blue CozyCast on 8 stitches. Work in stockinette stitch for 7" (18cm).
End
with knit row.
Shape
the Flap
Row
1: Bind off 1 stitch (space for antenna), purl to end. (7 stitches)
Row
2: Knit.
Rows
3, 5, 7, and 9: Purl.
Row
4: Knit 4, knit 2 together, knit 1. (6 stitches)
Row
6: Knit 3, knit 2 together, knit 1. (5 stitches)
Row
8: Knit 2, knit 2 together, knit 1. (4 stitches)
Row
10: Knit 1, knit 2 together, knit 1. (3 stitches)
Bind off all stitches.
Make Buttonhole Loop: Cut yarn about 18" (46cm) from last stitch; thread on tapestry needle. Insert needle into beginning stitch of bind-off row and carry the yarn to end stitch of bind-off row (other side of flap), leaving a big-enough loop for button to fit through. Wrap yarn around loop several times to strengthen, and secure yarn by backstitching several times on wrong side of work.
Finishing the Blue Cozy
Fold
piece in half with right sides together to form the cell phone pocket (don't
include the flap). Pin side edges together. With sewing needle and matching
thread, whipstitch side seams closed. Remove pins.
Make the Handle: Cut length of yarn about 36" (90cm) long. Thread tapestry needle and secure 1 end of yarn on inside of side seam, under the top edge. Insert needle through side seam on opposite side, under the top edge, leaving a loop about 13" (33cm) long. Wrap yarn around loop several times to make a stronger handle, then return needle to first seam and secure end by weaving through side seam on wrong side of work. Turn piece to right side.
Attach
the Button: Fold flap over top edge of pocket, and match loop with the place to
attach button. With sewing needle and thread, stitch button in place. Weave in
ends to wrong side of work; secure firmly.
Making the Pink Cozy
Cast
on 11 stitches. Work in stockinette stitch for 71/2" (19cm). End with purl row.
Make
the Display Window: Knit 3 stitches, bind off 5 stitches, knit to end. (3
stitches on each side of bind-off). Place first set of stitches on holder. Work
stockinette stitch over remaining 3 stitches for 1" (2.5cm); end with purl row.
Cut yarn, leaving 6" (15cm) tail to secure later. Place stitches on second
holder. Slip stitches from first holder onto needle. With wrong side facing,
rejoin yarn at beginning of bound-off stitches. Purl 3 stitches. Work even in
stockinette stitch for 1" (2.5cm).
Next
row: Knit. At end of row, cast on 5 stitches using either knitted cast-on or
cable cast-on. Knit stitches from second holder (11 stitches). Work in
stockinette stitch for 1" (2.5cm). End with purl row.
Make
the Strap
Next
row: (right side) Bind off 3 stitches, knit to end of row. (8 stitches)
Next
row: (wrong side) Bind off 4 stitches, purl to end of row. (4 stitches)
Continue working strap on 4 stitches for a total of 5" (12.5cm). Bind off all stitches.
Finishing the Pink Cozy
With
right sides together, fold cozy in half (don't include strap). Pin side edges
together. With sewing needle and thread, whipstitch side seams together. Remove
all pins. Turn piece to right side. Sew 1 side of snap on wrong side of strap,
about 1/2" (1.3cm) from end. Fold strap in half and, on back side of cozy, mark
where to attach other half of snap. Sew snap in place. Weave all yarn ends to
wrong side, and secure.
Now that you have you cell phone all secure and good-looking, why not try the next pattern for an eyeglass case?
For more helpful knitting tips and interesting patterns, try:
- Free Knitting Patterns
- Free Baby Knitting Patterns
- Free Clothing Knitting Patterns
- Free Knitting Patterns for the Home
- Free Accessory Knitting Patterns
- Free and Easy Knitting Patterns
- How to Knit
- Knitting Instructions
- Easy Baby Knitting Patterns
- Free Baby Toys Knitting Patterns
- Free Baby Sweaters Knitting Patterns
- Free Knitting Patterns for Baby Blankets
- Free Baby Bootie Knitting Patterns
- Free Socks Knitting Patterns
- Free Mitten Knitting Patterns
- Free Hat Knitting Patterns
- Free Scarf Knitting Patterns
- Free Pillow Knitting Patterns
- Free Purse Knitting Patterns
Free Eyeglass Case Knitting Pattern
Eyeglasses
will be well protected in this densely knit case. Choose a multicolor yarn to
display the subtle texture of linen stitch. The whole case is worked as one
piece, which
makes it a perfect project for a beginner.
Bright stripes will help make sure
that you can always find your new
eyeglass case.
Techniques
Binding
off -- BO
Cable
cast-on
Casting
on -- CO
Knitted
cast-on
Mattress
stitch
Slip
stitch purlwise
Size
31/2x71/2 inches
(9x19cm)
26 stitches/40 rows=4" (10cm) in pattern
What You'll Need
Yarn: 100 yards heavy worsted weight cotton
We used: Plymouth Fantasy Naturale (100% cotton): #9709 multicolor in blues, greens, and purple, 1 skein
Needles: US size 8 (5mm)
Notions: 7/8" (2.2cm) button; scissors; tapestry needle; sewing needle and thread to match (if buttonholes are too small to use yarn)
Making the CaseCast on 49 stitches.
Row
1: (right side) Knit 1, *bring yarn to front of work (as if to purl), slip next
stitch purlwise, take yarn to back of work, knit 1**; repeat from * to ** to
end of row.
Row
2: (wrong side) Purl 2, *take yarn to back, slip 1 purlwise, bring yarn
forward, purl 1**; repeat from * to ** to last stitch, end with purl 1.
Repeat
rows 1 and 2 for pattern. Work pattern until piece measures 71/2" (19cm) in
length, ending with wrong-side row.
Next
row: (right side) Bind off 26 stitches at beginning of row, work remaining
stitches in pattern. (23 stitches)
Next
row: (wrong side) Bind off first 2 stitches, work remaining stitches in
pattern. (21 stitches)
Make Flap: Work in pattern on remaining 21 stitches for 13/4" (4.5cm). End with wrong-side row.
Make Buttonhole: Work 8 stitches in pattern, bind off center 5 stitches for
buttonhole, work remaining stitches in pattern.
Next
row: (wrong side) Work in pattern up to bound-off stitches, cast on 5 stitches
using knitted cast-on or cable cast-on. Finish row in pattern. Work even in
established pattern for 3/4" (2cm) more from buttonhole; bind off all stitches.
Finishing the Case
Fold
piece in half lengthwise, leaving flap free. With tapestry needle and
yarn, sew together bottom and side seams using mattress stitch. Fold
flap over opening; sew button in place. Weave yarn ends to wrong
side and secure.
Now you may be ready for a slightly bigger project. On the next page, you'll find a great pattern for a knitted wine sack.
For more helpful knitting tips and interesting patterns, try:
- Free Knitting Patterns
- Free Baby Knitting Patterns
- Free Clothing Knitting Patterns
- Free Knitting Patterns for the Home
- Free Accessory Knitting Patterns
- Free and Easy Knitting Patterns
- How to Knit
- Knitting Instructions
- Easy Baby Knitting Patterns
- Free Baby Toys Knitting Patterns
- Free Baby Sweaters Knitting Patterns
- Free Knitting Patterns for Baby Blankets
- Free Baby Bootie Knitting Patterns
- Free Socks Knitting Patterns
- Free Mitten Knitting Patterns
- Free Hat Knitting Patterns
- Free Scarf Knitting Patterns
- Free Pillow Knitting Patterns
- Free Purse Knitting Patterns
Free Striped Wine Sack Knitting Pattern
A
bottle of wine makes a nice gift, but presenting it in a one-of-a-kind
hand-knit, felted wine sack makes a nice gift unforgettable.
Make sure that your gift of wine is
remembered with this wine sack.
Length: Approximately 131/2 inches (34.5cm)
Circumference: Approximately 10 inches (25.5cm)
Tie length: Approximately 50 inches (127cm)
What You'll Need
Yarn: 100% wool worsted weight yarn, about 175 yards (160m)
We used: Noro Kureyon (100% wool; 109 yards per 50g ball): color #154, 2 balls
Needles: size 8 (5mm) double-pointed, set of 4
Notions: Open-ring stitch marker; tapestry needle; size I/9 (5mm) crochet hook
Gauge
15
stitches=4" (10cm) in circular stockinette stitch (knit all rounds)
Note: Superwash wool and synthetics will not felt; do not use for felting projects.
Making the Sack
Loosely
cast 42 stitches onto one double-point needle, then divide stitches equally
onto 3 needles (14 stitches on each). Join into circle, being careful not to
twist stitches. Place open-ring stitch marker in first stitch to denote
beginning of round, and move marker upward every few rounds.
Round
1 (wrong side): Knit.
Round
2 (right side): Purl.
Round
3: Knit.
Round
4: Purl.
Round
5: Knit.
Change to circular stockinette stitch (knit all rounds) until piece measures 17" (43cm).
Purl the next round (on right side of work).
Decrease Rounds
Round
1: (Knit 5, knit 2 together) to end of round. (36 stitches)
Rounds
2, 4, 6, 8, and 10: Knit.
Round
3: (Knit 4, knit 2 together) to end of round. (30 stitches)
Round
5: (Knit 3, knit 2 together) to end of round. (24 stitches)
Round
7: (Knit 2, knit 2 together) to end of round. (18 stitches)
Round
9: (Knit 1, knit 2 together) to end of round. (12 stitches)
Round
11: (Knit 2 together) to end of round. (6 stitches)
Round
12: Knit. Remove marker.
Cut yarn leaving 6" (15cm) tail. Thread the tail onto a tapestry needle and pull through the remaining 6 stitches, pulling tightly to close. Weave in loose ends to wrong side of work.
Make
the Tie
With
crochet hook and yarn, make a crochet chain about 56" (142cm) long.
Beginning in second chain from hook work 1 single crochet in each chain to end
of row. Fasten off.
Felting
Felt
wine sack and tie in washing machine.
The tie is finished felting when you can gently stretch it to about 50" (127cm). Let sack dry with wine bottle inside so it keeps its shape.
Tie overhand knot at both ends of strand, and tie around neck of wine bottle.
Another project that would make a great gift is a set of knitted lace hand towels. Go to the next page to learn how to make them.For more helpful knitting tips and interesting patterns, try:
- Free Knitting Patterns
- Free Baby Knitting Patterns
- Free Clothing Knitting Patterns
- Free Knitting Patterns for the Home
- Free Accessory Knitting Patterns
- Free and Easy Knitting Patterns
- How to Knit
- Knitting Instructions
- Easy Baby Knitting Patterns
- Free Baby Toys Knitting Patterns
- Free Baby Sweaters Knitting Patterns
- Free Knitting Patterns for Baby Blankets
- Free Baby Bootie Knitting Patterns
- Free Socks Knitting Patterns
- Free Mitten Knitting Patterns
- Free Hat Knitting Patterns
- Free Scarf Knitting Patterns
- Free Pillow Knitting Patterns
- Free Purse Knitting Patterns
Free Lace Hand Towel Knitting Pattern
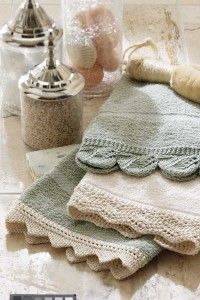
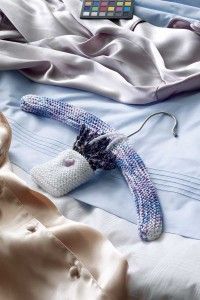
Add
simple knitted lace edging to everyday hand towels, and smile as guests admire
your handiwork. These edgings are worked sideways after casting on a few
stitches. Work the lace in any length, and apply to pillowcases, afghans,
scarves, and more.
Delicate hand-knit hand towels look
much more complicated than they are.
Binding off -- BO
Blocking
Casting on - CO
Knit in front and back of same stitch - k1f&b
Knit 2 together -- k2tog
Purl 2 together -- p2tog
Slip slip knit decrease -- ssk
Weaving in yarn tails
Yarn over -- yo
Gauge
Natural edging on natural towel: 24 stitches/38 rows=4" (10cm) in pattern
Sage edging on natural towel: 24 stitches/32 rows=4" (10cm) in pattern
What You'll Need
Yarn: 50 yards (46m) sport weight 100% cotton (natural edging on sage towel); 70 yards (63.7m) sport weight 100% cotton (natural edging on natural towel); 70 yards (63.7m) sport weight 100% cotton (sage edging on natural towel)
We used: Needful Yarns Lana Gatto Skipper (100% cotton): #124 natural, 1 ball each for natural edging on natural towel and natural edging on sage towel; #123 sage, 1 ball
Needles: US size 2 (2.75mm)
Notions: Tapestry needle; long pins with large heads; sewing needle and thread to match
Miscellaneous: 16x24 inches (40.5X61cm) hand towel, or desired size
Natural-color Edging on Sage Towel
Cast
on 8 stitches.
Row
1: Knit 3, yarn over, knit 2 together, yarn over, knit 3. (9 stitches)
Rows
2, 4, 6, 8, and 10: Knit.
Row
3: Knit 3, yarn over, knit 2 together, yarn over, knit 4. (10 stitches)
Row
5: Knit 3, yarn over, knit 2 together, yarn over, knit 5. (11 stitches)
Row
7: Knit 3, yarn over, knit 2 together, yarn over, knit 6. (12 stitches)
Row
9: Knit 3, yarn over, knit 2 together, yarn over, knit 7. (13 stitches)
Row
11: Knit 3, yarn over, knit 2 together, yarn over, knit 8. (14 stitches)
Row
12: Bind off 6 stitches, knit to the end of the row. (8 stitches)
Repeat
rows 1-12 for pattern. Continue in pattern until the edging, when slightly
stretched, fits across bottom edge of towel. Complete edging, binding off all
stitches at row 12.
Natural-color Edging on Natural Towel
Cast
on 12 stitches.
Row
1: Knit 4, yarn over, knit 2 together, knit 2, yarn over, knit 2 together, yarn
over, knit 2. (13 stitches)
Row
2: Yarn over, knit 2 together, knit 11.
Row
3: Knit 3, [yarn over, knit 2 together] 2 times, knit 2, yarn over, knit 2
together, yarn over, knit 2. (14 stitches)
Row
4: Yarn over, knit 2 together, knit 12.
Row
5: Knit 4, [yarn over, knit 2 together] 2 times, knit 2, yarn over, knit 2
together, yarn over, knit 2. (15 stitches)
Row
6: Yarn over, knit 2 together, knit 13.
Row
7: Knit 3, [yarn over, knit 2 together] 3 times, knit 2, yarn over, knit 2
together, yarn over, knit 2. (16 stitches)
Row
8: Yarn over, knit 2 together, knit 14.
Row
9: Knit 3, [knit 2 together, yarn over] 2 times, knit 2, knit 2 together, [yarn
over, knit 2 together] 2 times, knit 1. (15 stitches)
Row
10: Yarn over, knit 2 together, knit 13.
Row
11: Knit 2, [knit 2 together, yarn over] 2 times, knit 2, knit 2 together,
[yarn over, knit 2 together] 2 times, knit 1. (14 stitches)
Row
12: Yarn over, knit 2 together, knit 12.
Row
13: Knit 3, knit 2 together, yarn over, knit 2, knit 2 together, [yarn over,
knit 2 together] 2 times, knit 1. (13 stitches)
Row
14: Yarn over, knit 2 together, knit 11.
Row
15: Knit 2, knit 2 together, yarn over, knit 2, knit 2 together, [yarn over,
knit 2 together] 2 times, knit 1. (12 stitches)
Row
16: Yarn over, knit 2 together, knit 10.
Repeat
rows 1-16 for pattern. Continue in pattern until the piece, when slightly
stretched, fits across bottom edge of towel.
Complete edging, working row 16 of pattern repeat as follows: Yarn over, knit 2 together, bind off 1 stitch (this will be the yarn over the stitch remaining from the decrease), *knit 1, bind off 1 stitch**. Repeat from * to ** to end of row. See Finishing, below.
Sage-color Edging on Sage Towel
Cast
on 8 stitches.
Row
1: Knit 5, yarn over, knit 1, yarn over, knit 2. (10 stitches)
Row
2: Purl 6, increase in next stitch by knitting into front and back loops, knit
3. (11 stitches)
Row
3: Knit 4, purl 1, knit 2, yarn over, knit 1, yarn over, knit 3. (13 stitches)
Row
4: Purl 8, knit 1 front and back, knit 4. (14 stitches)
Row
5: Knit 4, purl 2, knit 3, yarn over, knit 1, yarn over, knit 4. (16 stitches)
Row
6: Purl 10, knit 1 front and back, knit 5. (17 stitches)
Row
7: Knit 4, purl 3, knit 4, yarn over, knit 1, yarn over, knit 5. (19 stitches)
Row
8: Purl 12, knit 1 front and back, knit 6. (20 stitches)
Row
9: Knit 4, purl 4, slip slip knit, knit 7, knit 2 together, knit 1. (18
stitches)
Row
10: Purl 10, knit 1 front and back, knit 7. (19 stitches)
Row
11: Knit 4, purl 5, slip slip knit, knit 5, knit 2 together, knit 1. (17
stitches)
Row
12: Purl 8, knit 1 front and back, knit 2, purl 1, knit 5. (18 stitches)
Row
13: Knit 4, purl 1, knit 1, purl 4, slip slip knit, knit 3, knit 2 together,
knit 1. (16 stitches)
Row
14: Purl 6, knit 1 front and back, knit 3, purl 1, knit 5. (17 stitches)
Row
15: Knit 4, purl 1, knit 1, purl 5, slip slip knit, knit 1, knit 2 together,
knit 1. (15 stitches)
Row
16: Purl 4, knit 1 front and back, knit 4, purl 1, knit 5. (16 stitches)
Row
17: Knit 4, purl 1, knit 1, purl 6, slip 1 knitwise, knit 2 together, pass
slipped stitch over, knit 1. (14 stitches)
Row
18: Purl 2 together, bind off 5 stitches, purl 3, knit 4. (8 stitches)
Repeat
row 1-18 for pattern. Work in pattern until the piece, when slightly stretched,
fits across bottom edge of towel. Complete edging, binding off all stitches in
pattern at row 18. See Finishing, below.
Finishing the Towels
Weave
in all yarn tails to wrong side of work. Block. Pin edging to 1 end of towel;
thread sewing needle with matching thread, and attach edging to towel with
overcast stitch. Remove all pins.
For more helpful knitting tips and interesting patterns, try:
- Free Knitting Patterns
- Free Baby Knitting Patterns
- Free Clothing Knitting Patterns
- Free Knitting Patterns for the Home
- Free Accessory Knitting Patterns
- Free and Easy Knitting Patterns
- How to Knit
- Knitting Instructions
- Easy Baby Knitting Patterns
- Free Baby Toys Knitting Patterns
- Free Baby Sweaters Knitting Patterns
- Free Knitting Patterns for Baby Blankets
- Free Baby Bootie Knitting Patterns
- Free Socks Knitting Patterns
- Free Mitten Knitting Patterns
- Free Hat Knitting Patterns
- Free Scarf Knitting Patterns
- Free Pillow Knitting Patterns
- Free Purse Knitting Patterns
Free Designer Dishtowel Knitting Pattern
Making
dishcloths is a great way for a knitting novice to practice new stitch
patterns.These
projects are quick, fun to make, and useful. Try the three patterns shown here, and
beware: They're habit-forming! 
Dishtowels so easy to make that you
can watch TV while you're knitting.
Binding off -- BO
Casting on -- CO
Garter stitch
Knit stitch -- k
Purl stitch -- p
Weaving in yarn tails Size
9x11 inches (23x28cm)
Gauge
Blue dishcloth: 19 stitches/32 rows=4" (10cm) in pattern
Yellow dishcloth: 18 stitches/28 rows=4" (10cm) in pattern
Multicolor dishcloth: 19 stitches/33 rows=4" (10cm) in pattern
Note: Exact gauge isn't necessary; the finished dishcloths will either be slightly smaller or larger if your gauge is a bit off.
What You'll Need
Yarn: Worsted weight cotton yarn, about 75 yards (69m) for each dishcloth
We used: Lily Sugar'n Cream (100% cotton): #26 Light Blue, 1 ball; #86 Lemon Chiffon, 1 ball; Lily Sugar'n Cream Crafter's Cotton (100% cotton): #201 Cool Breeze, 1 ball
Needles: US size 7 (4.5mm)
Notion: Tapestry needle
Making
the Blue Dishcloth
Cast
on 43 stitches.
Row
1: Knit 3, *purl 1, knit 3**; repeat from * to ** to end of row.
Row
2: Knit.
Repeat
rows 1 and 2 until piece measures 110 (28cm). Bind off. See
Finishing, below.
Making
the Yellow Dishcloth
Cast
on 42 stitches. Knit in garter stitch (knit every row) for 6 rows.
Begin
main pattern
Row
1: Knit.
Row
2: Knit 4, purl 34, knit 4.
Row
3: Knit 4, purl 5, [knit 4, purl 6] 2 times, knit 4, purl 5, knit 4.
Row
4: Knit 4, purl 34, knit 4.
Row
5: Knit.
Row
6: Knit 4, purl 34, knit 4.
Row
7: Knit 8, [purl 6, knit 4] 3 times, knit 4.
Row
8: Knit 4, purl 34, knit 4.
Repeat
these 8 rows for pattern. Work even until piece measures about 101/4" (26cm),
ending with row 8. Knit 6 rows in garter stitch. Bind off. See
Finishing, below.
Making
the Multicolor Dishcloth
Cast
on 43 stitches.
Row
1: [Knit 1, purl 1] across row.
Repeat
for desired length, beginning each row with a knit stitch to create seed-stitch
pattern. Bind off. See Finishing, below.
Finishing the Towel
Cut
yarn, leaving about 6" (15cm) tail. Thread tapestry needle, and secure yarn by
weaving across a few stitches on wrong side of work.
Another beginners' favorite is the pot holder. On the next page we have found a great, classic pattern for you to try out.
Machine-wash or hand-wash them in cold water using mild soap. Do not bleach. Rinse well in cold water. Squeeze gently, and roll in a towel to remove excess water. Reshape and lay flat to dry. Wash dark colors separately. |
For more helpful knitting tips and interesting patterns, try:
- Free Knitting Patterns
- Free Baby Knitting Patterns
- Free Clothing Knitting Patterns
- Free Knitting Patterns for the Home
- Free Accessory Knitting Patterns
- Free and Easy Knitting Patterns
- How to Knit
- Knitting Instructions
- Easy Baby Knitting Patterns
- Free Baby Toys Knitting Patterns
- Free Baby Sweaters Knitting Patterns
- Free Knitting Patterns for Baby Blankets
- Free Baby Bootie Knitting Patterns
- Free Socks Knitting Patterns
- Free Mitten Knitting Patterns
- Free Hat Knitting Patterns
- Free Scarf Knitting Patterns
- Free Pillow Knitting Patterns
- Free Purse Knitting Patterns
Free Americana Pot Holder Knitting Pattern
This
darling pot holder captures the special style of homespun early Americana. The
crocheted edge and classic shades of red, white, and blue make the pot holder
look special without involving complicated techniques.
These pot holders are classic pieces of
Americana that won't go out of style.
Techniques
Binding
off -- BO
Casting
on -- CO
Crochet
chain
Garter
stitch
Single
crochet
Size
Approximately
7x7 inches (18x18cm)
Gauge
24
stitches/48 rows=4" (10cm) in
garter stitch
Yarn: Approximately 100 yards (274m) each 98.3% cotton, 1.7% elastic yarn in 3 colors
We used: Cascade Yarns Fixation: #8176 Ecru (color A), 1 skein; #2625 Blueberry (color B), 1 skein; #3794 Wine (color C), 1 skein
Needles: US size 5 (3.75mm)
Notions: US size G (4.25mm) crochet hook; tapestry needle
Notes: * Yarn is used doubled throughout. Wind color A into 2 balls before starting.* Special abbreviation: sl2kp. Slip 2 together as if to knit, knit 1, pass the slipped stitches over (a centered double decrease).
Making the Pot Holder
Cast
on 71 stitches using 2 strands of color A held together as 1. Work as follows:
Row
1: Knit 34, slip 2 stitches together knitwise, knit 1, pass both slipped
stitches over the knit stitch, knit 34. (69 stitches)
Row
2 and all even-numbered rows: Knit.
Row
3: Knit 33, sl2kp, knit 33. (67 stitches)
Row
5: Knit 32, sl2kp, knit 32. (65 stitches)
Row
7: Change to colors B and C (1 strand each color held together as 1); knit 31,
sl2kp, knit 31. (63 stitches)
Row
9: Knit 30, sl2kp, knit 30. (61 stitches)
Row
11: Knit 29, sl2kp, knit 29. (59 stitches)
Row
13: Knit 28, sl2kp, knit 28. (57 stitches)
Row
15: Knit 27, sl2kp, knit 27. (55 stitches)
Row
17: Knit 26, sl2kp, knit 26. (53 stitches)
Row
19: Change to color A (2 strands held together as 1); knit 25, sl2kp, knit 25.
(51 stitches)
Row
21: Knit 24, sl2kp, knit 24. (49 stitches)
Row
23: Knit 23, sl2kp, knit 23. (47 stitches)
Row
25: Knit 22, sl2kp, knit 22. (45 stitches)
Row
27: Knit 21, sl2kp, knit 21. (43 stitches)
Row
29: Knit 20, sl2kp, knit 20. (41 stitches)
Row
31: Knit 19, sl2kp, knit 19. (39 stitches)
Row
33: Change to colors B and C (1 strand each color held together as 1); knit 18,
sl2kp, knit 18. (37 stitches)
Row
35: Knit 17, sl2kp, knit 17. (35 stitches)
Row
37: Knit 16, sl2kp, knit 16. (33 stitches)
Row
39: Knit 15, sl2kp, knit 15. (31 stitches)
bKnit 14, sl2kp, knit 14. (29 stitches)
Row
43: Knit 13, sl2kp, knit 13. (27 stitches)
Row
45: Change to color A (2 strands held together as 1); knit 12, sl2kp, knit 12.
(25 stitches)
Row
47: Knit 11, sl2kp, knit 11. (23 stitches)
Row
49: Knit 10, sl2kp, knit 10. (21 stitches) bKnit 9, sl2kp, knit 9. (19 stitches)
Row
53: Knit 8, sl2kp, knit 8. (17 stitches)
Row
55: Knit 7, sl2kp, knit 7. (15 stitches)
Row
57: Knit 6, sl2kp, knit 6. (13 stitches)
Bind off remaining 13 stitches. Cut yarn, leaving tails of about 24" (61cm).
Hanging Loop: Using crochet hook and yarn tails, make a single chain of 13 stitches,
attaching last stitch to other side of pot holder at beginning of bound-off
row, forming a loop (see photo). Thread remaining tail end on tapestry needle,
and weave between bound-off stitches to secure. With colors B and C held
together as 1, join to work at 1 side of loop, and work in single crochet
around edge of pot holder, including outside of loop (see photo). Do not work
single crochet under loop, across bound-off stitches. Use tapestry needle to
weave in all loose ends.
Looking to knit something that will straighten up your closet? We have a pattern for a padded hanger and sachet that just might be what you're looking for.
To
convert from meters to yards, multiply
the meters by 1.09. To
convert from yards to meters, multiply the yards by 0.91.
For more helpful knitting tips and interesting patterns, try:
- Free Knitting Patterns
- Free Baby Knitting Patterns
- Free Clothing Knitting Patterns
- Free Knitting Patterns for the Home
- Free Accessory Knitting Patterns
- Free and Easy Knitting Patterns
- How to Knit
- Knitting Instructions
- Easy Baby Knitting Patterns
- Free Baby Toys Knitting Patterns
- Free Baby Sweaters Knitting Patterns
- Free Knitting Patterns for Baby Blankets
- Free Baby Bootie Knitting Patterns
- Free Socks Knitting Patterns
- Free Mitten Knitting Patterns
- Free Hat Knitting Patterns
- Free Scarf Knitting Patterns
- Free Pillow Knitting Patterns
- Free Purse Knitting Patterns
Free Padded Hanger and Sachet Knitting Pattern
Dress
up an old hanger in an instant with this easy project. Fill the cute little
sachet with your favorite dried flowers, aromatic herbs, potpourri, or cedar
shavings.
With this project, your old hangers
will soon find new life.
Binding off -- BO
Casting on -- CO
Crochet chain
Garter stitch
Knit 2 together -- k2tog
Mattress stitch
Weaving in yarn tails
Yarn over -- yo
Size
Hanger
cover: Approximately 16 inches (40.5cm)
Sachet:
23/4x23/4 inches (7x7cm)
21 stitches/11 rows=4" (10cm) in garter stitch
What You'll Need
Yarn: 60 yards (55m) worsted weight yarn for hanger cover (yarn A); 20 yards (18m) coordinating yarn for sachet (yarn B)
We used: Patons Grace (100% cotton): #60903 lavender (yarn A), 1 ball; #60005 snow (yarn B), 1 ball
Needles: US size 5 (3.75mm)
Notions: Size F/5 (3.75mm) crochet hook; tapestry needle; sewing needle and white sewing thread; 1/2" (1.3cm) decorative button
Miscellaneous: Straight wooden hanger with metal hook
Making the Sachet
Holding
2 strands of yarn B together as 1, cast on 15 stitches. Work in garter stitch
(knit every row) for about 5" (12.5cm).
Next row (eyelet buttonhole): Knit 6, knit 2 together, yarn over, knit 7. Knit 5 more rows; bind off. Fold piece in half, and weave sides together using mattress stitch. Placing seam in middle of back, sew bottom together using mattress stitch.
Crochet Chain: Insert crochet hook into 1 side seam, just under top edge. Using 2 strands of yarn B, work a crochet chain for 7" (18cm). Cut yarn, leaving about 6" (15cm) tail. With threaded tapestry needle, attach chain to opposite side seam under the top edge and to the inside. Weave yarn ends through several stitches on wrong side of work, and secure. With sewing needle and thread, attach button in position on inside of sachet, opposite eyelet buttonhole.
Making the Hanger CoverHolding 2 strands of yarn A together as 1, cast on 80 stitches and work in garter stitch (knit every row) for 23/4" (7cm). Bind off all stitches. Cut yarn, leaving about 30" (76cm) tail.
Find center of knit piece, and slip it over the metal hanger hook, taking care not to snag knitting. Fold knit piece in half lengthwise over hanger. Thread tapestry needle with yarn tail, and weave loose ends to wrong side to secure. Pull yarn snugly to gather and tighten side edge and enclose it over hanger end. Close other side in the same way. Weave loose ends to wrong side and through a few stitches to secure. Sew cast-on and bind-off edges together neatly. Weave last remaining yarn tail to inside, and secure.
A distinctive pattern can liven up your kitchen. Learn to make pot holders with an eye-catching checkerboard design on the next page.
For more helpful knitting tips and interesting patterns, try:
- Free Knitting Patterns
- Free Baby Knitting Patterns
- Free Clothing Knitting Patterns
- Free Knitting Patterns for the Home
- Free Accessory Knitting Patterns
- Free and Easy Knitting Patterns
- How to Knit
- Knitting Instructions
- Easy Baby Knitting Patterns
- Free Baby Toys Knitting Patterns
- Free Baby Sweaters Knitting Patterns
- Free Knitting Patterns for Baby Blankets
- Free Baby Bootie Knitting Patterns
- Free Socks Knitting Patterns
- Free Mitten Knitting Patterns
- Free Hat Knitting Patterns
- Free Scarf Knitting Patterns
- Free Pillow Knitting Patterns
- Free Purse Knitting Patterns
Free Checkered Pot Holder Knitting Pattern
The
perfect gift for your favorite chef! These checkerboard pot holders are knitted
using the intarsia technique and then felted in the washing machine to make
them good and sturdy.
The eye-catching design of
the Checkered Pot Holders
stands out in any kitchen.
Size
Before
felting: Approximately 11x131/2 inches (28x34cm)
After felting: Approximately 8x81/2 inches (20x21.5cm)
What You'll Need
Yarn: 100%
wool worsted weight yarn, about 121 yards (111m) each in 2 colors (makes 2 pot
holders)
We used: Knit Picks Wool of the Andes (100% wool; 110 yards [101m] per
50g skein): #23420 Coal (color A), 2 skeins; #23775 Fog (color B), 2 skeins
Needles: US size 8 (5mm) straight; US size 9 (5.5mm) double-pointed, set of 2
Notion: Tapestry needleGauge
18
stitches and 24 rows=4" (10cm) in stockinette stitch before felting
Note: When changing colors, drop the old color and bring the new color up from under the old color, twisting them together to avoid gaps. For each section being worked, you will need 2 balls color A and 2 balls color B.
Making the Pot Holder
With
color A and straight needles, loosely cast on 48 stitches.
Rows
1 and 2: Knit.
Row
3 (right side): With first ball of color A, knit 13, drop color A; attach first
ball of color B, knit 11, drop color B; attach second ball of color A, knit 11,
drop color A; attach second ball of color B, knit 11, drop color B; attach
third ball of color A, knit 2, turn work.
Row
4: Still working with third ball of color A, knit 2, drop color A; pick up color
B, purl 11, drop color B; pick up color A, purl 11, drop color A; pick up color
B, purl 11, drop color B; pick up color A, purl 11, knit 2, turn work.
Rows
5-20: Repeat rows 3 and 4 eight times more.
Row
21: Repeat row 3 once more. Turn work. Cut all yarn except for the ball of
color A that is at the working end of your needle.
Row
22 (wrong side): With attached ball of color A, knit 2, purl 11, drop color A;
attach first ball of color B, purl 11, drop color B; attach second ball of
color A, purl 11, drop color A; attach second ball of color B, purl 11, drop
color B; attach third ball of color A, knit 2, turn work.
Row
23: Still working with third ball of color A, knit 2, drop color A; pick up
color B, knit 11, drop color B; pick up color A, knit 11, drop color A; pick up
color B, knit 11, drop color B; pick up color A, knit 13, turn work.
Rows
24-39: Repeat rows 22 and 23 eight times more.
Row
40: Repeat row 22 once more. Turn work. Cut all yarn except for the ball of
color A that is at the working end of your needle.
Rows
41-78: Repeat rows 3-40 once more.
Rows
79 and 80: With attached ball of color A, knit all stitches.

View Enlarged Image
The diagram for our checkered pot holders.
Make
the Hanger
Using
double-point needles and color A and leaving a 4" (10cm) tail at
beginning, cast on 4 stitches. Work in I-cord for 6" (15cm); cut yarn
leaving 4" (10cm) tail. With both yarn tails threaded on tapestry needle,
stitch both ends of I-cord securely to upper left corner of pot holder to form
a loop.
Felting
Felt
pot holders in washing machine.
Most of the projects that we have looked at so far have been quite small and quick to make. For something that might take a little longer, try the next pattern -- the zigzag throw.
For more helpful knitting tips and interesting patterns, try:
- Free Knitting Patterns
- Free Baby Knitting Patterns
- Free Clothing Knitting Patterns
- Free Knitting Patterns for the Home
- Free Accessory Knitting Patterns
- Free and Easy Knitting Patterns
- How to Knit
- Knitting Instructions
- Easy Baby Knitting Patterns
- Free Baby Toys Knitting Patterns
- Free Baby Sweaters Knitting Patterns
- Free Knitting Patterns for Baby Blankets
- Free Baby Bootie Knitting Patterns
- Free Socks Knitting Patterns
- Free Mitten Knitting Patterns
- Free Hat Knitting Patterns
- Free Scarf Knitting Patterns
- Free Pillow Knitting Patterns
- Free Purse Knitting Patterns
Free Zigzag Throw Knitting Pattern
A
hand-knit throw makes a cozy and thoughtful gift. The bulky chenille knits up
quickly and comes in a dizzying array of colors: Just choose your favorites.
This great throw makes for hours of fun
knitting followed by comfy, cozy warmth.
Width: 37 inches (94cm)
Length: 43 inches (109cm)
What
You'll Need
Yarn: Bulky
weight yarn, about 1,000 yards (914m)
We used: Lion Brand Yarns Chenille Thick and Quick (91% acrylic, 9% rayon; 100 yards [91.4m] per skein): #125 Chocolate (color A), 5 skeins; #108 Dusty Blue (color B), 5 skeins
Needles: US size 13 (9mm)
Notion: Tapestry needle
Gauge
11
stitches and 16 rows=4" (10cm) in zigzag stitch
Zigzag
Stitch
Row
1 (right side): Slip 1 stitch purlwise with yarn in back, knit in front and
back of next stitch, knit 4, slip slip knit decrease, knit 2 together,
knit 4, *(knit in front and back of stitch) 2 times, knit 4, slip slip knit
decrease, knit 2 together, knit 4; repeat from * until 2 stitches remain, knit
in front and back of stitch, knit 1.
Row
2: Slip 1 purlwise with yarn in front, purl to end of row.
Row
3: Repeat row 1.
Row
4: Repeat row 2.
Making the Throw
With
color A, loosely cast on 100 stitches.
View Enlarged Image
Diagram for the zigzag throw.
Begin
with row 2 (wrong side) of pattern and work rows 2-4 of Zigzag Stitch pattern.
After row 4 is finished, cut color A leaving 4" (10cm) tail to weave in
later.
With
color B, work rows 1-4 of Zigzag Stitch pattern. After row 4 is finished, cut
color B leaving 4" (10cm) tail.
Continue
working rows 1-4 of Zigzag Stitch alternating colors A and B until piece
measures approximately 42" (104cm) from cast-on edge and last color worked
is color B.
With
color A, work rows 1-3 of Zigzag Stitch.
Bind off loosely purlwise.
Make
the Tassels (make 15)
For
each tassel: Cut 6 strands of color A each 6" (15cm) long, cut 2 strands
of color A each 9" (23cm) long, and cut 6 strands of color B each 6"
(15cm) long. Holding all 12 of the 6" (15cm) strands together, tie them
together at their midpoint with a 9" (23cm) strand of A. (Don't cut the
ends of this strand; they will be used later to attach the tassels to
the afghan points.) Fold the 12 strands in half at the tie and with remaining
9" (23cm) strand of A, tie
them together approximately 1/2 inch (1cm) down from fold. Evenly trim strands at bottom of tassel.
Attach Tassels to Cast-on Edge: Thread a tapestry needle with the remaining tails of a 9" (23cm) strand of color A and sew the tassel to one point along the cast-on edge of the throw. Repeat for each of the 6 remaining points.
Attach Tassels to Bind-off Edge: Attach tassels same as for cast-on edge, attaching a tassel to each of the 6 points of the bound-off edge and at each of the 2 "half points" at the far right and far left side of the bound-off edge.
The last project we will introduce you to in this article is one that will be great for those cold autumn evenings: A felted Christmas stocking that you can decorate to your heart's desire.For more helpful knitting tips and interesting patterns, try:
- Free Knitting Patterns
- Free Baby Knitting Patterns
- Free Clothing Knitting Patterns
- Free Knitting Patterns for the Home
- Free Accessory Knitting Patterns
- Free and Easy Knitting Patterns
- How to Knit
- Knitting Instructions
- Easy Baby Knitting Patterns
- Free Baby Toys Knitting Patterns
- Free Baby Sweaters Knitting Patterns
- Free Knitting Patterns for Baby Blankets
- Free Baby Bootie Knitting Patterns
- Free Socks Knitting Patterns
- Free Mitten Knitting Patterns
- Free Hat Knitting Patterns
- Free Scarf Knitting Patterns
- Free Pillow Knitting Patterns
- Free Purse Knitting Patterns
Free Felted Christmas Stocking Pattern
Bring
your mantel to life during the holiday season! Select your favorite shade of
wool for this elegant stocking, or choose several. Just imagine how festive the
mantel will look when you hang a different-color stocking for each member of
your family. 
These beautiful hand-knit stockings are
great as is, or you can personalize
them with your own decorations.
Techniques
Binding
off -- BO
Casting
on -- CO
Felting
Joining
new yarn
Knit
2 together -- k2tog
Picking
up stitches
Purl
2 together -- p2tog
