Yarn Crafts

String art flower

If you think yarn crafts for kids are nothing more than knitting and crochet, look again. Versatile yarn can jazz up a wall hanging, make drawings seem to pop off the page, or add color to backpacks or scarves with tassels. And those are just a few of the possibilities!

These no-sew crafts work as rainy-day art crafts or fabric projects for camp. You'll find them easy to make -- and fun to do with kids.

Advertisement

Follow the links below to learn how to make your own yarn crafts:

Woven Wall Hanging

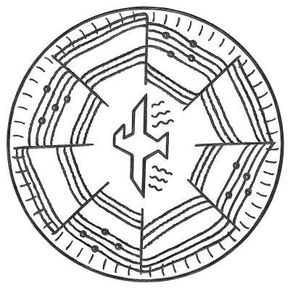
Add a woven yarn border to make this wall hanging special.

String Art

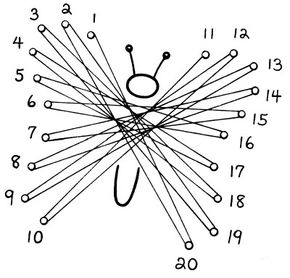
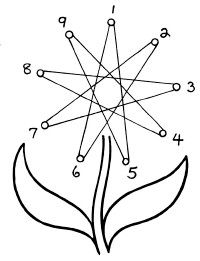
Make your drawings look three dimensional with string art.

Fancy Boa

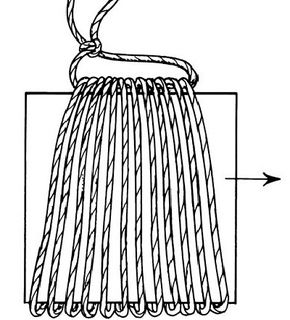
Get ready for formal, red-carpet dress-up with this fancy boa.

Yarn Tassels

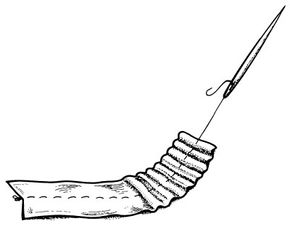
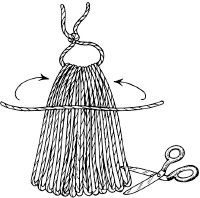
Add a splash of color to backpacks, scarves and decor with these bright tassels.

Weaving Frame

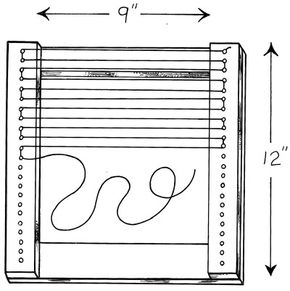
Construct a frame that you can use over and over to weave pot holders, rugs and more.

Look on the next page to learn how you can use yarn to jazz up a woven wall hanging.

For more fabric and art crafts, check out:

Advertisement

Woven Wall Hanging

Decorate this wall hanging with woven yarn.

Start with a paper plate to make this a woven wall hanging. Then jazz it up with yarn and all sorts of trim -- some rough, some smooth, some shiny, and even some unexpected, such as wire.

What You'll Need: ­

Advertisement

  • Markers
  • Paper plate
  • Pencil
  • Ruler
  • Blunt scissors
  • Yarn
  • Trims such as pony beads or feathers (optional)

Step 1: Draw a small design in the center of the paper plate with markers.

Step 2: Use a pencil to lightly mark 3-inch increments around the edge of the plate to indicate spacing.

Step 3: Starting about 1/2 inch from the outer edge of the plate at one of the pencil marks, cut a 2-1/2-inch slit toward the center of the plate. Make sure you don't cut into your center design. Repeat around the whole plate.

Step 4: Weave pieces of colorful yarn through the slits. Change colors by tying one color to another at the back of the plate.

Step 5: As you weave the yarn, thread on beads or tie in feathers.

Step 6: When you're done weaving, knot the yarn in back and cut off any excess yarn.

Why just draw a picture when you can make it look three dimensional? Look on the next page to learn more about string art.

For more fabric and art crafts, check out:

Advertisement

String Art

String butterfly

String art is easy to make with yarn and has a three-dimensional feeling. This string butterfly and flower look like they are actually leaping off the background.

String flower

What You'll Need:

Advertisement

  • 8×8-inch square of wood
  • 29 small nails
  • Hammer
  • Pencil
  • Colored yarn or string
  • Blunt scissors
  • Markers

Step 1: Have an adult hammer the nails into the wood base, placing them as shown in the illustrations to make a butterfly and a flower.

Step 2: Following the illustrations, pencil in a number next to each nail. This will be your guide when you start to string the design.

Step 3: To string the butterfly, tie one end of the yarn to Nail 1. String the yarn from Nail 1 to Nail 20, and then bring the yarn back up to Nail 2 and down to Nail 19.

Step 4: Continue stringing the yarn using the butterfly illustration as your guide. Once you're finished, tie the yarn to Nail 11. Trim off excess yarn.

Step 5: To make the flower, tie one end of the yarn to Nail 1. String the yarn from Nail 1 to Nail 5, and then from Nail 5 to Nail 9, and from Nail 9 to Nail 4.

Step 6: Continue stringing, using the flower illustration as your guide. When you come back to Nail 1, tie the yarn to the nail. Trim off excess yarn.

After you've finished stringing, use markers to draw a stem and leaves for the flower and a head, body, and antennae for the butterfly.

Keep reading to find out how you can turn yarn and tulle into a fancy boa for dress-up fun.

For more fabric and art crafts, check out:

Advertisement

Fancy Boa

Netting and yarn make a glamorous boa.

A fancy boa is a glamorous accessory that can make anyone look sophisticated. Here's one you and a child can make to throw around her neck the next time she plays dress up.

What You'll Need:

  • Plastic needlepoint needle
  • Measuring tape
  • 2 yards of tulle netting
  • Yarn
  • Blunt scissors
  • Glitter or sequins and craft glue (optional)

Step 1: Thread the needle with about 4 feet of yarn. Tie a knot at one end.

Advertisement

Step 2: Cut all the netting into 4-inch-wide strips.

Step 3: Use the needle and yarn to sew a gathering stitch through the netting. Thread the yarn in and out in even stitches about 1 inch apart down the center of the netting. Every yard or so, bunch up the netting.

Step 4: Continue stitching onto another strip until you have used all the netting strips. Trim off the excess yarn, and tie it in a knot. Spread the netting out evenly.

If you want to add sparkle to your boa, glue on glitter or sequins.

Brighten up pillows, backpacks, or scarves with colorful yarn tassels. Keep reading to discover how to make tassels.

For more fabric and art crafts, check out:

Advertisement

Yarn Tassels

First step for yarn tassel
Tie a hanger on the tassel.
Publications International, Inc.

Yarn tassels are easy to make and can add color to everything from pillows to backpacks. Look around for objects that need a splash of color, and then decorate them with tassels.

Snip through the bottom.

­What You'll Need:

  • 2-1/2-inch square of cardboard
  • Yarn
  • Blunt scissors

Step 1: Wrap yarn 10 to 15 times around the cardboard square.

Advertisement

Step 2: To make­ the tassel hanger, thread a piece of yarn under the wrapped yarn at the top edge of the cardboard. Bring the hanger ends together to form a loop, and tie a knot to secure it.

Step 3: Carefully slip the wrapped yarn loops off the cardboard.

Step 4: Tie another piece of yarn around the top third of the yarn loops.

Step 5: Cut the loops at the bottom to make the tassel.

Repeat these steps to make more tassels. Use the tassels to decorate shoes, barrettes, bicycle handlebars, place mats, hats, and more. You can also make two-color tassels in your school's team colors.

Want to try weaving? Check on the next page to find out how you can make a simple weaving frame. You'll be able to make pot holders, rugs and more.

For more fabric and art crafts, check out:

­

Advertisement

Weaving Frame

Weaving frame
Weaving frame
Publications International, Inc.

A weaving frame is not hard to make with adult help. You can use the frame to weave one square for a pot holder or lots of squares for a rug.

What You'll Need:

  • Four 1×2-inch wooden boards
  • Saw
  • Sandpaper
  • Pencil
  • Ruler
  • 46 1-inch nails
  • Hammer
  • Wood glue
  • C-clamps
  • Cotton string
  • Crochet hook
  • Yarn
  • Wide-toothed comb or pick
  • Blunt scissors­

Step 1: Have an adult saw two 12-inch pieces and two 9-inch pieces from the wooden boards.

Advertisement

Step 2: Sand the wood smooth.

Step 3: Use a pencil to mark 23 dots about 1/2 inch apart along each 12-inch piece. Have an adult hammer a nail in the wood at each mark.

Step 4: To make the frame, glue the wood pieces in a square with the 12-inch pieces on top of the 9-inch pieces, as shown in the illustration. Hold the pieces together with C-clamps, and let the frame dry overnight.

Step 5: To weave on the frame, tie the cotton string to the first nail and run the string back and forth around the nails. Tie it off at the last nail.

Step 6: Poke the crochet hook over and under the cross threads. Hook in the yarn and pull it through. On the next pass, start under and then go over. Use the comb to tighten the threads against one another after you finish a row.

Step 7: When you are finished with the square, cut the strings and tie them off.

For more fabric and art crafts, check out:

Advertisement

Advertisement

Loading...