While it may be tempting to hurry through the finishing so you can finally see the completed project, it's important not to rush through sewing the seams and weaving yarn tails if you want the end result to look polished and professional. Block each piece before assembling, and allow the pieces to dry. This helps the edges remain flat as you work.
Shoulder Seams (bound-off edges)
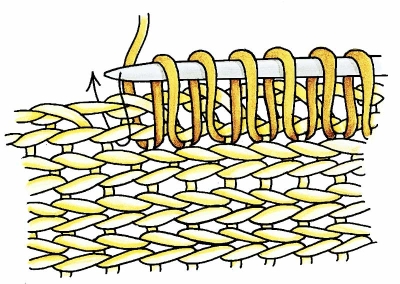
Step 1: Lay both pieces flat, with right sides facing up. Thread a yarn needle, and, beginning at the right-side edge of the piece closest to you (the lower piece), insert the needle from back to front through the center of the first stitch. Pull the yarn through, leaving a yarn tail to weave in later.
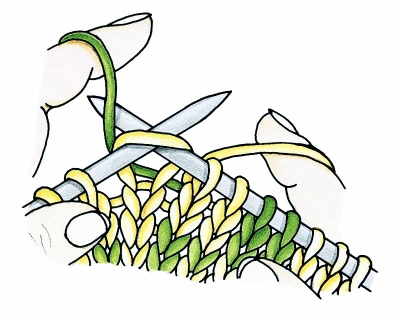
Step 2: Insert the needle from right to left under the two vertical legs of the first stitch on the piece farther from you (fig. 25a), then insert the needle from right to left under the next two vertical legs on the near piece, beginning in the same hole as the first stitch was made. Pull the yarn gently to adjust the stitch and close the stitches together.
 Shoulder Seams: Figure 25a
Step 3: Continue to alternate sides, inserting the needle from right to left under two strands and beginning in the same hole as the last stitch was made. Pull the yarn every few stitches to adjust it and close the seam. At the end of the seam, weave in the yarn tail.
Mattress Stitch
Mattress stitch is a great stitch to know when it comes to sewing vertical seams, including side and sleeve seams.
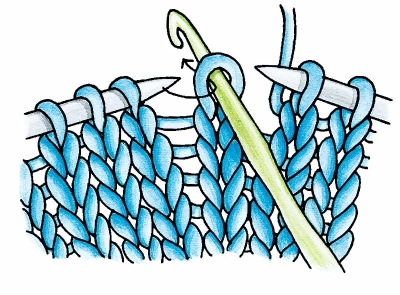
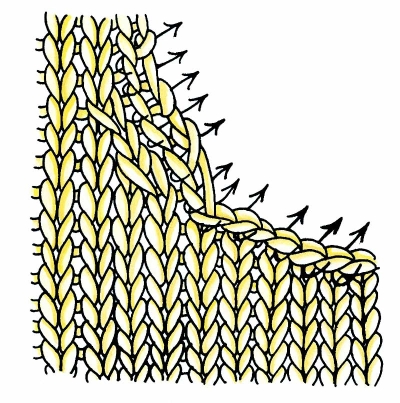
Step 1: Thread a yarn needle with matching color yarn, leaving a four-inch tail to weave in later. With both pieces flat and right sides facing up, insert the needle under the horizontal strand between the first and second stitches of the first row on one piece and the corresponding strand on the second piece. Gently pull the yarn to tighten.
Step 2: Insert the needle under the horizontal strand on the next row of one piece, and then insert the needle under the strand on the same row of the other piece.
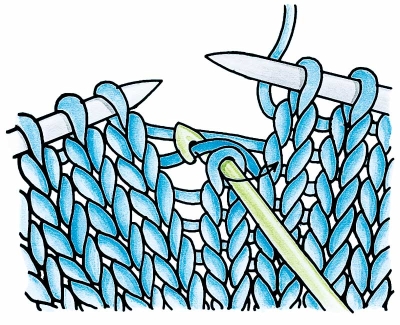
Step 3: Continue to work under the horizontal strands, alternating pieces, until you have six to eight rows worked (fig. 25b), and then pull the yarn gently to close the seam.
 Mattress Stitch: Figure 25b
Step 4: Continue weaving together to the end of the seam. Weave yarn tails into the seam stitches, and secure.
Backstitch
Backstitch is an easy way to make a firm seam.
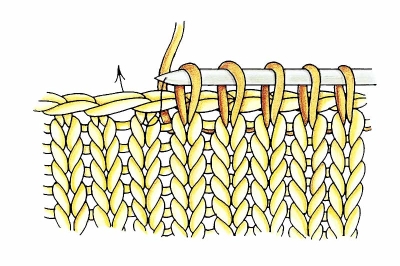
Step 1: Thread a tapestry needle with matching yarn. With right sides together, work along the wrong sides about one stitch in from the edges. Work two running stitches on top of each other to secure the lower edges (fig. 26a).
 Backstitch: Figure 26a
Step 2: With the needle and yarn behind the work, insert the needle through both layers of fabric about two stitches to the left of the running stitch and pull the yarn to the front of the work.
Step 3: Insert the needle from front to back one stitch back to the right, working through both layers.
Step 4: Moving forward to the left about two stitches, bring the needle to the front of the work, about one stitch ahead of the original stitch. Repeat the process until you reach the end of the seam, working one stitch backward (to the right) on the front side of the work and two stitches forward (to the left) on the back side of the work.
Step 5: Finish the seam by working two or three running stitches on top of each other, stitching over the bound-off edges. Weave in yarn tails.
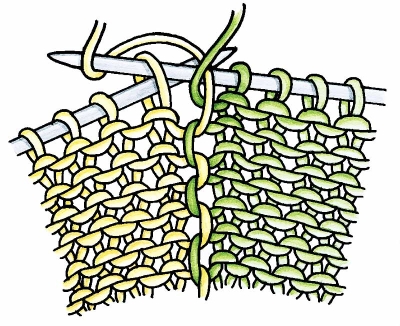
Three-Needle Bind-off
This bind-off finishes off two edges, binding off the stitches and closing the seam at the same time. Normally used to close shoulders, it can also be used to close side seams when working a garment from side to side. You can also pick up stitches along two side edges and then use the three-needle bind-off to close those seams. To make a flat, neat seam on the right side, follow these instructions.
Step 1: With the right sides of the work together, and with the needle tips aligned and facing to the right (fig. 27a), hold both needles in your left hand.
 Three-Needle Bind-off: Figure 27a
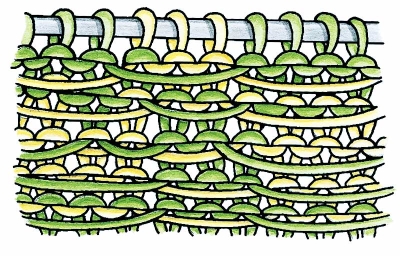
Step 2: Insert the empty right-hand needle into the first stitch on each of the two needles in the left hand, and knit the two stitches together (fig. 27b). Slip them off the needle as you would a knit stitch. You now have one stitch on the right needle.
 Three-Needle Bind-off: Figure 27b
Step 3: Knit the next pair of stitches the same way. You now have two stitches on the right needle.
Step 4: Pull the first stitch on the right-hand needle over the second stitch (the one closest to the tip), just as you would in a normal bind-off (fig. 27c).
 Three-Needle Bind-off: Figure 27c
Step 5: Repeat steps 3 and 4 until all stitches have been bound off. Cut the yarn and pull the end through the last loop; weave in the end to secure.
Kitchener Stitch (or Grafting)
This technique joins live stitches together in an elastic, invisible seam. The method can also be used over bound-off stitches to make a strong, stable seam.
With an equal number of stitches on two needles, and right sides facing up, hold the needles parallel to each other with points facing right. Thread a blunt tapestry needle with two to three times the length of the area to be joined. For live stitches, work as follows:
Step 1: Insert threaded needle into the first stitch on the front needle purlwise (as if to purl); leave stitch on needle.
Step 2: Insert needle into the first stitch on the back needle knitwise (as if to knit); leave stitch on needle.
Step 3: Insert needle into the same first stitch on the front needle knitwise (fig. 28a); slip stitch off needle.
 Kitchener Stitch: Figure 28a
Insert needle into the next front stitch purlwise; leave stitch on needle (fig. 28b).
 Kitchener Stitch: Figure 28b
Step 4: Insert needle into the same stitch on the back needle purlwise (fig. 28c); slip stitch off needle.
 Kitchener Stitch: Figure 28c
Insert needle into the next back stitch knitwise; leave stitch on needle (fig. 28d).
 Kitchener Stitch: Figure 28d
Repeat steps 3 and 4 until all stitches are worked.
Tip: To make the technique easier as you work, remember this...Front needle: purlwise leave on, knitwise take off. Back needle: knitwise leave on, purlwise take off.
Weaving in Yarn Tails
Carefully weaving in the yarn ends makes your knitting look neat and keeps it from pulling loose and unraveling over time.
Thread a tapestry needle with the yarn tail. Working on the wrong side of the knitting, weave the needle in and out of the back of the stitches for a few inches in one direction, and then turn and work in the opposite direction for an inch or two. Pull the yarn gently to tighten, and cut it close to the work. Stretch the knitting slightly so that the tail disappears into the last stitch.
Learn all about washing and blocking your knitted piece in the next section.