How to Maintain an Air Conditioner

By: Fix-It Club
Air conditioner repairmen work on home unit.
Central air conditioners are made up of two separate components: the condenser unit, located outside the house on a concrete slab, and the evaporator coil above the furnace. Fstop123/Getty Images

Central air conditioners have two separate components: the condenser and the evap­orator. The condenser unit is usually located outside the house on a concrete slab. The evaporator coil is mounted in the plenum or main duct junction above the furnace.

Most central air conditioners are connected to a home's forced-air distribution system. Thus, the same motor, blower, and ductwork used for heating are used to distribute cool air from the air conditioning system. When a central air conditioner is operating, hot air inside the house flows to the furnace through the return-air duct. The hot air is moved by the blower across the cooled evaporator coil in the plenum and is then delivered through ducts to cool the house. When the air conditioner works but the house doesn't cool, the problem is probably in the distribution system.

Advertisement

Both the evaporator and the condenser are sealed. Therefore, a professional service person should be called for almost any maintenance other than routine cleaning. Central air conditioners should be professionally inspected and adjusted before the beginning of every cooling season. However, don't let your maintenance end with this annual checkup. While there aren't many repairs you can make yourself, there are specific maintenance procedures you can follow to keep your system operating at peak efficiency.

Caution: Before doing any work on an air conditioning system, make sure the power to the system, both to the condenser and to the evaporator assembly, is turned off.

Cleaning the Evaporator

The evaporator for the central air s­ystem is located directly above the furnace in the plenum. The evaporator may not be accessible, but if it is, you should clean it ­once a year. If the plenum has foil-wrapped insulation at its front, you can clean the evaporator; if the plenum is a sealed sheet metal box, do not attempt to open it. Here's how to clean an accessible evaporator:

Step 1: Remove foil-wrapped insulation at front of plenum; it's probably taped in place. Remove tape carefully, because you'll have to replace it later. Behind insulation is access plate, which is held in place by several screws. Remove screws and lift off plate.

Advertisement

Step 2: Clean entire underside of evaporator unit with stiff brush. A large hand mirror can help you see what you're doing. If you can't reach all the way back to clean entire area, slide evaporator out a little. Evaporator can be slid out even if it has rigid pipes connected to it, but be careful not to bend pipes.

Step 3: Clean tray below evaporator unit. This tray carries condensation away from evaporator. Pour 1 tablespoon of household bleach into weep hole in tray to prevent fungus growth. In extremely humid weather, check condensate drain and pan every other day. If there's much moisture in pan, weep hole from pan to drain line may be clogged. Open weep hole with piece of wire.

Step 4: Put unit back into place, reinstall plate, and tape insulation back over it.

Step 5: Turn back on air conditioner, and check for air leaks. Seal any leaks with duct tape.

Maintaining the Condenser

In most air-conditioning systems, the condenser unit is located outside the house and is prone to accumulate dirt and debris from trees, lawn mowing, and airborne d­ust. The condenser has a fan that moves air across the condenser coil. You must clean the coil on the intake side, so, before you turn off the power to the air conditioner, check to see which direction the air moves across the coils. Here's how to clean the condenser:

Step 1: Cut down any grass, weeds, or vines that have grown around condenser unit; they could be obstructing airflow.

Advertisement

Step 2: Clean condenser with commercial coil cleaner, available at refrigerator supply stores. Instructions for use are included. Flush coil clean (do not use hose); let dry.

Step 3: Clean fins with soft brush to remove accumulated dirt. You may have to remove protective grille to reach them. Do not clean fins with garden hose, as water could turn dirt into mud and compact it between fins. Clean fins very carefully: They're made of light-gauge aluminum and are easily damaged. If fins are bent, straighten them with fin comb, sold at most appliance parts stores. A fin comb is designed to slide into spaces between fins. Use it carefully to avoid damaging fins.

Step 4: Check concrete pad on which condenser rests to make sure it's level. Set carpenters' level front to back and side to side on top of unit. If pad has settled, lift pad with pry bar or piece of 2-by-4, then force gravel or rocks under concrete to level it.

During the fall and winter, outside condenser units should be protected from the elements to prevent leaf blockage and ice damage. Cover the condenser unit with a commercial condenser cover made to fit the shape of the unit or use heavy plastic sheeting secured with sturdy cord.

Handling the Refrigerant

The coolant used in most air conditioning systems is a refrigerant called Freon. If the system does not contain the proper amount of Freon, little or no cooling will take place. If you suspect a Freon problem, call a professional service person to recharge the system. Caution: Do not try to charge your system's refrigerant lines.

Here's how you can repair the system's coolant lines. Examine the lines running from the condenser outside the evaporator inside the house. If the insulation is damaged or worn, it will cut down on the cooling efficiency of the unit and, therefore, should be replaced.

Advertisement

Replace damaged or worn coolant line insulation with new insulation of the same type as soon as possible. Follow manufacturer's instructions for installation.

Many homes or apartments use window-unit air conditioners, so it's also important to know how to maintain or service these smaller units. Learn how to head off problems and keep these units running smoothly in the next section.

How to Troubleshoot a Window Unit

Both of the major components of a room air conditioner are contained in one housing. The condenser coil faces outside, and the evaporator faces inside.
Publications International, Ltd.

Room air c­onditioners, also called window units, work the same way central air conditioners do. They are smaller than central systems and often more expensive to operate. Depending on its size, a room unit may cool only the room in which it's located, or it may be able to cool adjoining rooms as well.

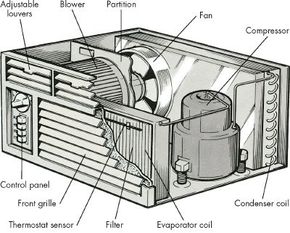
Sandwiched between the coils are a compressor, two fans, a motor, and thermostat controls. Dirt is the biggest enemy of window air conditioners; it can lower the efficiency of the evaporator coil, block the operation of the fan that blows out the cool air, clog filters, and block drain ports.

Advertisement

The coils, the compressor, and the motor of a room air conditioner are sealed components, so any repairs to them should be left to a professional service person. However, you can make minor repairs, and regular maintenance will keep your unit running well. When extensive repairs are needed, you can also save the cost of a service call by removing the air conditioner from its mounting and taking it to the repair shop.

During the winter, room air conditioners should be protected from the elements. Either remove the unit from its mounting and store it or cover the outside portion of the unit with a commercial room air conditioner cover or with heavy plastic sheeting, held in place with duct tape.

Caution: Before doing any work on a room air conditioner, make sure it's unplugged. Room air conditioners have either one or two capacitors, located behind the control panel and near the fan. Capacitors store electricity, even when the power to the unit is turned off. Before you do any work on an air conditioner, unplug it and discharge the capacitor or you could receive a severe shock. The unit's owner's manual will show the location of capacitors and tell how to discharge them. Otherwise, let an air conditioning technician do it.

Maintaining Key Components

The filter, power cord, coils, switch, thermostat, drain ports, and fan are important to service on a routine basis to avoid larger problems. Below are guidelines on how to maintain these key parts.

Filter

At the beginning of every cooling season and once a month during the season, remove the front grille and clean or replace the filter. If you live in a very dusty area, clean or replace the filter more often. Most room air conditioners have a washable filter that looks like sponge rubber.

Clean the filter with a solution of mild household detergent and water; rinse well. Let the filter dry completely before reinstalling it. Some units have a throwaway filter, similar to a furnace filter. When this type of filter becomes dirty, replace it with a new one of the same type.

Power Cord

The power cord that connects the air conditioner to the wall outlet may become worn and fail to supply electricity to the unit. To check the cord, remove the control panel. Unscrew the cord terminals and then attach a test wire across the bare lead wires.

Hook the clips of a volt-ohm-milliammeter (VOM) set to the RX1 scale to the prongs of the cord's plug. If the meter reads zero, the cord is functioning. If the meter reads higher than zero, replace the cord.

Evaporator and Condenser Coils

Clean the evaporator and condenser coils at the beginning of the cooling season and every month during the season. If you live in a very dusty area, clean the coils more often. Use a vacuum cleaner on these components.

If the fins on the coils are bent, straighten them with a fin comb, sold at most appliance parts outlets. A fin comb is designed to slide into the spaces between the fins. Use it carefully as the fins are made of light-gauge aluminum and are easily damaged.

Switch

The selector switch, located directly behind the control panel, turns the unit on. If the air conditioner does not run at any setting, and it is receiving power, chances are the switch is faulty. To correct the problem, remove the control panel and locate the switch. Check the switch terminals for burnt insulation or burn marks on the terminals. If you see any indication of burning, replace the switch with a new one of the same type.

The switch is held to the control panel or frame with screws; unscrew it and connect the new one the same way. If you determine the problem may not be the switch, call a professional service person.

Maintaining the thermostat and drain ports on your home air-conditioning window unit is vital to keep the whole system working properly. It won't be a difficult or burdensome task if you folllow the guidelines mentioned below.

Thermostat

The thermostat is located behind the control panel. Here's how to test and/or replace the thermostat:

Step 1: Remove grille and control panel from unit. Thermostat has special sensing bulb attached to it; this part extends from thermostat into evaporator coil area. Its role is to sense temperature, which is controlled by thermostat.

Advertisement

Step 2: Remove thermostat carefully because you must return sensing bulb to identical spot later. To make replacement easier, tag location of bulb before you remove thermostat.

Step 3: Check thermostat with VOM set to RX1 scale. Clip probes of tester to thermostat terminals, and turn temperature control dial to coldest setting. If meter reads zero, thermostat is functioning properly. If reading is higher than zero, replace thermostat with new one of same type. If thermostat is held to control panel or frame with screws, clips, or metal tabs, connect new thermostat the same way the old one was connected.

Note: If the thermostat has more than two lead wires connected to it (not counting the sensing bulb wire) do not try to test or replace it. Instead, call a professional service person.

Drain Ports

As the air conditioner operates, condensed moisture and water vapor from the evaporator coil are funneled through drain ports or an opening between the partition in the middle of the evaporator coil and the condenser coil. At this point, the fan blows the moisture against the condenser coil, where the water is dissipated.

Drain ports can become clogged with dirt. The result is water leaking from the appliance, usually through the bottom of the grille. To prevent clogging, clean the ports with a short piece of wire hanger or the blade of a pocketknife. Do this at the beginning of every cooling season and every month during the season. Also check the condenser side of the air conditioner. Some models have a drain port along the bottom edge of the cabinet frame. If your air conditioner has this drain port, clean it out when you clean the other ports.

The fan, motor, and compressor require routine maintenance to keep your air-conditioning unit running at its most efficient. The following are some simple guidelines.

Fan

When a fan malfunctions, the problem is usually loose or dirty blades. If the fan won't operate or if it's noisy, cleaning and tightening will usually fix it. Here's how to repair a room air conditioner's fan:

Step 1: Open cabinet and locate fan.

Advertisement

Step 2: Clean away any debris with vacuum and soft cloth.

Step 3: Check fan blade on motor shaft for looseness. Blade is fastened to shaft with setscrew at hub of blade.

Tighten setscrew with screwdriver or Allen wrench. If air conditioner has round vent fan, tighten fan on motor shaft by inserting long-blade screwdriver through port in fan.

Fan is installed in its h­ousing with bolts, and vibration can loosen these fasteners. Then tighten them with wrench.

Step 4: If fan has oil ports, apply several drops of 20-weight nondetergent motor oil (not all-purpose oil) to each port at beginning of cooling season.

Step 5: If you suspect fan motor is faulty, test it with VOM set to RX1 scale. Disconnect terminal wires from terminals, and clip probes of VOM to wires.

If meter reads between about 3 and 30 ohms, motor is functioning properly. If meter reads either zero or an extremely high number, replace motor.

To remove the fan motor, remove the fan, the power wires, and several mounting bolts. Install the new motor with the reverse procedure. However, if the condenser coil must be moved to get the fan out, do not try to remove the motor. Call a professional service person.

Motor and Compressor

If problems occur in the motor or compressor of the air conditioner, call a professional service person.

By following the routine maintenance mentioned in this article, you will be able to handle most problems that occur with your central air conditioning or window unit.