How to Repair a Refrigerator

By: Fix-It Club  | 
How much do you know about refrigerator repair?
©iStockphoto.com/jean gill

Key Takeaways

  • Basic refrigerator repairs can be done at home with a bit of knowledge and patience, involving components like door gaskets, thermostats and defrost timers.
  • Before performing any work on a refrigerator or freezer, it’s crucial to unplug the appliance and, if applicable, safely discharge the capacitor to avoid electrical shock.
  • While many refrigerator problems can be addressed by a DIYer, issues involving the coolant system, motor or compressor are best left to professional service persons.

A refrigerator is one of the few appliances in your home that runs continuously, day or night, keeping your food cold. If you consider how hard a refrigerator has to work, it is actually quite amazing that they break down so infrequently. On the rare occasion your refrigerator does stop working, you may face a high repair bill and the expense of replacing all your lost food. Have no fear! This article is here to tell you everything you need to know about repairing your refrigerator and freezer yourself. You might be surprised to learn that repairs are actually quite easy, requiring only a little knowledge about the appliance and a little patience. Let's get started with some basic information.

Refrigerators and freezers consist of two basic components: a condenser coil and an evaporator coil. A liquid coolant is circulated through these coils by a compressor and a motor. The refrigerant liquid is cooled in the condenser; it then flows to the evaporator. At the evaporator, the air in the unit is cooled by contact with the liquid-filled coil. The condenser of a refrigerator or freezer is the coil on the outside of the unit; the evaporator is the coil on the inside. The coolant is circulated through the system by a compressor.

Advertisement

Most refrigerators and freezers are frost-free. In this type of unit, a heater is automatically turned on by a timer in order to melt the frost inside the unit. Frost is melted by the heater at several different spots in the unit, starting with the coldest and most frosted areas. When the frost is completely melted, the thermostat automatically switches to a cooling cycle in order to maintain the standard freezing temperature. Because this process is automatic, frost does not build up inside the box.

The unit's compressor system, which forces the coolant through the coil system, is driven by a capacitor-type motor. Other basic parts of the cooling/defrosting system include switches, thermostats, heaters, condensers, and fans. A do-it-yourselfer can test and replace many of these refrigerator components. However, there are exceptions, as explained later, that are best left to a professional repair person.

Caution: Before doing any work on a refrigerator or freezer, make sure it's unplugged. After unplugging the unit, check to see if the motor/compressor has a capacitor; this component is located in a housing on the top of the motor. Capacitors store electricity, even when the power to the unit is turned off. Before you do any work on a capacitor-type refrigerator or freezer, you must discharge the capacitor, or you could receive a severe shock.

Advertisement
Discharing a Capacitor

To discharge the capacitor:

Step 1: Unplug the refrigerator or freezer.

Advertisement

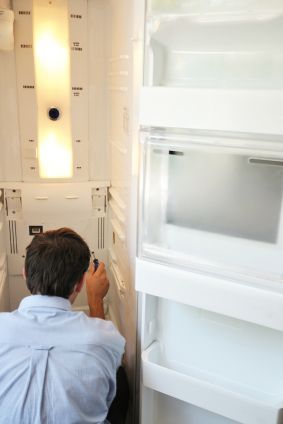
Step 2: To gain access to the capacitor, remove the service panel over the back rear portion of the unit or the service panel on the front of the unit below the door, as detailed later for disassembly. The capacitor is located in a housing on the top of the motor/compressor unit; it looks like a large dry cell battery.

Step 3: To discharge the capacitor, use a 20,000-ohm, 2-watt resistor -- an inexpensive wire unit available at most electrical supply stores. Fasten the probes of the resistor to the terminals of the capacitor; this discharges the capacitor. If the capacitor has three terminal posts, connect the resistor to one outer terminal and the center terminal, then to the other outside terminal and the center terminal. After discharging the capacitor, you can proceed with the repairs.

Disassembling the Refrigerator

The control components of a refrigerator are usually located in the top or upper section of the unit. The motor, compressor, condenser coil, and condenser fan are located in the bottom section.

To gain access to the components in the upper section of the unit, remove the retaining screws or pry out the clips that hold plastic or metal panels over the parts. These fasteners may be hidden by trim or molding; in this case, pry off the trim or molding with a stiff-bladed putty knife. Protruding controls may also serve as retainers for the various panel sections. In most refrigerators, the shelves can be removed to allow access to some of the panels.

To gain access to the lower section of the refrigerator, remove a service panel held by retaining screws at the back of the unit below the condenser coils. The unit may also have a front access panel below the door. This panel may be held by retaining screws, or it may slip up and off two side brackets. On some models, you can tip the refrigerator over and test and service parts from the bottom. In this case, the refrigerator must be defrosted, unplugged, and emptied before any servicing can be done.

The condenser and evaporator coils and the compressor are sealed units on most refrigerators. If a malfunction occurs within these parts, call a professional service person. Other parts can usually be unscrewed or pried loose from mounting brackets.

Testing the Power Cord

If the cord of the unit looks frayed, or if you see burn marks on the prongs of the plug or at the terminal screws -- on the terminal block, under the rear access panel of the unit -- the cord may be faulty. Test the cord with a VOM set to the RX1 scale (instructions for using the VOM can be found here).

An enormous number of refrigerator problems can stem from the simple opening and closing of the door. From improper temperature to an abundance of frost, door maintenance could solve all your problems. To learn how to service your refrigerator door, move on to the next section.

Advertisement

Servicing a Refrigerator Door

If you find that your refrigerator's compressor is constantly running -- wasting energy and cutting down the life of your appliance -- it could be due to problems with the door. Ideally, the climate inside a refrigerator would never be broken, and the unit could maintain a steady temperature all the time. Of course, we have to open our refrigerators many times a day. Here are some tips to keep your doors working properly and to keep the warm air away from your food.

Servicing the Door Gasket

When a refrigerator gasket (usually a rubber seal around the door) becomes hard or cracked, its seal is broken, and the unit's efficiency drops sharply. Test the door gasket for leaks by placing a dollar bill between the gasket and the door jamb and closing the door. Pull the bill out. If it offers some resistance, chances are the gasket fits properly. If the bill comes right out, or falls out, the gasket is faulty and should be replaced. Test the gasket at several locations around the door. Before you replace the gasket, check the door hinges for leakage.

Advertisement

To replace a gasket:

Step 1: Buy a gasket made specifically for the model refrigerator you own. So-called fit-all gaskets may fit after a fashion, but tailoring them to the door's configuration can be a tough job. If you aren't sure about the model number of your refrigerator, cut out a small section of the gasket and take the sample to an appliance dealer for matching. If the gasket has to be ordered, you can glue the section back into the gap with rubber cement for a make-do repair until the new gasket comes in.

Step 2: Let the new gasket sit about 24 hours in the room with the refrigerator to bring it to the correct temperature and humidity, or soak the gasket in warm water to make it pliable.

Step 3: Begin removing the old gasket. Door gaskets are held by screws, clips, or adhesives, and the gasket may have a retaining strip, which helps shape it and provides a fastening tab or guide. On some units, the gasket may be held in place by the edge of the door panel; the panel is fastened with spring-steel pressure clips, bolts, or screws. To remove the gasket, remove the fasteners that hold it and remove any retaining strips; or remove the fasteners that hold the door panel.

Step 4: Finish removing the fasteners on one side of the door at a time. Do not remove the entire door panel. If the gasket is held by spring clips, be careful not to pry too hard on the clips; they're under tension and could spring out of their mountings. If the gasket is held by adhesive, pry it off with a putty knife.

Step 5: When the old gasket is off, clean the mounting area thoroughly with mild household detergent and water. Remove stubborn adhesive with mineral spirits and fine steel wool, followed by a detergent/water rinse.

Step 6: Start the replacement at one side of the top of the door. Work down the sides to replace the entire gasket. Smooth the gasket evenly into place, easing it around corners. Use gasket cement to secure it if the manufacturer specifies this step. Make sure the gasket lies flat, with no lumps or curled edges.

Step 7: Replace the fasteners, retaining strips, or panel that held the old gasket. After the gasket is in place, tighten or loosen the mounting bolts necessary to adjust the gasket to the door jamb. If the gasket is glued in place, there isn't much you can do but wait for the gasket to conform to the door jamb.

Test the gasket on a freezer door with the same dollar-bill procedure; if the gasket is faulty, replace it with a new gasket made especially for the freezer. Do not remove the freezer door to replace the gasket. Freezer doors are often tensioned with spring devices, which can be very troublesome to replace after the door has been removed, and on some models wiring has to be disassembled as well.

Advertisement

Servicing Door Hinges

A worn or broken door gasket may not be the cause of door leaks. Misaligned and loose door hinges can cause the door to rock or sag slightly, making even a well-fitted gasket ineffective.

Step 1: If the door won't shut tightly, tip the refrigerator slightly backward by propping up the front of the unit or unscrewing the front leveling legs two complete turns. Experiment with this adjustment until the door stays closed, but don't tip the unit very far out of front-to-back level.

Advertisement

Step 2: If leveling doesn't work, tighten the hinge screws. You may have to open the door (especially the freezer door) to turn these screws. On some units, you may have to remove a hinge cap or trim to reach the screws; pry off the cap or trim with a screwdriver. Sagging and looseness can be corrected by shimming the door hinges. Loosen the hinge and place a hinge-shaped cardboard shim between the hinge and the door. Then tighten the hinge again. Sagging may also be caused by a wrongly placed shim. In this case, you can correct the problem by removing the shim. Experiment with the shims; you may be able to eliminate the sagging.

Step 3: If the door is warped, tighten the screws that hold the inner door shell to the outer door shell. You may have to change or adjust the door gasket after making this adjustment.

Step 4: Check the catch. Newer units have a magnetic catch on the door. If the door doesn't latch properly, remove the magnetic strike from the inner door shell and shim it slightly with a piece of thin cardboard. You may have to adjust the gasket to conform with the new shim.

Servicing the Door Switch

On the refrigerator door jamb, locate a small push-button switch. This component operates the light inside the refrigerator. If the switch is malfunctioning, the light in the unit may stay on, and the heat from the lightbulb can cause cooling trouble in the box.

Step 1: Check the bulb to see if it is burned out. If not, depress the push button on the door switch.

Step 2: If the light stays on, clean the switch with a cloth. Then remove the switch from the jamb. Remove retaining screws hidden by a plastic trim piece, pry the switch out of the jamb with a screwdriver, or pry off the jamb trim to expose the switch. Then test the switch with a VOM set to the RX1 scale (instructions for using the VOM are given on page 19).

Step 3: Clip one probe of the VOM to each terminal of the switch and press the push button. The meter should read zero. If the needle on the scale moves above zero, replace the switch with a new one of the same type.

Step 4: Connect the new switch the same way the old one was connected.

Now that we have thoroughly exhausted door repair, there's nothing left to do except move inside and learn about the internal components of a refrigerator. In the next section, you will learn everything from how to repair a leak to how to service your ice maker.

Advertisement

Servicing Internal Components

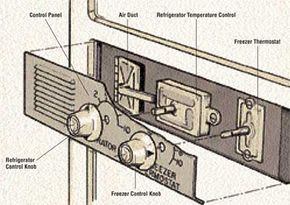
Thermostat controls regulate the temperature of the refrigerator and freezer. Remove the control panel to reach the controls.
©2006 Publications International, Ltd.

The inner-workings of a refrigerator can be a mixed bag. Some components are fairly easy to service or repair, while others should only be handled by professionals.

Servicing the Limit Switch

The limit switch is found only on frost-free refrigerators and freezers. Its function is to keep the defrost heating element from exceeding certain set temperatures. If a refrigerator has lots of frost in the freezer compartment, the problem may be the limit switch. However, other components -- the evaporator fan, the defrost timer, and the defrost heater -- can cause the same problem. Check these for malfunctions, as detailed below. If these parts are in working condition, the problem is most likely in the limit switch. Don't try to fix the limit switch yourself; call a professional service person for replacement.

Advertisement

Servicing the Thermostat Control

The thermostat control is usually mounted inside the refrigerator. Its visible control knob is turned to regulate the refrigerator/freezer temperature. The workability of this control can be tested in various ways, depending on the problem. To test the thermostat control:

Step 1: If the compressor runs all the time, turn the control knob to the OFF position. If the compressor still runs, unplug the unit, then pull off the control knob and remove the screws holding the thermostat in place. Pull out the thermostat and remove either the red or the blue wire from its terminal. Plug in the unit. If the compressor doesn't run, the thermostat is faulty. Replace it with a new thermostat.

Step 2: If the compressor runs after the wire is removed from its terminal, there is probably a short circuit somewhere in the unit's wiring. In this case, don't try to fix the problem yourself; call a professional service person.

Step 3: If the refrigerator or freezer runs but the box doesn't cool, unplug the unit and remove the thermostat with a screwdriver. Disconnect both wires from the thermostat. Tape the ends of the wires together with electrical tape, and plug in the appliance. If the refrigerator starts and runs normally, the thermostat is faulty. Replace it with a new one of the same type. Connect the new thermostat the same way the old one was connected.

Step 4: If the freezer compartment is normal but the refrigerator box doesn't cool, set the dials that control both compartments to mid-range. Remove these knobs (they're usually friction-fit). Then unscrew the temperature control housing; you'll see an air duct near the control. Replace the knob on the freezer thermostat and turn the control to the OFF position. Open the refrigerator door and look closely at the air duct. If this duct doesn't open wider in about ten minutes, the control is faulty. Replace the control with a new one of the same type. Connect the new control the same way the old one was connected.

Servicing the Evaporator Fan

In some cases, a faulty thermostat may not be the cause of a warm refrigerator or freezer. A warm box may also be caused by a defective fan, a blocked fan, or broken or bent fan blades. If the blades are jammed, try to free them. If they're bent, straighten them with pliers. If this doesn't solve the problem, call a professional service person.

On some refrigerators, the door switch operates the evaporator fan. If the fan seems to be malfunctioning, the door switch could be faulty. Test the switch as detailed in the last page, and replace it if necessary.

Advertisement

Servicing the Defrost Timer

If the compressor doesn't run, it is likely that the defrost timer is malfunctioning. This part is located near the compressor. To test the defrost timer:

Step 1: Unplug the refrigerator.

Advertisement

Step 2: Disconnect the wires from the timer and timer motor. Remove the timer from its brackets by backing out two retaining screws.

Step 3: Test the defrost timer with a VOM set to the RX1 scale. Clip one probe of the VOM to each defrost timer -- not motor -- wire, and turn the timer control screw shaft until it clicks. If the defrost timer is functioning, the meter will read zero. If the needle jumps, the defrost timer is faulty. Replace it with a new one of the same type.

Step 4: Connect the new defrost timer the same way the old one was connected.

To check the defrost timer motor, clip one probe of the VOM to each motor wire, setting the scale to RX100. If the meter reads between about 500 and 3,000 ohms, the motor is functioning properly. If the meter reads higher than 3,000 ohms, the timer motor is faulty. Replace it with a new one of the same type. Connect the new motor the same way the old one was connected.

Servicing the Defrost Heater

This component is a heating element located on the evaporator coil. When the refrigerator or freezer switches to the defrost cycle, the defrost heater is turned on to melt the frost in the compartment. Failure of the defrost heater causes failure to defrost.

Test the element with a VOM set to the RX1 scale. To gain access to the heating element, remove the compartment's wall panels. Clip one probe of the VOM to each element terminal. The meter should read between 5 and 20 ohms. If it doesn't, the heating element is faulty and should be replaced. Replace the heater with a new one of the same type and electrical rating. Connect the new heater the same way the old one was connected.

Servicing the Condenser Fan

The condenser fan is located under the unit. If the fan is malfunctioning, the refrigerator or freezer won't cool properly, or it will run continuously or not at all.

Test the fan with a VOM set to the RX1 scale. Disconnect the electrical wires to the fan motor and clip one probe of the VOM to each fan motor terminal. If the meter reads from 50 to 200 ohms, the motor is functioning properly. If the meter reads higher than 200 ohms, the fan motor is faulty and you should replace it.

While you're working on the fan motor, make sure the fan blades are clean and unobstructed. If the blades are bent, carefully straighten them with pliers.

Clearing the Drain Ports

The drain ports are located along the bottom of both the freezer and the refrigerator sections of the unit. These holes can become clogged with debris or ice, causing a drainage problem when the unit is defrosting. To clear the ports, use a short section of wire that will fit the holes. Do not use a toothpick, because the wood may break off in the port and become stuck. On some refrigerators, the drain ports are located near the defrost heater at the evaporator coils. A lot of disassembly is required to clean this type of unit. If the refrigerator or freezer is this type, you may be better off calling a professional service person to clear the ports.

On some freezer compartments, the drain is located under the freezer compartment and shaped like a shoehorn. This type of drain can usually be unscrewed so that the drain area can be cleaned.

Servicing the Drain Hose and Pan

The condenser fan is located under the bottom of the refrigerator. During the defrosting cycle, water may run through a small hose into the drain pan and is naturally evaporated. On some refrigerators, the drain hose is rubber instead of metal. This type of hose can become cracked, causing leaks. Examine the hose. If it's damaged, replace it with a new one of the same type. If you spot water on the floor, the drain pan may be tipped on its brackets, or the pan may be cracked or rusted. To eliminate the leak, realign or replace the pan.

Servicing Ice Makers

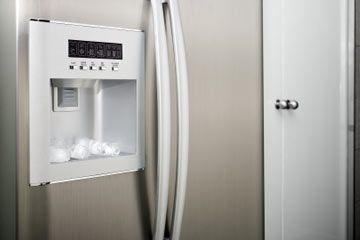
Freezers with automatic ice makers sometimes malfunction because the water inlet valve strainer that feeds water to the ice maker becomes clogged. To correct this problem, unplug the appliance and disconnect the water supply. Remove the water line where it enters the valve--usually at the bottom edge of the unit. Locate the wire strainer and remove it. Clean the strainer with a stiff brush, using mild household detergent. Reassemble the component in reverse fashion.

Servicing a Refrigerant Leak

Coolant leaks are identifiable by their acrid smell. There is nothing you can do to repair a coolant leak except call a professional service person to deal with the problem.

Servicing the Motor/Compressor

The compressor and motor of a refrigerator or freezer are contained in a sealed unit. If you trace problems to either of these components, do not try to fix the unit yourself. Call a professional service person.

As you've seen, some common refrigerator problems (like faulty gaskets) can easily be repaired at home, while others (like a motor or compressor) are beyond the scope of the average handyman. Now you know how to make the small repairs, as well as when you've met your match.

©Publications International, Ltd.

Advertisement

Frequently Asked Questions

How can I tell that my refrigerator's problem is with the compressor?
Signs that a refrigerator’s compressor might be failing include the fridge not cooling properly, strange noises coming from the fridge and the compressor feeling too hot to touch or not running at all.
What's the best way to clean refrigerator coils?
To clean refrigerator coils, unplug the fridge and locate the coils (either behind or beneath the unit). Then gently remove any dust and debris with a coil brush or vacuum attachment. Vacuum or wipe away any remaining dust.

Advertisement

Loading...