Adding new furniture to your home can not only improve and enhance the way you use the space, it can dramatically change the look of a room. But buying furniture is a significant investment, and it can be difficult to find exactly what you're looking for -- the style, color and long-lasting quality you have in mind.
Don't let your budget prevent you from getting the furniture pieces you need. With a few tools and a little time, you can use the instructions in this article to create your own wooden furniture pieces by hand. Not only is building your own furniture much less expensive than buying from a store, it puts you in control. You can select just the wood and just the paint or stain you want, so you're sure to create exactly the piece you have in mind.
Advertisement
Whether you're looking for a bookcase, desk, telephone stand or plant stand, the easy-to-follow instructions on the following pages will get you on your way to the furniture you've been wanting.
Continue to the next page to begin your first furniture-building project: a simple, freestanding bookcase.
For more ideas related to creating your own furniture, see:
How to Repair Wooden Furniture: You don't have to start from scratch and make new furniture. Learn how to repair the wooden pieces you already have.
How to Stain Wooden Furniture: Staining wooden furniture adds protection as well as beautiful color, and when you do it yourself, you can get just the shade you want. Follow this link for instructions on staining pieces you've purchased or handmade.
A Guide to Decorating Wooden Furniture: Wooden furniture can be decorated to fit any design scheme or color palette. Use this guide to transform simple items into elegant, finished pieces that will accent your home.
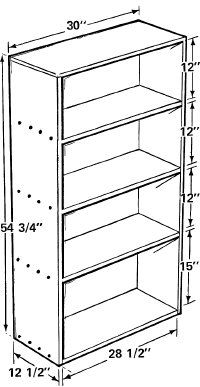
The bookcase stands 54 3/4 inches high and 30 inches wide, with three shelves; molding covers the cut edges.
Are books and magazines scattered all over your home or office? Has it been weeks since you saw the surface of your desk or kitchen table? Correct this mess quickly by following these
Tools:
Advertisement
measuring rule
pencil
square
straightedge
power saw
hammer
miter box
handsaw
nail set
Materials:
3/4-inch grade A-B interior plywood
carpenters' glue
6-penny finishing nails
1/8-inch tempered hardboard
5/8-inch brads
1-inch brads
shelf-edge molding
wood filler
sandpaper
stain or paint
The overall outside dimensions of this bookcase will be 30 inches wide, 12 1/2-inches deep, and 54 3/4-inches high. The bottom shelf will be 15 inches high; and the other two shelves will be 12 inches high.
Cut two 12x54-inch pieces of 3/4-inch plywood for the bookcase sides. Cut a 12x30-inch piece of 3/4-inch plywood for the top. Cut a 12x28 1/2-inch piece of 3/4-inch plywood for the bottom. Cut all pieces so that the face grain of the plywood runs lengthwise.
Set the four cut pieces on edge on a flat working surface in the form of a rectangle, with the bottom piece between the sides and the top piece on top of the sides. Apply a bead of carpenter's glue along all butt joints and align the joints carefully so that all faces are flush. Drive three 6-penny finishing nails into each joint.
Cut a 30x54 3/4-inch piece of 1/8-inch tempered hardboard for the back; make sure that the piece is perfectly square. Set the back on the bookcase frame and adjust it until the frame is square and flush with all edges of the back piece. Apply a bead of glue all along the edge of the bookcase frame and set the back piece into place with its smooth side facing the inside of the bookcase. Secure the back with 5/8-inch brads, about 12 inches apart and 3/4-inch in from the edges.
Set the bookcase up on its side and measure off 15 inches along that side from the face of the bottom piece. With a square and a pencil, make a light line across the side from front to back to mark the edge of the shelf. From that line, measure out 3/4-inch and draw another light line. Measure up another 12 inches and draw a line, then up another 3/4-inch and draw another line. Measure up another 12 inches and 3/4-inch, and draw lines marking the top shelf. Turn the bookcase over onto its other side and repeat to mark the shelves on that side. These guidelines mark the levels where the shelves will be set.
Cut three 11 1/2x28 1/2-inch pieces of 3/4-inch plywood for shelves; make sure that the face grain runs lengthwise. Apply a bead of glue to each end and the back edge of each shelf. Slip each shelf into position, carefully aligned on the guidelines. Nail it in place by driving four 6-penny finishing nails through the bookcase sides from the outside and into the shelf ends at each joint.
Lay the bookcase face down. Measure up from the bottom at each side a distance of 16 1/8 inches, and make a mark at each point. Line the marks up with a straightedge and draw a pencil line between them. Similarly, measure up 12 inches from that line and draw another line, then measure up another 12 inches and make another line. Nail the back piece to the rear shelf edges along these guidelines, using 1-inch brads spaced every 6 inches.
Lay the bookcase face up. Cut two 54 3/4-inch lengths of shelf-edge molding. Miter each end to a 45-degree angle. Apply a bead of glue to the edges of the sides. Set the moldings in place and align them carefully. Secure the molding with 1-inch brads spaced every 10 to 12 inches.
Cut two 30-inch lengths of molding. Miter each end to a 45-degree angle. Apply a bead of glue along the edges of the top and bottom pieces. Set the molding into place and align the pieces carefully. Secure the molding with 1-inch brads spaced every 10 to 12 inches.
Cut three 28 1/2-inch lengths of molding. Apply glue to the leading edges of the shelves. Set the molding in place and secure the strips with 1-inch brads.
With a nail set and hammer, sink all of the nailheads--except those on the back panel--slightly below the surface of the wood. Fill the nailhead holes with wood filler. Sand the bookcase smooth. Finally, stain or paint as desired.
For more ideas related to creating your own furniture, see:
How to Repair Wooden Furniture: You don't have to start from scratch and make new furniture. Learn how to repair the wooden pieces you already have.
How to Stain Wooden Furniture: Staining wooden furniture adds protection as well as beautiful color, and when you do it yourself, you can get just the shade you want. Follow this link for instructions on staining pieces you've purchased or handmade.
A Guide to Decorating Wooden Furniture: Wooden furniture can be decorated to fit any design scheme or color palette. Use this guide to transform simple items into elegant, finished pieces that will accent your home.
Advertisement
How to Build a Desk
One side of this desk is supported by the desk top resting on a standard two-drawer file cabinet.
A desk can be a big help in organizing and managing household paperwork, and it need not be elaborate to do a good job. This model is easy to build and can be used even where space is limited.
Tools:
measuring rule
pencil
square
straightedge
power saw
hammer
miter box
handsaw
nail set
paintbrushes
Materials:
1 × 4 and 2 × 4 stock
carpenters' glue
6-penny finishing nails
3/4-inch grade A-B plywood
8-penny finishing nails
shelf-edge molding
3/4-inch brads
wood filler
sandpaper
primer
paint
two-drawer file cabinet
Time: about 3 to 4 hours, plus time for painting
Advertisement
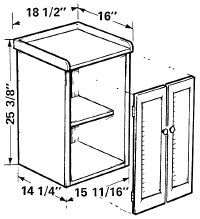
This desk is designed to accommodate a standard two-drawer file cabinet, measuring 29 inches high, 15 1/4 inches wide, and 22 inches deep, which is set at one end as one of the desk's supports. If the file cabinet you use is a different size, you'll have to alter the following desk dimensions accordingly. The overall dimensions of the desk in this project are 48 inches in length, 24 inches in depth, and 29 3/4 inches in height. This desck can be used with any chair of standard height, including a stenographer's chair.
To begin the project, cut two pieces of 1 × 4 to 30 3/4 inches long, one piece of 1 × 4 to 20 1/2 inches long, and one piece of 2 × 4 to 20 1/2 inches long.
Set the 1 × 4 and 2 × 4 pieces on edge on a flat working surface in the form of a rectangle. Position the 2 × 4 side piece with its outside face back exactly 3/4 inch from the ends of the front and back 1 × 4s. Apply carpenters' glue to the joints and, after aligning them carefully, nail them together with two 6-penny finishing nails each.
Cut a 20 1/2 × 29-inch piece of 3/4-inch plywood for the desk's end panel.
Position the panel against the 2 × 4 side piece on the outside face, between the front and back pieces, with the top edge flush with the top of the desk frame. Apply glue to the butt joints and a generous coating of glue to one face of the end-panel/side-piece joint. Secure the panel by driving a pair of 8-penny finishing nails through the faces of the front and back pieces of the framework and into the edges of the plywood panel. Also drive six 6-penny finishing nails -- staggered and spaced -- through the face of the end panel and into the 2 × 4 side piece.
The desk frame is 1 × 4s, with a 2 × 4 reinforcement along the end panel. The top overhangs the frame.
Cut a 24 × 48-inch piece of 3/4-inch plywood for the top of the desk, with the plywood face grain running lengthwise. Apply glue to the top edge of the desk-frame/end-panel assembly, and position the top so that it overhangs at the rear by 3/4 inch, at the front by 11/4 inches, and at the right side by 1 inch. Nail the desk top to the framework with 6-penny finishing nails, which should be driven through the top and into the edges of the frame members and end panel. Secure the desk top with nails at each corner, spaced about 2 inches from the corners in each direction, and space the remaining nails about 11 to 12 inches apart. Drive three more 8-penny finishing nails down into the 2 × 4 side member.
Cut strips of shelf-edge molding to fit along the front and side edges of the desk top and to cover the front edge of the end panel. Work carefully and fit each piece of molding individually. If you use square-edge molding, butt joints can be employed, but rounded-edge molding is best mitered to 45 degrees to form perfect right-angle corners on the top piece.
Apply glue to the molding and position the strips. Once in place, secure the strips with 3/4-inch brads.
With a hammer and nail set, sink all nailheads slightly below the surface of the wood. Fill the nailhead holes, as well as any imperfections in the wood surface or joints, with wood filler. Then sand the entire desk to a smooth finish.
Apply a coat of primer, followed by two coats of semigloss interior latex (or other) paint. Let the paint dry completely; then set the desk into position over a two-drawer file cabinet.
Ta-da! Let the organization begin.
If a smaller organization area might also be handy, check out the next page for details on how to build a telephone stand.
For more ideas related to creating your own furniture, see:
How to Repair Wooden Furniture: You don't have to start from scratch and make new furniture. Learn how to repair the wooden pieces you already have.
How to Stain Wooden Furniture: Staining wooden furniture adds protection as well as beautiful color, and when you do it yourself, you can get just the shade you want. Follow this link for instructions on staining pieces you've purchased or handmade.
A Guide to Decorating Wooden Furniture: Wooden furniture can be decorated to fit any design scheme or color palette. Use this guide to transform simple items into elegant, finished pieces that will accent your home.
Advertisement
How to Build a Telephone Stand
The edged top keeps telephone and note pads in place.
If you want a special spot for your desk-style telephone, this easy-to-build combination telephone stand/cabinet keeps phone, note pad and pencil, and telephone directories in one convenient place. With everything in one spot, you'll also save space and hide clutter, while adding an interesting piece of furniture to your home.
TooIs:
measuring rule
pencil
square
straightedge
power saw
hammer
miter box
handsaw
coping saw
screwdriver
nail set
paintbrushes
Materials:
3/4-inch grade A-B plywood
carpenters' glue
6-penny finishing nails
shelf-edge molding
1-inch brads
1 × 2 clear pine stock
two 7 × 23-inch stock louvered doors
two cabinet knobs
four decorative surface-mount hinges
two cabinet door roller-catch assemblies
wood putty
sandpaper
primer
latex paint
Time: about 3 to 4 hours, plus finishing timeBegin the project by cutting the six main pieces of the telephone stand from 3/4-inch plywood. Be sure to cut all pieces with the plywood face grain running parallel to the long dimension:
Advertisement
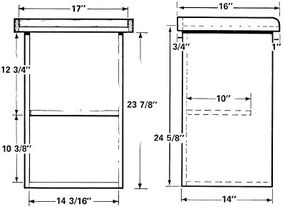
bottom,14 × 14 3/16 inches
two sides, 14 × 23 7/8 inches each
top, 15 × 17 inches
back, 14 3/16 × 23 1/8 inches
Next, lay the back piece on a flat working surface and apply a bead of carpenters' glue along one of its long edges. Stand the bottom piece up against the glued edge, with the corners of the pieces flush. Nail the bottom to the back with four 6-penny finishing nails.Lay the glued and nailed assembly on its side and run a bead of glue along the uppermost edge. Set a side piece into place so that the top corners meet, the bottom edge of the side is flush with the bottom surface of the bottom piece, and one side edge is flush with the outside surface of the back. Nail the side into place with three 6-penny finishing nails, which should be spaced and driven into the edge of the bottom. Finish securing the piece by driving five more nails into the edge of the back of the telephone stand. Turn the assembly over, and repeat these steps to attach the other side piece.Set the assembly upright and run a bead of glue along the top edges of the back and side pieces. Set the top piece into place so that the rear edge is flush with the back surface of the cabinet, leaving a 1-inch lip at the front and centering the top so there's a lip of about 3/4-inch at each side. Secure the top with three 6-penny finishing nails along each side and four more across the back, driven down into the edges; space the nailing line along the sides 1 3/32 inch in from the edge of the top piece.Cut a 10 × 14 3/16-inch piece of plywood for the shelf, and check it for a snug fit between the sides of the stand. With a measuring rule, square, and pencil, locate and mark a guideline across the inside face of each side piece, 10 3/8 inches up from the inside face of the bottom piece. Apply glue to the back and side edges of the shelf and slip it into place, aligned on the guidelines.Next, draw light pencil guidelines on the sides and back of the cabinet to mark the edges of the shelf. Secure the shelf with three 6-penny finishing nails, which should be driven through the sides and into each end of the shelf. Drive four more nails through the back of the cabinet into the edge of the shelf.
Inside the telephone stand, the shelf is set back to provide easy access to bottom storage.
Lay the telephone stand on its back. Cut strips of shelf-edge molding to fit all the front edges of the plywood pieces -- top, bottom, sides, and shelf. Fit the molding exactly, using either butt or mitered joints. Apply glue to the edges and secure the strips with 1-inch brads set about 6 inches apart.
Cut two lengths of 1 × 2 pine stock to 15 3/4 inches, plus the thickness of the shelf edging -- the edging will probably be 3/8 inch thick, but this can vary slightly. Round the top of one end of each edging piece to a radius of about 3/4 inch or to a gentle curve. Just be sure the two pieces are identical and well-rounded.
Apply a bead of glue along the side edges of the top piece of the telephone stand's cabinet. Secure each pine strip with three 6-penny finishing nails, placing the rounded end forward and flush at the front and back, with the bottom edge aligned with the bottom surface of the top piece. Drive the nails into the edges of the top piece.
Cut a 17-inch-long piece of 1 × 2 pine stock. Apply glue to the rear edge of the top piece and to the ends of the pine strip. Position this strip between the first two pine strips, with the top edges flush, and secure it with four evenly spaced 6-penny finishing nails. Then align the top corners and drive two more 6-penny nails through the side strips into the ends of the back strip.
Mount a cabinet knob on each door, on the longitudinal centerline of the door and 6 inches down from the top. Mount hinges on each door, on opposite sides, with the top of the top hinges 4 inches down from the top of each door and the bottom of the bottom hinges 4 inches up from the bottom of the door.
Set each door into place and adjust it so that there is a 1/16-inch clearance at the top, bottom, and side. Secure the hinges to the stand's edges, then center each screw exactly in the hinge mounting hole and drive it perfectly straight to align the door properly.
Mount the roller catches to latch the doors, following the instructions provided by the manufacturer. Then set a catch on the inside of each side of the top piece, with each catch centered on the longitudinal centerline of the inside door frame -- in line with the knob.
Remove the doors and take the hardware off. With a hammer and nail set, sink all visible nailheads slightly below the surface of the wood. Fill the nailhead holes and any imperfections in the joints or wood surfaces with wood putty, then sand both the cabinet and the doors smooth.
To finish the stand, apply a coat of primer, followed by two coats of interior semigloss latex (or other) paint.
When dry, place your phone on top of the telephone stand and anything you're likely to need while making a call inside the cabinet.
To further add to your home's distinction and organization, continue to the next page to build a plant stand.
For more ideas related to creating your own furniture, see:
How to Repair Wooden Furniture: You don't have to start from scratch and make new furniture. Learn how to repair the wooden pieces you already have.
How to Stain Wooden Furniture: Staining wooden furniture adds protection as well as beautiful color, and when you do it yourself, you can get just the shade you want. Follow this link for instructions on staining pieces you've purchased or handmade.
A Guide to Decorating Wooden Furniture: Wooden furniture can be decorated to fit any design scheme or color palette. Use this guide to transform simple items into elegant, finished pieces that will accent your home.
Advertisement
How to Build a Plant Stand
Follow instructions to make the base pieces and top.
Plants love special attention (and really, don't we all?), so give a favorite plant some extra elevation and added presence in your home by making a plant stand for it. This simple stand works well on a table or on the floor, and for more height or larger plants, you can change the dimensions as needed.
Tools:
measuring rule
pencil
carpenters' square
handsaw or saber saw
drill with 3/4-inch, 9/64-inch or #28, and 1/16-inch or #52 bits
straightedge
chisel
hammer
fine-toothed flat file
miter box and backsaw
nail set
sanding block
countersink
screwdriver
paintbrush
Materials:
3/4-inch grade A-A or furniture-grade plywood
half-round molding
hide glue
3-penny finishing nails
medium- and fine-grit sandpaper
rag
2-inch #6 flathead wood screws
plastic wood
paint or stain
Time: about 3 hours, plus drying and finishing timeFor a finished and professional-looking plant stand, use 3/4-inch grade A-A or furniture-grade plywood, and buy half-round molding to cover the cut edges. Measure and mark two plywood base pieces 12 inches wide and 24 inches long, with the grain of the plywood running the long way. Use a carpenters' square to keep the corners accurate, and cut the base pieces with a handsaw or a saber saw.Measure and mark the horizontal and vertical centerline of each piece. Then, on the vertical centerline of each piece, mark a point 3/8-inch below the horizontal centerline. Drill a 3/4-inch hole at this point. To avoid splintering, drill through the marked point just until the bit starts to protrude from the other side. Then turn the piece of plywood over and drill through the other side to complete the hole.
Advertisement
With a straightedge, draw lines from the sides of the hole down to the bottom of each base piece, outlining a 3/4-inch-wide slot on each piece. Carefully cut out the marked slots with a handsaw or a saber saw, cutting along the inside of the lines so the slots are an even 3/4 inch wide.
Square the rounded tops of the slots with a saber saw or a chisel and hammer. If you use a chisel, be careful not to splinter the wood; make many small cuts instead of one or two large ones. Smooth the raw edges of the slots carefully with a fine-toothed flat file, and test the slots as you work with a scrap piece of 3/4-inch plywood. File only until the slots are wide enough to accept the scrap. Smooth the slots carefully and accurately; the cut sides must be flat and square, and the edges must not splinter or become rounded.
To make the top of the stand, mark and measure a 14-inch-square piece of plywood, using a carpenters' square to keep the corners straight. Using a miter box and a backsaw, cut four 14-inch pieces of half-round molding, then miter the ends at a 45-degree angle. Attach the strips of molding to the edges of the plywood top by applying hide glue to the back of each strip and then nailing it into place with 3-penny finishing nails. Sink the nailheads with a nail set and allow the glue to dry completely, as directed by the manufacturer.
To finish the cut edges of the base pieces, cut four 24-inch pieces of half-round molding with squared ends. Apply hide glue to the back of each molding strip and nail the strips onto the outside long edges of the base pieces with 3-penny finishing nails; sink the nailheads with a nail set. Let the glue dry as directed.
When the glue is completely dry, sand the base pieces and the top as necessary, using a sanding block and medium- and fine-grit sandpaper. Smooth the edges where the molding meets the edge of the plywood, but do not sand the inside surfaces of the slots in the base pieces.
Creating the base.
To assemble the stand, apply hide glue to the inside edges of the slots in the base pieces, then put the two pieces together at right angles, with the glued slots interlocking firmly and the top and bottom edges of the base pieces flush. Set the base on a flat surface and adjust it so that the pieces are perfectly in line and square with one another; then carefully wipe away any excess glue that has leaked from the joints. Let the glue dry completely, as directed by the manufacturer.
When the glue is completely dry, put the stand together. Draw an X on the bottom side of the top piece, from corner to corner, and draw a light X on the other side. Set the top piece on the assembled base and align it so that the penciled X on the bottom is hidden by the edges of the base X. The top piece is attached to the base with screws, so mark points for two screws along each arm of the lightly drawn X on the top. Then remove the top from the base.
At each marked point, drill a hole completely through the top piece, using a 9/64-inch or #28 bit. Countersink each hole so that the head of each assembly screw will lie slightly below the surface of the wood. Replace the top on the base, align it, and mark the screw holes on the edges of the base X. With a 1/16-inch or #52 bit, drill pilot holes 1 inch deep at the marked points on the edges of the base.
Apply a coating of hide glue to the edges of the base X, set the top into place, and secure the top to the base with 2-inch #6 flathead wood screws through the holes in the top and into the predrilled holes in the base. Quickly turn the stand over and wipe off any excess glue.
Using plastic wood, fill screw and nail holes and any visible cracks at the edges of the half-round molding. Lightly sand the top of the stand to remove the penciled X, and sand all visible wood surfaces as necessary. Paint or stain as desired.
When the plant stand is dry, move your favorite flower or fern onto its new home and enjoy!
For more ideas related to creating your own furniture, see:
How to Repair Wooden Furniture: You don't have to start from scratch and make new furniture. Learn how to repair the wooden pieces you already have.
How to Stain Wooden Furniture: Staining wooden furniture adds protection as well as beautiful color, and when you do it yourself, you can get just the shade you want. Follow this link for instructions on staining pieces you've purchased or handmade.
A Guide to Decorating Wooden Furniture: Wooden furniture can be decorated to fit any design scheme or color palette. Use this guide to transform simple items into elegant, finished pieces that will accent your home.
Advertisement
Cite This!
Please copy/paste the following text to properly cite this HowStuffWorks.com article: