You don't always need to call a pro; you can sometimes perform basic faucet repairs on your own. Jose Luis Pelaez Inc / Getty Images
Faucets are a key part of your home for an obvious reason: They dispense water. Therefore, keeping your faucets in working condition is of great importance.
A number of things can go wrong with your faucets, from leaks to noise, leading to a need for faucet repair. Sometimes you'll need to replace a faucet altogether to solve the problem.
Advertisement
Here, we'll show you how to make several basic repairs to your home's faucet system, including those involving spray hoses. We'll start by addressing how to fix a leaky faucet.
A dripping faucet is the most common plumbing problem as well as one of the easiest to repair. Yet many people ignore it and leave the dripping faucet unrepaired. That costs money. A steady drip can waste $20 or more in water in a short time.
Multiply that figure by the number of faucet drips in your home, and you can calculate how much of your money is literally going down the drain. The waste from a dripping hot water faucet is even more because you're also paying to heat the water before it goes down the drain.
Advertisement
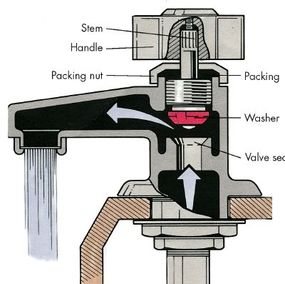
A drip is caused by seepage from the water supply. Remember the water supply enters your home under pressure, so there must be a watertight seal holding back the incoming water when the faucet handle is in the OFF position.
That seal is usually created by a washer pressed tightly against the faucet seat. Obviously, when the washer or the seat is not functioning properly, a little water can seep through and drip out of the faucet spout. To stop the drip, all you usually have to do is replace the washer or repair the seat.
The first thing to do when fixing a faucet drip is to turn off the water supply. You should be able to turn off the supply at a nearby shutoff, but if your house is not equipped with shutoffs for individual fixtures, you'll have to go to the main shutoff and turn off the entire water supply to your home.
Advertisement
Fixing Compression-type Faucets
No matter what a compression faucet looks like, whether it has separate handles for hot and cold water or just one that operates both hot and cold, it operates according to certain basic principles.
What You'll Need
Use these tools on a compression-type faucet:
Advertisement
Flathead screwdriver
Penetrating oil
Slip-joint pliers or adjustable wrench
Replacement washers
Here's how to disassemble a leaky compression faucet and stop a drip.
Step 1
Shut off the water supply and remove the faucet handle held to main body of faucet by unscrewing tiny screw on top or at back of handle. Some screws are hidden by metal or plastic button or disc that snaps out or is threaded.
Once you get the button out, you'll see top-mounted handle screw. If necessary, use penetrating oil such as WD-40 to help loosen it.
Step 2
Remove the handle and look at faucet assembly. Remove the packing nut with a pair of large slip-joint pliers or an adjustable wrench, being careful not to scar metal.
Twist out the stem or spindle by turning it in the same direction you would to turn on faucet.
Step 3
Remove the screw that holds washer. Use penetrating oil, if necessary, to loosen screw. Examine the screw and stem, replacing if damaged.
Advertisement
How to Silence a Noisy Faucet
Faucets can scream, whistle, or chatter when you turn them on or off. There are several possible causes for these ear-shattering phenomena.
When to Replace the Pipes
If your house is newly built, you may have pipes that are too small to allow the water to pass through them properly. Similarly, pipes in older homes can become restricted by the formation of scale, indicated by a noisy faucet.
Advertisement
In either case, you must replace the pipes to get rid of the noise, which is not really a quick fix.
When to Replace a Washer
Most likely, however, your noisy faucet is caused by a washer that is either the wrong size or is not held securely to the stem. Turn off the water supply before starting on this or any other faucet repair job.
Replacing the washer or tightening it should eliminate the noise. If the faucet still makes noise, check the washer seat. The seat can become partially closed with residue, and the restricted water flow can cause whistling or chattering. If this is the case, clean the seat.
When to Coat Threads
A squealing noise heard when you turn the faucet handle means the metal threads of the stem are binding against the faucet's threads. Remove the stem, and coat both sets of threads with petroleum jelly. The lubrication should stop the noise and make the handle easier to turn.
Of course, if the stem threads or faucet body threads have become worn, the resulting play between them causes vibration and noise in the faucet. In this case, you'll need more than just lubrication to quiet the faucet.
Install a new stem and see if the noise stops. If not, the faucet body threads are worn, and the only solution is a completely new faucet. Fortunately, the stem usually wears first. But even if you must replace the entire faucet, the job is fairly easy.
Advertisement
How to Replace a Faucet
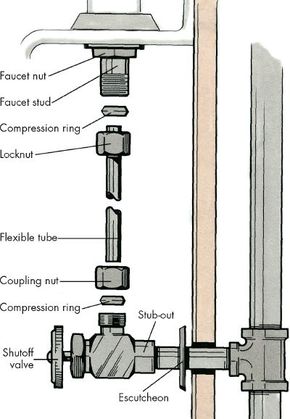
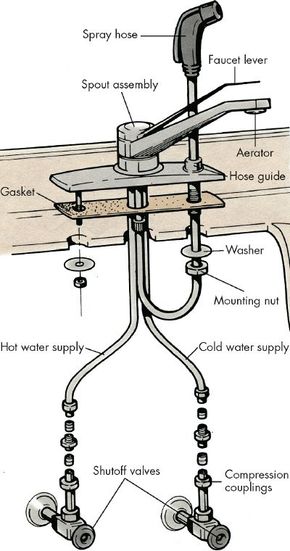
The faucet is secured to the sink by a nut under the basin. The water supply line is usually connected to the faucet with a threaded compression fitting.
Replacing a kitchen faucet requires some work and patience. Fortunately, new faucet units are made for do-it-yourself installation with easy-to-follow instructions included.
A new faucet can work wonders for the appearance of your fixtures and will also eliminate all the leaks, drips and other problems you may have had with your old faucet.
Advertisement
Make sure whatever faucet unit you choose will completely cover the old faucet's mounting holes. If you have an unusual sink in your home, look for an adjustable faucet unit that is designed to fit many types of sinks. Once you select the faucet model you want, follow these steps to install it properly
Step 1
Remove the old faucet assembly from sink, then the clean sink around the faucet mounting area.
Step 2
If the new faucet has spray hose, attach the hose. Run the spray hose down through its opening in faucet assembly, through its opening in sink, and up through sink's center opening. Then attach hose to supply stub on faucet.
Step 3
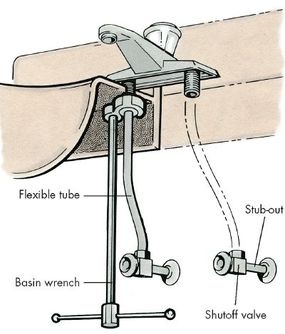
Install the new faucet assembly into the mounting holes in sink. With new the faucet assembly in position, place washers and nuts on assembly's mounting studs under sink and hand-tighten them, making sure the assembly is in proper position and any gaskets are correctly aligned. Then further tighten the nuts with a basin wrench.
Because there is very little room under the sink, you willprobably need a basin wrench to tighten the coupling nuts.
Align and connect the original water supply lines with flexible supply tubes coming from new faucet. Make sure the hot water and cold water lines are connected to proper supply tubes on faucet assembly.
When you attach lines, be sure to use two wrenches: One holds the fitting while the other turns the nut on water supply line.
Step 5
Turn on hot and cold water supplies to the fixture. Run both hot and cold water full force to clear the supply lines and to check the fixture for leaks. If there's any evidence of leakage, go back over procedure to check for loose or improper connections.
Although bathroom faucets are similar to the ones we've just described, they can present their own distinct challenges. In the next section, we'll show you how to install various bathroom faucets.
Replacing Bathroom Faucets
Replacing a bathroom sink faucet can be done using the same procedures described in the previous section.
One difference may be the presence of a pop-up drain plug that's connected by a linkage to a knob or plunger on the old faucet assembly. There should be one or two places in the linkage where it can be easily disconnected from the faucet before removing the original unit from the basin.
Instructions provided with the new faucet will tell you exactly how to connect the new drain assembly. Be sure to reconnect the drain linkage when installing the new faucet.
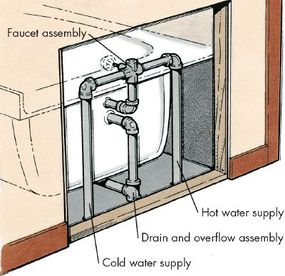
Replacing a tub faucet can be complicated because the connections are behind a wall. However, there may be an access panel that allows you to reach those connections.
Replacing a shower or tub faucet is not usually a quick fix because the connections are made behind a wall. However, there may be an access panel so you can get at the pipes without ripping the wall apart.
If you have to cut into the wall and want to tackle this project, be sure to add an access panel for future pipe and faucet repairs.
Once you get to the tub faucet connections behind the wall, the job is no harder than working on your kitchen faucet. Shut off the water supply, remove the faucet handles on the tub side, then disconnect the old faucet unit from the back.
If there's an old showerhead pipe, unscrew it from its pipe inside the wall; do the same thing with the tub spout. Now you're ready to install all the new parts. Follow the directions that are included with the new assembly.
In the final section, we'll return to the kitchen, where many faucets are equipped with spray hoses. We'll tell you what to do if a spray hose breaks down.
Advertisement
How to Repair a Spray Hose
A spray hose is attached under the sink at the base of the spout assembly. The entire spray assembly can be removed from the top of the sink by unscrewing it and pulling it out through the hose guide.
Many modern sink faucets are fitted with spray hose units, and these units occasionally leak or malfunction. The assembly has a diverter valve within the spout body, a flexible hose connected to the spout under the sink, and a spray head with an activating lever and an aerator assembly.
The spray head body and lever are part of a sealed unit; if it malfunctions, the unit must be replaced with an identical unit. Other parts of the spray system, however, can be repaired. In this section, we'll provide detailed instructions on how to service the various parts of a spray hose.
Advertisement
What You'll Need to Repair an Aerator
Adjustable wrenches
Clean cloth
Fine-bristled stiff brush
Vinegar
Penknife
Reassemble the aerator, making sure you get all parts positioned in proper order and direction.
Advertisement
Repairing the Flexible Hose
Water dripping off the flexible hose beneath the sink indicates a leak at the hose-to-spout connection, the hose-to-spray-head connection, or somewhere in the hose itself.
What You'll Need to Repair a Flexible Hose
Clean cloth
Adjustable wrenches
Plumbers' joint compound or tape
Vinyl electrical tap
Step 1
Dry the hose thoroughly and check head connection. If a leak is at this point, tighten connection, disassemble and make repairs, or replace the head and hose assembly.
Advertisement
Step 2
Check the spout connection under the sink. Tightening may stop a leak here.
Step 3
If the leak continues, disconnect the hose, apply plumbers' joint compound or wrap plumbers' joint tape around threads, and reconnect hose.
The easiest way to spot a leak in hose is to inspect it inch by inch under strong light while water is running through it. Look particularly for tiny cracks, chafes or indications of some mechanical damage.
Temporary repairs can be made by wrapping slightly damaged section of hose with vinyl electrical tape, but you'll probably need to replace the hose eventually.
Advertisement
Checking the Diverter Valve
Uneven water flow, low pressure when the pressure at other faucets seems all right, or troublesome switching back and forth from spray head to sink spout can be caused by a malfunctioning diverter valve or by a restricted hose.
What You'll Need to Check a Diverter Valve
Adjustable wrenches
Wire coat hanger
Replacement hose
Step 1
Remove the spray head at the coupling and disconnect the coupling from the hose by prying off the snap-ring retainer.
Advertisement
Step 2
Turn on the water and let a strong stream flow into hose. If a strong stream of water flows out of the open end of hose, then you know diverter valve is the source of the trouble.
A weak stream flowing from open end of hose may indicate blockage in hose itself. Briefly running water at full force may clear hose.
Step 3
If the above steps don't locate the problem, remove the hose from the spout attachment, stretch it out straight and look through it while aiming it toward strong light source.
If hose appears to be clear, problem lies in diverter valve. If hose is blocked, clear it with wire coat hanger or length of wire.
Step 4
As needed, replace hose. If you can't get exact replacement, adapters are available for connecting different types and sizes.
Advertisement
Servicing the Diverter Valve
What You'll Need to Service a Diverter Valve
Screwdriver
Adjustable pliers
Pipe wrench
Toothpicks
Replacement valve
Step 1
Remove the sink spout by loosening the screw on top, unscrewing threaded spout ring or nut, and lifting spout out of its socket to expose valve seat.
Some water supply valves are just set in place and can be lifted straight out by gripping them with pliers; others are secured by a screw. If there is a screw, turn it enough to free valve. If possible, disassemble the valve.
Advertisement
Step 2
Flush all parts with water and clean all surfaces and apertures with toothpicks. Don't use metal tools, as they could damage the unit.
Step 3
Reassemble and reinstall valve, then test the unit. If it still operates poorly, you will probably have to replace the valve. Replacement must be exact, so take the faucet manufacturer's name and unit model number or old valve with you when you buy new valve.
Whether it's a spray hose or a spout, your home's faucet system will need periodic repairs. But if you follow the steps we've outlined in this article, you'll be able to get these jobs done with minimal trouble.
This article was updated in conjunction with AI technology, then fact-checked and edited by a HowStuffWorks editor.
Advertisement
Cite This!
Please copy/paste the following text to properly cite this HowStuffWorks.com article: