How to Repair a Deck

By: Fix-It Club
Nail a 2X4 cleat to each outside joist and set the new boards into the opening. You'll have to cut off the bottom of the groove on the last board.
©2006 Publications International, Ltd.

A deck or porch can be a great spot for peace and tranquility. Caring for a deck, on the other hand, can be a nightmare. Decks are, obviously, constantly exposed to the elements, and can show signs of weathering even days after they are constructed. Most deck fixes that can be tackled by a do-it-yourselfer involve cleaning and routine maintenance. Here are just a few pointers:

Advertisement

Deck-Repair Tips

  • Inspect your deck frequently for popped nails and loose railings or boards. Remove and replace any nails that have popped with coated screws, and immediately repair or replace loose railings to avoid hazards.
  • To clean everyday dirt from a wood deck, use a mild household detergent in water to wash it. Rinse thoroughly.
  • Use mineral spirits to remove stains caused by tree sap. Rinse thoroughly.
  • To remove mildew, wash the deck with a bleach and water solution (1 cup bleach to 1 gallon warm water). Flush the area with water and allow it to dry. Commercial brighteners are also available; follow the manufacturer's instructions. If mildew is a continued problem, you probably have too much shade on your deck. Check to see if you can trim some tree branches or bushes to expose more of the deck to the sun's drying effects.
  • Deck stains make routine cleanup much easier and preserve the life of the wood. Apply stains specially formulated for decks immediately over new wood, except for pressure-treated lumber, which should age for six months before being stained. The deck will benefit from a new coat of stain every one to two years (be sure the stain contains commercial sealant). Follow the manufacturer's instructions for applying the stain. If your deck has been painted, you will have to remove the paint before a stain can be applied.
  • Avoid applying clear finishes, such as varnish or shellac, to wood decks. They don't withstand sun and moisture, and they must be removed if they start to peel.

Advertisement

Replacing Damaged Deck Flooring

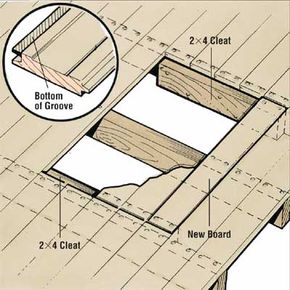
Step 5: Brace the boards at each end by installing 2X4 cleats along the inside faces of the joists at the sides of the hole. Cut a piece of 2X4 as long as the hole for each joist. Paint all of the patching materials with wood preservative before installation, covering all surfaces. Let the preservative dry as directed, then nail the 2X4 cleats flat to the side joists, with their top edges exactly flush.

Step 6: If the old boards were rotten, you should take steps to prevent further decay. Cover the ground under the porch with heavy plastic, lapping the plastic about six inches up at the sides. Set a few stones or bricks on the plastic to hold it in place. For the most effective rot prevention, paint all exposed wood under the porch with a coat of wood preservative. These preventive measures will keep your porch strong and healthy for years to come.

Advertisement

Step 7: With the cleats in place, set the new floorboards into the opening, one by one, with their ends resting on the cleats along the joists. Set the first board in tongue first, and insert each board to lock its tongue into the groove of the previous board. Nail each end of each board to the cleat with two or three 16d finishing nails. At the last board, lock the tongue in and set the groove side flat over the tongue of the adjoining board. It won't lock to the joining board, but with the bottom of the groove removed, it will fit into place. When all the nails are in place, countersink them with a nail set, and fill the cracks and cover the nail heads with water putty. Do not use wood plastic; it isn't strong enough. Water putty dries rock-hard.

Step 8: To finish the job, let the water putty dry and then sand the patch lightly. Paint the patched area with a primer coat of porch and floor enamel, and let the paint dry. Then repaint the porch as needed.

If you want to spend your weekends lounging on your deck -- instead of sanding and applying varnish -- follow these simple guidelines to keep your deck looking beautiful.

©Publications International, Ltd.

Advertisement

Advertisement

Loading...