Repairing Power Cords and Plugs
Major appliances have many components in common, making repairs easier. For example, once you've learned to repair a power cord on a refrigerator, you can apply the same skills to repairing a washing machine's power cord.
The following sections explain common devices that are used on major appliances and offers tips on how to repair them.
Advertisement
Power Cords and Plugs
Many appliance "breakdowns" are really due to worn, frayed power cords or plugs that no longer make proper electrical contact. To ensure safe operation, you should check all appliance cords for problems periodically and replace frayed or broken cords immediately. When you suspect a cord is faulty, remove it from the appliance and test it with a continuity tester. Clip the tester to one blade of the plug and touch the probe to one of the two wires -- or, if it's a plug-in cord, insert the probe into one of the two holes -- at the appliance end of the cord. If the tester lights or buzzes, move it to the other wire or hole and test again. Repeat this procedure to test the other blade of the plug. If the tester lights or buzzes at every test point, the cord is not faulty; if it fails to light or buzz at any point, the cord or the plug is faulty. You can pinpoint the defect by cutting off the plug and testing the cut end of the cord; if the tester lights or buzzes at all test points now, the plug is the defective part. The damaged component -- cord, plug, or both -- should be replaced.
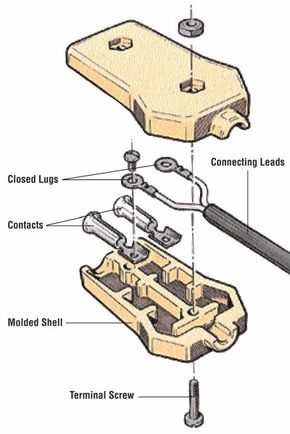
Often, the hardest part of replacing an appliance cord is determining how the appliance comes apart so that you can remove the old cord and attach a new one. Sometimes all you have to do is remove the cover from a connection box. In other cases, as with a small hair dryer, the unit itself must be partially disassembled before you can reach the terminals. In nearly all cases, the cord is held in place by a clamp or by a fitted strain-relief device. To remove the cord, unscrew the terminal screws or pull the pressure connectors apart, loosen the clamp or remove the strain-relief device, and pull the cord out. Installation of the new cord is simply a reverse procedure. Be sure to save the strain-relief device and replace it on the new cord. If you damage the strain-relief device when you remove it, replace it with a new one of the same type.
In some equipment, the conductor ends are looped around terminal screws, making new connections easy. Carefully strip off the outer insulation (not the insulation on the inner wires) for about 2 inches at the end of the cord. Then, using a wire stripper, remove about 1/2 inch of insulation from the end of each conductor wire. Twist the exposed filaments of each wire clockwise into a solid prong. Loosen the terminal screws and loop each bare wire end clockwise around a screw. Tighten the screws firmly. Connect the wires at the appliance end of the new cord the same way the old wires were connected.
If only the plug on a major appliance is faulty, you can attach a new plug to the old cord. Male plugs, with two blades or with two blades and a grounding prong, plug into an outlet. Female plugs, often used at the appliance end of the cord, have terminal holes instead of blades. Male plugs can usually be taken apart so you can access the terminal screws. Female plugs may be held together by rivets or by screws. Screw-held plugs can be taken apart, but rivet-held plugs cannot be repaired.
When a plug malfunctions, open the plug, if possible, and check to make sure the conductor wires are properly attached to the plug's screw terminals. If the wires are loose, tighten the terminal screw. This may solve the problem; otherwise, the plug should be replaced. To attach a new male plug:
Step 1: Insert the cord end through the plug opening and pull it through for about five or six inches.
Step 2: Carefully strip off the outer insulation for about 2 inches. Then, using a wire stripper, remove about 1/2 inch of insulation from the end of each conductor wire.
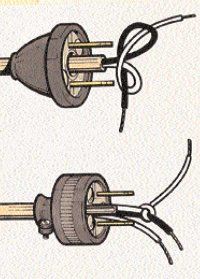
Step 3: Twist the exposed filaments of each wire clockwise into a solid prong. After twisting the conductor ends, tie a tight knot with the inner wires of the cord. Then pull the plug down over the knot, leaving the exposed ends of the conductor wires sticking out. Loosen the terminal screws in the plug.
Step 4: On a two-wire plug, loop each wire around one prong and toward a screw terminal. Loop the bare wire end clockwise around the screw terminal and tighten the screw. If the screws are different colors, connect the white wire to the white screw and the black wire to the yellow screw. On a three-wire plug, use the same technique to connect each of the three wires to a terminal screw. Connect the green grounding wire to the green screw terminal.
Step 5: When the conductor wires are firmly secured to the terminal screws, slide the cardboard insulator over the blades of the plug. If the plug has a clamp-type sleeve, clamp it firmly around the cord.
In the next section, we will delve deeper into your appliances, and learn how to repair gaskets, wiring, switches, and thermostats.