How to Repair Wooden Furniture Joints

A man assembling a wooden drawer with tools.
In many cases, a loose joint can simply be re-glued. Force glue into the joint with a glue injector and clamp the piece firmly until the adhesive is completely cured. vitranc / Getty Images

Structural problems in wooden furniture can be defined in terms of three things: the material itself, the way it's put together, and the way it functions.

The material itself is the problem when a part is broken, warped, or missing. The way it's put together is involved when joints fail or parts aren't fitted properly. The way a piece of furniture functions depends on both material and construction, and functional problems can always be traced to one or both of these sources. Nothing can turn an all-around loser into a quality piece of furniture, but with a few basic repair techniques you can handle most structural furniture problems. In this article, we'll discuss some of those techniques that can help you keep your wooden furniture in good, useable condition.

Advertisement

Rebuilding Loose Joints

When a joint fails, you have two problems to deal with: the immediate functional problem and the long-term effect of the failure on the rest of the frame. A loose joint that's not repaired today may not break tomorrow, but it will put stress on other joints. In a week's time, one wobbly leg may become two. To prevent simple structural problems from turning into more serious ones, loose or separated joints should be repaired immediately.

Gluing

The simplest solution is usually the best one, in repairs as well as in refinishing. When you discover a loose joint, first make sure the screws (if any) are tight; then try to repair it with an adhesive: plastic resin, epoxy, or resorcinol. Force the adhesive into the loose joint with a glue injector. If you can, wiggle the joint to distribute the adhesive. Clamp the joint for about two days, until the adhesive is completely cured. If possible, strengthen the glued joint with a glue block, as detailed below.

After gluing the loose joint, put the piece of furniture back into service. Check the joint again in a few weeks. If it has worked loose again, it can't be permanently repaired by regluing; you'll have to reinforce it, resecure it, or rebuild it completely.

Reinforcing: Glue Blocks and Steel Braces

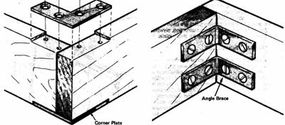
Glue blocks, the original furniture braces, are solid pieces of wood used to reinforce corner joints and provide additional support. Steel corner plates and angle braces perform the same function, but they can detract from the appearance of the piece of furniture, and they can also lower its value. For this reason, glue blocks are still an important part of furniture repairs. Valuable pieces of furniture, antiques, and good reproductions should always be repaired with glue blocks instead of steel braces when possible.

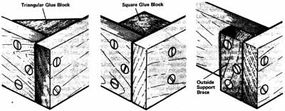
Glue blocks for corner braces can be either square or triangular. Square blocks are used chiefly as outside support braces or on long joints, such as the inside corners of drawers, where cutting a triangle would be impractical. In most cases, triangular glue blocks are preferable.

Glue blocks can be cut from any square stock, but hardwood is preferred. To make a glue block, cut a square piece of wood in half diagonally. The larger the piece of wood, the greater the gluing surface of the block. The length of the blocks will depend on the project; on average, 2 inches is adequate. To strengthen chair and table legs, cut triangular braces that are as large as necessary from 1-inch nominal boards. At the right-angle corner of the block, cut off a diagonal or make a notch to fit around the leg. For braces, 1 x 2 lumber works well.

© Glue blocks, the original furniture braces, are used to reinforce corner joints and provide additional support. Triangular glue blocks (left) are usually preferable for corner braces. Square glue blocks are used on long joints where cutting a triangle would be impractical (center), and as outside support braces (right). If possible, glue blocks should be cut from hardwood.

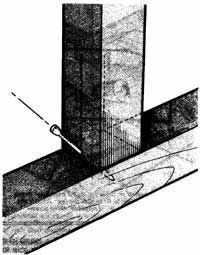
To install a triangular glue block, spread adhesive on the two right-angle sides or edges. Set the block into the corner and twist it slightly to distribute the adhesive on the bonding surfaces. Small glue blocks can be strengthened by nails driven through the block into the furniture frame; drill pilot holes for the nails to make sure you don't split the wood. To strengthen chair and table braces, drive three screws through the block and into the frame, one screw straight into the corner and one straight into each side, at an angle to the inside block edge. Predrill the screw holes for the block in both the block and the frame.

Sometimes a corner joint is held by a steel bracket instead of a glue block. If the leg wobbles, first make sure the nut that holds the bracket is securely tightened. If this doesn't solve the problem and the bracket is set into notches in the frame, it may not be seated properly. Remove the nut and reseat the bracket; then replace the nut securely.

Gluing and bracing may not be sufficient to shore up a loose joint, so you need to know other ways to handle more complicated problems. Learn some advanced repair techniques in the next section.

© Steel corner plates (left) and angle braces (right) are often used to reinforce weak joints, especially in inexpensive furniture. Because they can detract from the appearance of the piece, and can also lower its value, they should never be used on valuable or antique furniture.

Advertisement

Resecuring and Rebuilding Loose Joints

© A loose joint can sometimes be resecured with a long screw, coated with glue and driven into the joint. Cover the screw head with a dowel plug, and refinish the frame.

Some loose furniture joints are going to require a little more attention to make them structurally sound. Although resecuring or even rebuilding a joint may take additional time, you can accomplish either one with some advanced repair techniques.

Resecuring: Screws and Glue

If a loose joint would be difficult to take apart, you may be able to solve the problem with a long screw. First align the joint and drill a pilot hole for the screw. Then enlarge the top of the pilot hole so that a small piece of dowel can be installed over the screw head. Coat the screw with glue, and drive it into the joint so that it pulls the joint tightly together. Before you tighten the screw, try to force adhesive into the loose joint; this will help strengthen the joint. Then tighten the screw firmly.

Advertisement

To cover the screw head, cut a piece of dowel (wooden peg) to fit the enlarged hole. It should be slightly longer than the opening, so that the end of the dowel will protrude slightly above the surface of the frame. Insert the dowel plug with glue, making sure the end of the dowel is flush with the head of the screw, and let the glue dry completely; then carefully cut the end of the dowel flush with the surface, and sand it smooth. You'll probably have to refinish the frame so the dowel matches, and you may want to install false dowel plugs at the other joints in the frame so that they match. The dowel will give the frame a handmade pinned or pegged look.

The screw/plug trick can also be used to repair loose rungs and backs, but the pieces involved must be large enough to accept the screw and dowel. Small parts such as turnings and slats may split when a screw is driven into them.

For the strongest screw-reinforced joint, the screw should be driven into a piece of dowel instead of the frame itself. This isn't always possible. If you can, disassemble the joint, drill a hole at the screw point, and plug the hole with a dowel, gluing the dowel into place. Then reassemble the joint with a screw and glue, as above. If you want to hide the head of the screw, enlarge the hole for a dowel plug or countersink the screw slightly and fill the depression with wood filler.

Rebuilding: Disassembly and Doweling

© If a joint doesn 't come apart easily, it may be held by nails or screws; these fasteners should be removed before the joint is disassembled.

Rebuilding a joint -- or a series of joints -- is not as tough as it might sound, although it does require a good deal of patience. You must work slowly to make sure all the parts are in the right places and all parts fit tightly. To disassemble the joint, pull it carefully apart. If it doesn't come apart easily, use a rubber or wooden mallet to tap the frame pieces apart, but be careful not to damage the wood.

Don't overlook the possibility that the joint was assembled with nails or screws as well as adhesive. In this case, you should remove the fasteners before you break the adhesive. If you can't remove them, break the adhesive bond and pry the joint apart very carefully. Don't force the joint apart. If the nails or screws are embedded too firmly, you'll split or splinter the wood. If prying would damage the wood, consider sawing the joint apart. Use a hacksaw with a thin blade that will go through metal and not leave a wide cut.

After the joint is disassembled, it must be thoroughly cleaned. If the old adhesive is brittle or crumbling, scrape it off with a knife or a narrow chisel. If it's hard to remove, use sandpaper, hot water, or a hot vinegar solution. You must remove all dirt and old adhesive. Whatever method you use, be very careful not to damage the wood or the joint won't fit together properly when you reassemble it.

Structural problems are most common in chairs and tables, and the joints involved are usually mortise-and-tenon (a prong or tongue of wood secured in a hole in the adjoining piece). In most cases, the tenon (prong or tong of wood) is worn or broken. If the damage isn't too bad, you may be able to thoroughly clean the joint and then reassemble it with epoxy, which is a good joint filler as well as a bonding agent. Wipe off any excess epoxy after assembling the joint, and clamp the joint until the epoxy is completely dry.

Keep the piece of furniture out of service for a week or so to make sure the glue has cured properly. If the tenon is badly damaged or if the joint was sawed apart, you'll have to rebuild the joint with hardwood dowels in place of the tenon -- two dowels are adequate for most joints. Use dowels about the same width and about twice the length of the damaged tenon. Cut off the damaged tenon, and remove any broken wood from the mortise. Plug the mortise completely with a wood plug, glued in and trimmed flush with the surface. Then use dowels to connect the parts again.


To make the holes for the dowels -- in the tenon base and in the plugged mortise -- use a doweling jig, clamped to the edge of the wood and adjusted to center the dowel holes. Dowel center points can also be used, but they aren't as accurate as a jig. Drill the holes to a total depth of about 1/4 inch deeper than the length of the dowel to allow for glue buildup under the dowels.

Score the sides of the dowels with pliers and round the ends slightly with sandpaper or a file. This improves glue distribution and makes insertion easier and more accurate. Apply glue to the dowels, and insert them into the holes in one side of the joint. Then coat the edge of the wood with glue, and slip the other joint piece onto the dowels. Tap the joint together with a rubber or wooden mallet, wipe off any glue that oozes out of the joint, and clamp the joint firmly for about two days, until the glue is completely set.

Loose joints on wooden furniture can cause long-term damage to the rest of the frame by increasing stress on other joints. But knowing how to repair or replace any joint problem can help you keep all of your furniture from being thrown away too soon.

©Publications International, Ltd.

Advertisement

Advertisement

Loading...