How to Build Kitchen Improvements

Any kitchen can benefit from a little extra attention to detail to something that's not quite right -- a wasted space, awkward access to a frequently used cupboard or shelf, a worn-out countertop in an otherwise beautiful kitchen. Taking care of these details can turn into productive and interesting projects, and can make your kitchen a more pleasant place to work and spend time.

You can learn how to do it yourself in this article. Learn how to laminate a countertop, create a pantry, install a roll-out shelf, and build a spice rack.

Advertisement

We'll get started in the next section by learning how to laminate a countertop.

For more information on making improvements to your kitchen, try the following links:

Advertisement

How to Laminate a Countertop

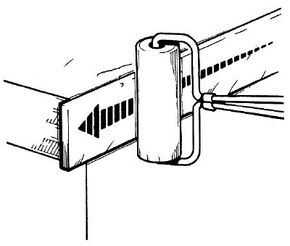
Align the edge strip and press it into place along the cemented counter edge; go over it with a roller to bond it firmly.

Covering a kitchen counter or a vanity with plastic laminate is painstaking, but not really demanding. With care and patience, you can lay a plastic laminate sheet on any clean, well-supported 3/4-inch plywood or particle board base.

Tools: ­

  • Measuring rule
  • Hammer
  • Nail set
  • Putty knife
  • Belt sander
  • Pencil
  • Straightedge
  • Carpenters' square
  • Safety goggles
  • Saber, circular, or table saw with fine-toothed carbide-tipped blade
  • Nylon paintbrush or notched spreader
  • Roller or rolling pin
  • Router with edge-trimming bit for plastic laminates
  • Fine-toothed flat file

Materials:

  • Plastic wood or wood putty
  • Medium- and medium-fine-grit sanding belts
  • Rags
  • Tack cloth
  • Precut plastic laminate edge strips
  • Sheet plastic laminate
  • Nonflammable contact cement
  • Brown paper or wax paper
  • Solvent for cement

Time: About 4 to 6 hours for a plain countertop

Advertisement

Tips on Buying Materials

Buy a sheet of plastic laminate big enough to cover the countertop completely, with a slight overhang on all sides; buy precut laminate edge strips to finish the sides of the countertop. Choose a nonflammable, water-solvent contact cement, or use the adhesive recommended by the laminate manufacturer. Rent a router with an edge-trimming bit for plastic laminates; if you don't have one, rent a saber or circular saw with a fine-toothed carbide-tipped blade. At least 48 hours ahead of time, set the plastic laminate in the room where it will be used to bring it to the correct temperature and humidity.

Preparing the Counter Surface

Prepare the counter surface carefully. Sink any protruding nails with a hammer and a nail set; fill cracks and cover railheads with plastic wood or wood putty. Sand the surface with a belt sander and a medium-grit sanding belt to smooth and level it thoroughly. If you're covering an old countertop, remove the old finish completely; sand down to clean, bare wood to provide a good base for the laminate. Wipe off all dust and sanding debris and then go over the entire counter surface with a tack cloth.

Measuring and Cutting the Laminate

Carefully measure and mark the sheet of plastic laminate to the approximate size of the countertop; it should be large enough to overhang the counter 1/8 to 1/4 inch on all sides. Use a carpenters' square and a straightedge to make sure the marks are accurate. Plastic laminates are very brittle; wear safety goggles to trim the laminate sheet. Support the laminate sheet firmly as close to the cutting line as possible; hold it down firmly to prevent shattering and chipping. Carefully and slowly cut the sheet as marked with a saber saw, a circular saw, or a table saw with a fine-toothed carbide-tipped blade. Cut the laminate face down with a saber saw or circular saw, face up with a table saw.

Applying the Edge Strips

Before laying the top sheet, cover the edges of the countertop with precut laminate edge strips, carefully butted together at the corners. Measure and cut the front and side edge strips to the correct length. Apply contact cement to the back of each edge strip and to the edges of the countertop as directed by the manufacturer, using a nylon paintbrush or a notched spreader. Let the adhesive cure and test for bonding readiness as directed.

Carefully press each edge strip into place over the cemented counter edge, first side strips and then front. The bottom of the strip should be flush with the bottom of the edge; let the top of the edge strip stick up above the countertop. You must align the edge strip perfectly as you press it down; once it makes contact with the cemented edge, it can't be moved. Butt the strips firmly together at the corners of the counter, front strip over sides. After applying each strip, go over it firmly with a roller or a rolling pin to bond it firmly to the counter edge.

Wearing safety goggles, trim the protruding upper edges of the edge strips with a router and an edge-trimming bit for plastic laminates. With a belt sander and a medium-fine-grit sanding belt, sand the cut edges carefully to bring them exactly flush with the counter surface. If the edge strip sticks up only a little, router trimming is unnecessary; use the belt sander to bring the edges flush. Use a fine-toothed flat file to smooth the edge in tight spots.

Applying the Countertop Surface

Wipe the countertop clean and go over it with a tack cloth. Following the manufacturer's instructions, apply contact cement to the entire counter surface and to the entire back of the laminate sheet; let the adhesive cure as directed. When the cement is dry, cover the entire countertop surface with brown paper or sheets of wax paper, laid back to front; make sure all the cemented surface is covered. The paper will not stick to the cemented surface.

Set the laminate sheet carefully into place on the countertop; make sure you don't disarrange the paper. Align the laminate sheet exactly on the countertop, butted firmly against the wall behind the counter, if any, and overhanging the counter slightly on all open sides. Keeping the laminate exactly in position, carefully slide out the brown paper or wax paper strips along the counter, pressing the laminate to bond it in place as you go; be careful not to let air bubbles form between the laminate and the countertop. If the countertop is a long one, you'll need an assistant to hold the laminate in place as you remove the paper.

To bond the sheet of laminate firmly and evenly in place, go over the entire counter surface with a roller or a rolling pin. Be sure to press out any air bubbles left between the laminate and the countertop.

To complete the countertop, carefully trim off the overhanging laminate edges with a router and an edge-trimming bit for plastic laminates; wear safety goggles as you work. Use a fine-toothed flat file to trim tight spots. Trim the edge of the top laminate sheet exactly flush with the outside face of the edge strip. Finally, bevel the cut edge of the top sheet slightly with a fine-toothed flat file.

Cleaning Up

Remove excess cement from the completed counter with water or the cement solvent; use water or solvent sparingly so it doesn't seep into the joints of the countertop. Scrape off large blobs of cement with a scrap of laminate; do not use a metal scraper. Clean the countertop according to the manufacturer's instructions.

If you wanted to know how to make space in your kitchen, the next section on how to build a pantry behind a door may be just what you’re looking for.

For more information on making improvements to your kitchen, try the following links:
Advertisement

How to Build a Pantry Behind a Door

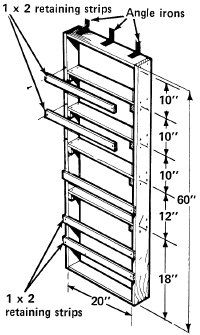
Space shelves to store smaller items on top shelves, tall things on the bottom. Retaining strips keep supplies in place.

Kitchen storage space is always at a premium, but there is potential storage behind every closed door -- build this simple behind-the-door pantry to take advantage of it.

Tools: ­

  • Measuring rule
  • Pencil
  • Carpenters' square
  • Handsaw or power saw
  • Drill
  • Countersink
  • Screwdriver
  • Hammer
  • Sanding block
  • Paintbrush

Materials:

  • 1 x 4 and 1 x 2 pine stock
  • 1-inch flathead wood screws
  • Carpenters' glue
  • 7-penny finishing nails
  • Medium- and fine-grit sandpaper
  • Paint
  • 2-inch angle irons

Time: 4 to 6 hours, plus finishing time

Advertisement

The dimensions used here are for a pantry unit 211/2 inches wide and 60 inches high, with four inside shelves. You can adjust these figures for a unit to fit a wide or narrow door, for any height desired. Keep the outside width of the unit at least 7 inches narrower than the door, to allow for the doorknob and provide the necessary clearance when the door is opened and closed.

Building the Pantry Frame

Build the frame for the pantry of 1 x 4 pine stock. Measure and mark two pieces of 1 x 4 60 inches long and six pieces 20 inches long; use a carpenters' square to keep the ends even. Cut the pieces of 1 x 4 with a handsaw or a power saw.

Put together a rectangular box from the two 60-inch pieces and two of the 20-inch pieces, with the long sides butted over the ends of the short sides at the corners. At each corner, drill two holes for 1-inch flathead wood screws through the face of the long side piece; countersink the screw holes so that the screw heads will lie flush with the surface of the wood. Set the side piece into position over the edge of the cross piece, mark the screw holes, and drill holes into the edge of the cross piece. Apply a bead of carpenters' glue to the cut edge of the cross piece and to the end of the side piece, join the pieces, and secure the corner with two 1-inch flathead wood screws driven through the drilled holes.

Making the Shelves

Cut retaining strips and shelf supports from 1 x 2 pine stock. Measure, mark, and cut six pieces of 1 x 2 211/2 inches long to hold stored goods on the shelves; measure and cut eight pieces of 1 x 2 31/2 inches long for shelf supports. Plan the spacing for the pantry shelves, with tall things on the bottom and four shelves spaced as desired inside the frame. Measure the things you plan to store in the unit to determine the desired shelf spacing -- a good spacing might allow 10 inches between the top of the frame and the first shelf, 10 inches from first to second and second to third, 12 inches from third to fourth, and 18 inches from the fourth shelf to the bottom of the frame. Or, if you don't need such widely spaced shelves, add a shelf to this basic unit.

To make the shelves, measure down from the top of the frame along each side piece and mark the shelf positions -- make sure you measure exactly the same on each side. The marked shelf positions do not allow for the thickness of the wood; measure 3/8 inch down from each marked line to mark the tops of the shelf support pieces. Set a 31/2-inch 1 x 2 shelf support piece at each marked shelf point, on each 1 x 4 side piece. To secure the shelf supports, use 7-penny finishing nails and carpenters' glue. Apply a bead of carpenters' glue to the face of each shelf support and to the face of the side frame piece, as marked. Set the support flat against the frame, with its top edge exactly flush with the marked support line, and nail through the outside face of the side piece into the face of the 1 x 2 support bracket. Drive two 7-penny finishing nails into each shelf support.

Use the remaining pieces of 20-inch 1 x 4 to make the pantry's four shelves. For each shelf, apply a bead of carpenters' glue to the bottom edges of the board's cut ends, and to the top edge of the two shelf brackets that will support it. Set the shelf into place across the two brackets, and make sure it's straight and flush against the supports. Secure each end with two 7-penny finishing nails from the top of the shelf into the support and two nails from the outside of the frame into the shelf edge. Stagger the nails so they don't hit against each other.

Finishing the Pantry

To complete the shelf unit, nail 1 x 2 retaining strips across the front of the unit, one strip 2 inches above each shelf. Secure the retaining strips with two 7-penny finishing nails driven through each end. To keep tall things in place on the bottom of the unit, nail two retaining strips across the open area, placed as desired.

To complete the pantry, sand all rough spots and edges with medium-and then fine-grit sandpaper. Paint as desired.

Finally, hang the pantry unit on the door, centered on the door's width and set conveniently on its height. Use three 2-inch angle irons across the top of the unit and three across the bottom; mark the screw holes, and drill, and countersink. Fasten the irons to the door with 1-inch flathead wood screws. If the door is a hollow-core type, be careful to attach the unit to the solid blocking inside the door -- tap on the door to locate the blocking. Hollow-core doors are blocked around the edges, and sometimes also have other blocking. Mark and drill the mounting holes on the top and bottom pieces of the pantry unit, set the unit into place, and secure it with screws driven into the drilled holes.

We have more storage solutions for your kitchen. On the next page, you will learn how to make a roll-out storage shelf.

For more information on making improvements to your kitchen, try the following links:
Advertisement

How to Build a Roll-Out Storage Shelf

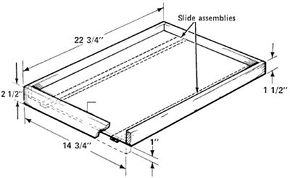
The roll-out shelf is 3/4-inch plywood, edged on three sides with 1 x 2 and on the front with a piece of 1 x 3; the bottom edge of the front strip extends 1 inch below the shelf bottom. Standard drawer slide assemblies are used to move the shelf.

For more convenient access to pans or small appliances, build this handy roll-out shelf unit into a base cabinet.

Tools:

  • Measuring rule
  • Pencil
  • Carpenters' square
  • Straightedge
  • Handsaw or power saw
  • Hammer
  • Screwdriver
  • Nail set
  • Paintbrush

Materials:

  • 3/4-inch grade A-B interior plywood
  • 1 x 2 and 1 x 3 pine stock
  • Carpenters' glue
  • 4-penny finishing nails
  • Two standard 22-inch-long drawer slide assemblies with installation screws
  • Wood filler
  • Sandpaper
  • Primer and semigloss interior latex paint, or finish desired

Time: About 4 to 6 hours, plus finishing time

Advertisement

Making the Shelf

To fit a standard 18 x 24-inch base cabinet, measure and cut a 131/4 x 211/4-inch piece of 3/4-inch grade A-B interior plywood for the roll-out shelf. Cut a 131/4-inch piece of 1 x 2 pine stock. Apply a bead of carpenters' glue to one 131/4-inch edge of the shelf, and set the 2-inch face of the 1 x 2 strip against the edge, flush at the bottom and at each end. Secure the strip with four 4-penny finishing nails.

Cut two 22-inch pieces of 1 x 2. Apply glue to the side edges of the shelf. Set the two strips against the edges, flush at the bottom and at each end, and secure each strip with six 4-penny finishing nails.

Cut a 143/4-inch piece of 1 x 3 pine stock. Turn the shelf assembly upside down, and apply glue to the remaining 131/4-inch edge of the shelf. Set the 1 x 3 strip against the edge so that the ends are flush, the top edges are flush, and the bottom edge protrudes 1 inch below the bottom surface of the shelf.

Attaching the Slide Assembly to the New Shelf

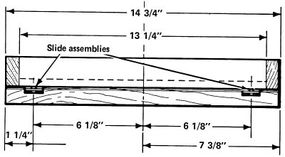
With the shelf still upside down, draw two lines across the bottom surface from front to back, each 11/4 inches in from the side. Center the upper half of a standard 22-inch-long drawer slide assembly on each guideline, and attach the slides with the screws provided. Installation instructions for drawer slides vary from brand to brand; follow the manufacturer's specific installation instructions.

On each side of the shelf, draw a line from front to back on the bottom surface, 1 1/4 inches in from the side. Center the upper half of a 22-inch drawer slide assembly over each guideline, and attach the slides securely.

Attaching the Slide Assembly to the Cabinet

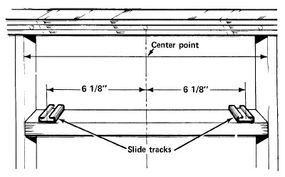
Determine and mark the front-to-back centerline of the cabinet's existing shelf, by measuring the exact distance between the sides of the door opening and marking the midway point. Measure 61/8 inches to both right and left of the centerline mark, along the front edge of the shelf. With a carpenters' square and a pencil, draw front-to-back lines at right angles to the shelf edge at each of these points. Center the bottom half of one drawer slide assembly on each of these guidelines, and attach the slides with the screws provided.

On the top of the old shelf, find the exact center point. Measure 6 1/8 inches to each side from this point along the front edge, and draw a line at each point; then attach the bottom tracks of the slide assemblies over the guidelines.

Finishing the Shelf

Mesh the slides and roll the new shelf into place in the cabinet, checking for ease of operation; there should be 1/8 inch clearance between the side of the door opening and the shelf side, at each side. The cabinet door must be able to open far enough so that it leaves the cabinet opening completely clear and does not obstruct the passage of the new shelf. Make any slide adjustments necessary for smooth operation.

Remove the roll-out shelf and remove the slide halves. With a nail set and hammer, sink the nailheads slightly below the surface of the wood. Fill the nail holes and any surface or joint imperfections with wood filler, and sand the shelf smooth.

To finish the shelf, apply a coat of primer and then two coats of semigloss interior latex paint, or whatever finish you like. Let the finish dry completely between coats. Apply at least one coat of finish to the bottom of the shelf to seal the wood.

When the finish is completely dry, replace the slide halves and install the shelf in the cabinet.

On our final page, we will tackle a familiar kitchen problem -- spice racks. 

For more information on making improvements to your kitchen, try the following links:
Advertisement

How to Build a Spice Rack

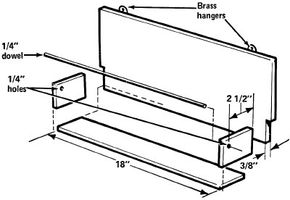
Build the rack to accommodate your spice containers; an 18-inch rack holds 12 standard spice cans, 2 1/2 inches deep. Use 1/4-inch dowel for a retaining strip across the front of the rack; add brass hangers at the top of the back panel.

Even if you search long and hard, you may never be able to find a spice rack to suit you. This rack is both easy to make and inexpensive.

Tools: ­

Advertisement

  • Measuring rule
  • Pencil
  • Straightedge
  • Carpenters' square
  • Handsaw or saber saw
  • Drill with 1/4-inch bit
  • Hammer
  • Nail set
  • Screwdriver
  • Paintbrush

Materials:

  • 3/8-inch grade A-B or furniture-grade plywood
  • Piece of 1/4-inch dowel
  • Hide glue
  • 1-inch brads
  • Small brass hangers
  • Plastic wood
  • Medium- and fine-grit sandpaper
  • Stain or paint

Time: 1 to 11/2 hours, plus finishing time

Plan the spice rack to fit your containers -- standard spice cans are 21/2 inches deep, and an 18-inch rack holds 12 standard cans. Line up the tins or bottles you want to display and measure them for the length, height, and depth the rack should be. Use 3/8-inch grade A-B or furniture-grade plywood for a professional finish.

Cutting the Wood

To make the rack, use your measured dimensions. Measure and mark the bottom panel on a piece of plywood, with the grain running the length of the shelf; use a carpenters' square and a straightedge to keep your marks even. Cut the panel out carefully with a handsaw or a saber saw. Measure and mark the two side pieces of the rack, exactly as wide as the bottom piece and high enough to accommodate the spice containers, either square or rectangular. Cut the side pieces carefully, making sure that their corners are square and that the two pieces are exactly alike.

Drill a 1/4-inch hole at one corner of one of the side pieces, evenly spaced from the two sides of the corner. Set this piece on top of the other side piece and use it as a template to mark a matching hole. Carefully drill a 1/4-inch hole through the second side piece so that it exactly matches the first one. The corners with the drilled holes are the top front corners of the side pieces.

Measure and mark a plywood back panel 1/4 inch longer than the bottom piece and 3 to 5 inches higher than the side pieces; cut it out carefully. With the back panel laid flat, butt the back edge of one side piece against one side of the back panel, with the bottom edge of the side piece flush with the bottom edge of the back. Carefully outline the back edge of the side piece on the back panel; this outlined area will be cut out so that the side piece fits smoothly into the side of the back piece. Repeat this procedure to outline the other side piece on the back. Then, being careful to cut within the traced outlines, cut out the marked corners of the back piece. Finally, measure and cut a piece of 1/4-inch dowel to the exact length of the untrimmed top of the back piece.

Assembling the Spice Rack

To assemble the spice rack, apply hide glue to the cutout edges, on one notched side of the back panel. Fit a side piece into the notch, with the drilled hole at the opposite top corner and the edges of the side piece flush with the back face and bottom edge of the back panel. Secure the side piece with several 1-inch brads driven through the side and into the edge of the back panel; use a nail set to sink the heads of the brads below the surface of the wood.

Apply a drop or two of hide glue around one end of the dowel, on the turned surface and not on the cut end. Insert the glued end of the dowel into the hole in the side piece, pushing it from the inside out, so that the end of the dowel is flush with the outside face of the side piece. Apply a drop or two of hide glue to the other end of the dowel and insert it into the drilled hole in the unattached side piece, from the inside face out. Then, holding the dowel in place, quickly glue and nail the second side piece into place. Sink the nailheads with a nail set.

Apply hide glue sparingly to three cut edges of the bottom panel and slide it into place, butted firmly between the side pieces and against the back of the rack. Nail the bottom piece firmly into place with brads driven through the back into the edges of the side pieces and through the side pieces into the ends of the bottom piece.

Completing the Spice Rack

To complete the rack, attach small brass hangers to the upper rear edge of the back with the screws provided. Fill nail holes and imperfections with plastic wood, and sand the rack as necessary with medium- and fine-grit sandpaper. Stain or paint the rack as desired.

For more information on making improvements to your kitchen, try the following links:
Advertisement

Advertisement

Loading...