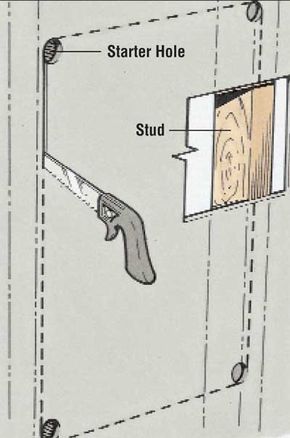
How to Install a Home Intercom System

By: Dan Ramsey
©2006 Publications International, Ltd. Begin the installation of the home intercom system by selecting the locations for the master station and substations. Often, the master station is located in the home's kitchen.

A home intercommunication system can be much more than just an easy way to call members of the family to dinner or to summon someone for a phone call. At a relatively modest cost, you can have a paging system that includes a radio to provide music throughout the house. Moreover, you can enhance home security with a front-door speaker that allows you to talk with a visitor before opening the door.

Installing a home intercom system requires only moderate carpentry ability as well as some simple wiring tasks. Some newer intercom systems use battery-powered wireless modules to extend the system without running wires in walls.

Advertisement

An intercom system has one major focal point: the master station. It contains the electronic circuitry for the voice communications. If it includes a music system, the master station will also contain a radio or tape player.

Intercom stations, at which you can only listen and reply, are called slave, remote, or substations. The typical substation contains a speaker (which doubles as a microphone during reply) and a switch to transfer from "listen" to "talk" modes of operation.

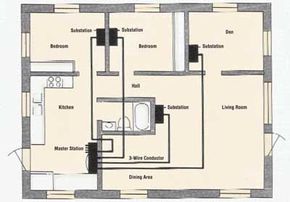
A typical installation consists of a master station installed at a convenient location, several indoor substations, and an outdoor substation. The outdoor substation is usually located at the front door and includes the button for the doorbell or chimes.

In some intercom sets, all operations are controlled by the master station: power on/off, radio on/off, and call station selection. You can call only one substation at a time or all at one time from the master station, and the single station you call is the only one that can reply. Operating the push-to-talk button or lever cuts off the sound of the radio for the duration of your conversation.

More elaborate systems allow communication with or monitoring of any substation, call initiation either from substation to substation or from substation to master station, or privacy at any substation without being monitored, plus music transmission to any or all substations.

All parts of the built-in system -- even the master station -- are sufficiently thin so you can install them flush on a wall in holes cut into the wall space. The master station will usually fit in the space between wall studs. All wiring can be hidden if you route it through the wall and along some of the underfloor joists.

See the next section for an example of the installation of a system with one master and four substations. Although such a system would be adequate only for a small home, the same principles can be applied easily in a larger building.

Advertisement

Tips for Installing a Home Intercom

©2006 Publications International, Ltd. After drilling holes at each of the four corners of your penciled outline, use a keyhole or saber saw to cut out the opening for your master station.

While you might not have the exact setup as the system described below, the following steps should help you get through most home intercom system installations.

Step 1: Begin the installation by inspecting the master station box or enclosure to determine how large an opening must be cut for it, and then select the location for the master station. Usually the manufacturer provides a bracket or flange, with holes for the mounting screws, for installing the master station within a wall.

Advertisement

After you make the necessary measurements to determine the size and shape of the hole for the master station and its mounting provisions, locate the studs inside the wall. The hole you cut should be located between the studs. Decide on a convenient height above the floor -- five feet (60 inches) is a good compromise for both short and tall persons -- and pencil the shape of the master station hole on the wall.

Drill 3/8-inch holes into the wall at the four corners of your penciled outline, then use a keyhole or saber saw to cut out the hole for the master station. Set the master station box in place to make sure that it fits the hole, and trim the edges of the hole if necessary. Set the box aside until you finish installing the wiring.

Step 2: Cut similar holes in the walls at each substation location. Try the holes for size, trim as necessary, and then set the substations aside until after you install their wiring.

Step 3: Check the wiring diagram. In the usual master station-substation installation, only the master station connects to the household's electrical system. Multiwire cable links the substations to the master station. If such cable is not supplied with your kit, or if you need additional cable, you can purchase it separately from a radio-electronics parts supplier. Ask for intercom cable with the required number of conductors, preferably with a jacket covering the conductors.

Step 4: Run a separate cable from each substation back to the master station. For neater installation, run the wire from the substation down inside the wall and into the basement or crawl space or up through the attic. Then, pass the wire through holes in the joists and alongside joists to a hole that leads into the in-wall space to the master station. Since the cables from all the substations run to the master station, you need a larger entry hole through the floor space in the wall below the master station. Maneuver each cable up to the master station opening, and label it according to its substation location. Numbered pieces of pressure-sensitive tape work well to identify the wires.

Step 5: At each substation location, connect the three wires to the terminals on the substation unit, following the wire color or other identification code that you will find stamped alongside the terminal screws. Fasten the substation unit in the wall -- preferably to a wall stud -- and attach the trim molding that surrounds the perimeter of the unit to hide the edges of the opening cut in the wall.

Caution: If the master station connects directly to your home's electrical system, be sure to de-energize the circuit involved and take precautions to prevent someone else from turning it back on while you are working on the circuit. If a transformer is supplied with the master station to power the system, place the transformer on or near a junction box or the main entrance panel, and connect it to the electrical system (after you de-energize the circuit) according to the manufacturer's instructions.

Step 7: Attach all substation and power line wires to the master station, but be sure that you make the attachments according to the markings on the master station's terminal connections. Mount the master station in the wall, affix it

firmly to the wall studs, and attach the trim molding. Then restore power to the circuit.

Step 8: Test the intercom system to see how well it performs. If any one of the substations fails to work, check the connections to terminals as well as the connections its wires make to the master station.

If you suspect a defective substation unit, replace it with another. That should pinpoint the problem to either defects in the wiring or to a defect in the unit itself, thereby allowing you to make the necessary repairs. Note: If battery-powered substations are used, replace the batteries on a regular basis, noting the replacement date inside the cover or on the batteries.

Whether you're looking for a bit more security in your home, music throughout the house, or just an easy way to call everyone down for dinner, a home intercom system is a nice addition to your household. Use the tips outlined in this article to install one today.


Advertisement

Advertisement

Loading...