How to Repair a Dryer

By: Fix-It Club
dryer
Repairing a dryer is easy if you follow the proper steps. Francesco Carta fotografo / Getty Images

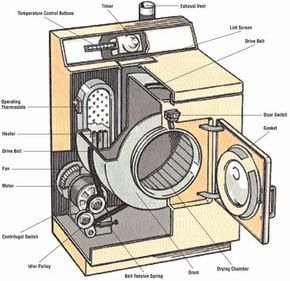
A dryer is simply a large drum into which wet laundry is loaded. A motor with pulleys -- connected by a series of belts -- turns the drum. Air heated by a gas heater or electric heating element is blown through the drum to dry the laundry. The temperature and speed of the drum are controlled by a series of thermostats operated from a timer device on the control panel of the dryer.

As a safety device, a dryer usually has a door switch that activates the working parts. Unless the door is properly closed, the dryer won't work, regardless of the settings on the control panel. Many dryers are equipped with a reset button on the control panel. If the motor won't run, let the dryer cool for about ten minutes. Then push the reset button. If there are no problems with the motor, switches, or electrical system, this should restart the dryer. Caution: Before doing any work on the dryer, make sure it's unplugged. Disconnect the grounding wire. If it is a gas-fueled dryer, close the gas-supply valve to shut off the unit's gas supply.

Advertisement


Disassembling the Dryer

A dryer consists of a large drum into which wet laundry is loaded. A motor with pulleys turns the drum, and heated air is blown through the drum.
©2006 Publications International, Ltd.

Except for the power cord and the exhaust vent, the components that make up the dryer are contained in a sheet metal box. Each component acts independently of the others, but all are interrelated in some way. There are several different ways to disassemble the cabinet for tests and repairs, depending on the manufacturer and model of the machine. Basic disassembly procedures are simple.

Some knobs may be held to their shafts with setscrews. Unscrew the fasteners and pull the knobs straight out. To get at most parts, however, only remove the back panel. Don't disassemble the rest of the cabinet until you're sure you can't make the tests, replacements, or repairs from the back. If the light in the dryer burns out, remove it from the dryer. You may need to remove retaining screws and panels to access it. Replace the burned-out bulb with a new one of the same type and wattage; check the ends of the old bulb for this information. Then replace any retaining panels. Here's how:

Advertisement

Step 1: To remove the back panel, remove a series of screws or bolts that hold the panel to the top and sides of the cabinet.

Step 2: To remove the lower front panel, pull it away from the bottom of the cabinet. Lift the lower panel up and away. Remove the springs under each side of the lower panel.

Step 3: To remove the top panel, wedge a stiff-bladed putty knife under the rim of the top and pry the top off. The putty knife helps release several spring fasteners at the top of the cabinet sides and front.

Step 4: To remove the dryer's control panel, remove the screws that hold it to the cabinet top or front. These screws may be under a piece of metal or plastic trim; pry off or unscrew the trim. Most knobs are friction-fit; pull them straight out.

Caution: When testing or repairing the electrical parts of a gas dryer, remember that the dryer is hooked to a gas pipe. Turn off the shutoff valve on the supply pipe before disconnecting the gas supply line or moving the dryer and before doing any electrical work.

Advertisement

Cleaning the Dryer

Besides drying clothes, dryers also remove lint. This fine, fuzzy material can cause trouble because it blocks dryer lint traps, clogs vents, and fills blowers. Lint can also gather around and in the tracks of the drum rollers, or in and under the pulleys and the drive belt. The result is poor clothes drying or -- sometimes -- no drying. To avoid lint problems, clean out the dryer's lint trap system every time you use the dryer.

To clean the lint screen, remove it from the unit. The screen may be located near or under the door sill, or in the top of the dryer near the control panel. It can usually be removed by pulling it up and out of its housing. Remove the accumulated lint to clear the screen; then replace the screen.

Advertisement

The exhaust vent also collects lint. Vent maintenance involves cleaning the lint from a screen in the dryer's vent exhaust collar and/or at the end of the exhaust vent where it sticks out through a basement window or through an exterior wall. To clean the screen, remove the clamp that holds the vent to the collar, or back out the screws that hold the vent to the collar, or pull the vent straight off an extended collar. Clean the screen thoroughly and replace it in the vent assembly.

To clean the vent itself, use a vent-cleaning brush (available at hardware stores) to pull out any lint deposits. Also check the vent run to make sure that the vent piping or tubing isn't loose at the joints, or -- in the case of flexible plastic venting -- isn't sagging between hanging brackets. Breaks or sags cause undue strain on the dryer's blower system, and can cause drying problems. If the vent pipe or tubing has become clogged with lint, remove the lint by pushing a garden hose or a drain-and-trap auger through the vent to a convenient joint. Disassemble the joint to remove the debris. With this procedure, it isn't necessary to disassemble the entire vent to find the blockage.

You can head off problems before they become too serious by providing routine maintenance for your dryer's door gasket, thermostat, timer, and other frequently used parts. Let's discuss how to service these important components in the next section.

Advertisement

Door & Switch

Dryers receive a lot of use, so it's important to know how to provide routine service to the door gasket, door switch, thermostat, and other major parts. Use the guidelines below for tips on how to check and maintain these important features.

Servicing the Door Gasket

The door of the dryer is sealed with one or more gaskets to keep the hot air in the dryer from escaping and prevent the cool air in the laundry area from being sucked into the dryer. A deteriorated or damaged gasket greatly lowers the efficiency of the dryer. To check the gasket, hold a sheet of tissue paper near the rim of the door while the machine is running. If the door leaks, the paper will flutter. If the gasket or seal leaks, looks worn or warped, has chunks of material missing, or feels hard and nonresilient, it should be replaced with a new gasket of the same type.

Advertisement

Servicing the Door Switch

The door switch is critical to the dryer's operation. If the switch is not working, the dryer will not run.

If the dryer has a door latch, make sure the latch is free of dirt or lint and properly adjusted before you make any switch tests or replacements. Sometimes a misaligned latch prevents the door from being closed tightly, preventing the switch from being activated.

The switch on the dryer may be accessible from the outside door, or you may have to remove the top of the dryer to access it. The switch is a simple assembly, with two lead wires running to it. Test the switch with a volt-ohm-milliammeter (VOM) set to the RX1 scale. Disconnect the switch leads and clip one probe of the VOM to each switch terminal. Press the switch closed with your finger. The VOM should read zero. If the needle jumps, the switch is faulty and should be replaced with a new one of the same type.

The switch is held to the dryer with setscrews; remove these screws and disconnect the leads to the switch. Install a new switch and connect the leads. Then position the switch and tighten the setscrews to hold it in place.

Advertisement

Servicing the Start Switch

This switch, located on the control panel, is usually the push-button type. Start switches don't fail often, but it does happen. To check the start switch, remove the control panel and test the switch with a VOM set to the RX1 scale. Disconnect the leads from the switch terminals and clip one VOM probe to each terminal. Press the switch button. If the meter reads zero, the switch is working.

If the needle jumps to a high reading, the switch is faulty and should be replaced. Replace the switch with a new one of the same type, connecting the new switch the same way the old one was connected.

Advertisement

Servicing the Thermostat

Thermostats, the dryer temperature control switches, are controlled by the temperature inside the dryer or by the heat of the motor. One or more thermostats on the panel can be adjusted to control the temperature in the dryer. Operating thermostats sometimes stick, causing control problems. These thermostats are usually positioned near the exhaust duct bulkhead or the fan housing of the dryer. Remove the back panel of the dryer to get at them.

Before you make any checks, try tapping the housing of the thermostats lightly with the handle of a screwdriver. This may jar the contacts loose. Temperature control switches are located behind the dryer control panel, and the panel must be removed for switch testing or replacement. Here's how to test and replace the thermostat:

Step 1: To check the control panel thermostat, make sure power is off to the dryer. Test the thermostat with a VOM set to the RX1 scale. Clip one probe of the VOM to each thermostat terminal. If the meter reads zero, the thermostat is working. If the needle jumps to a high reading, the thermostat is faulty and should be replaced.

Step 2: If necessary, replace the thermostat with a new one of the same type. Connect the new thermostat the same way the old one was connected.

Step 3: To check an operating thermostat, first make absolutely certain that the power to the dryer has been turned off and the dryer is cool. Then disconnect the leads to one side of the thermostat. Test an operating thermostat with a VOM set to the RX1 scale; clip one probe to each terminal of the thermostat. Disconnect the leads to one side of the thermostat so that the meter won't give a false reading. If the meter reads zero, the thermostat is working. If the needle jumps to a high reading, the thermostat is faulty and should be replaced.

Servicing the Timer

The dryer timer, located in back of the control panel, controls several things: the drying time of the clothes in the drum, the flow of electricity to the heating element, and the flow of power to the timer motor and the drum motor in the dryer cabinet.

Timers are driven by synchronous motors. Although the contact part of the timer can be cleaned and adjusted on some dryers, this is a job for a professional repair person. Timer motor repairs should also be handled by a professional, but you can replace a faulty timer yourself. Here's how to test and replace a dryer timer:

Step 1: To access the timer, remove the front of the control panel. On some dryers, the timer can be removed without removing the panel. In either case, pull the timer knob off the shaft and slip off the pointer. The pointer is usually keyed to the shaft by two flat surfaces to keep the pointer from slipping when it's turned.

Step 2: Test the timer with a VOM set to the RX1 scale. Turn the timer to the NORMAL DRY setting and disconnect one of the timer power leads. Some timers may have several wires connected to them: The power leads are usually larger than the other wires, and this size difference can be spotted under close examination. Clip one probe of the meter to each timer terminal. If the meter reads zero, the timer is working. If the needle jumps to a high reading, the timer is faulty and should be replaced. Replace the timer with a new one of the same size and type.

Step 3: To replace the timer, have a helper hold the new timer close to the old one, especially if there are several wires to be changed. Disconnect the old wires one at a time, connecting each corresponding new wire as you work, to make sure the connections are properly made. Or, draw a diagram detailing the proper connections. After all the wires are connected, check the connections again for accuracy.

A dryer that won't heat can't do its job. Learn how to assess heating problems for gas and electric dryers in the next section.
Advertisement

How to Repair Heating Elements

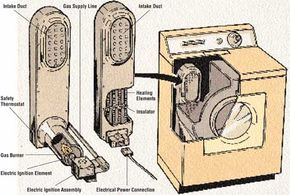
In a gas dryer, heat is provided by a gas heater, controlled by an air shutter. Electric dryers have self-contained electric heating elements.
©2006 Publications International, Ltd.

A dryer sometimes won't heat or heats too slowly because of a variety of reasons. By following the guidelines below, you can inspect the heating elements on a gas or electric dryer to pinpoint the source of the problem.

Troubleshooting the Gas Heater

In a gas dryer, heat is provided by a gas heater that is controlled by an air shutter. The gas heater is generally the source of no-heat or drying problems. You can often correct such problems by adjusting the air shutter on the gas burner, which is located along the bottom of the dryer.

Advertisement

To adjust the shutter, take out the screws and remove the panel that covers the gas flame. Turn on the dryer so the flame is burning. If the flame has a deep blue color and you hear air whistling around the burner, the air/gas mixture is receiving too much air. If the flame has a yellow tip, the mixture is not receiving enough air. Turn the thumbscrew or loosen the two screws slightly to increase or decrease the flow of air to the burner. Keep turning until the flame is a light blue color, without any yellow, and the whistling stops.

Gas dryers use an electric ignition device rather than a pilot light to light the gas heater: An element becomes hot and glows like the filament in a lightbulb. Electric ignition systems are always sealed; you can't adjust or repair them. If an electric ignition device fails, call a professional service person for replacement. 

Servicing the Electric Heating Elements

Electric heating elements, found in electric dryers, are self-contained units located in the back of the dryer. A defective heating element is frequently the source of no-heat or drying problems. Remove the back service panel to gain access to the elements.

The heating elements are located inside the heater ducts. If you think a heating element is faulty, test it with a volt-ohm-milliammeter (VOM) set to the RX1 scale. Disconnect the leads from the power terminals and clip one probe of the VOM to each terminal. The meter should read about 12 ohms. If the reading is higher than 20 ohms, the heater is faulty and should be replaced. Replace a faulty heater with a new one of the same type and electrical rating. A heater connected to a 115-volt line usually has an 8.4-ohm resistance; a heater connected to a 220-volt line usually has 11 ohms resistance.

The heater may also malfunction because it's grounded. To test for this, set the VOM to the RX1 scale and remove the leads to the heater. Clip one probe of the VOM to a heater terminal and touch the other probe to the heater housing. The meter needle should jump to a fairly high reading. If the needle flicks back and forth at a low reading, the heater is probably grounded and should be replaced. Here's how to replace the heater:

Step 1: Remove the back of the dryer. If necessary, also remove the cabinet top.

Step 2: Disconnect the leads and remove the screws that hold the duct in position. Then lift the entire heater unit out of the dryer.

Step 3: Remove the screws that hold the heating element in the duct.

Step 4: Slip the new heating element into the heating duct the same way the old one came out. Be careful not to damage the resistance coils. Replace the screws that hold the heating element in the duct, reconnect the leads, and screw the unit back into position. 

Servicing the Fan

The most common dryer fan problem is lint clogging the air passages through the heater and through the dryer drum. To clear a clogged air passage, remove the back service panel of the dryer and back out the screws holding the air duct in place. Then reach into the duct and remove all the lint and dirt possible. Reassemble the parts.

Also inspect the fan for a loose screw connection where the motor shaft is set on the dryer's drum. Remove the back service panel, tighten the screw, and replace the panel.

A heavy thumping sound coming from the dryer while it is running is a clear sign that your drum belt needs some repair. We'll discuss how to address this and other drum-related problems in the next section.

Advertisement

How to Repair the Drum and Motor

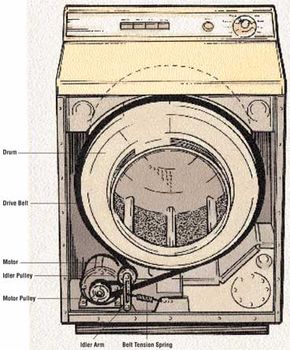
When replacing a drum belt, you may have to prop up the drum to keep it from sagging. Don't let the drum hang; the bolts that hold it could be ruined.
©2006 Publications International, Ltd.

The drum of the dryer is usually turned by a motor-and-belt assembly. There are two very clear signs that the belt is malfunctioning: You can easily spin the drum by hand when the dryer is off, or you hear a heavy thumping sound coming from the drum when the dryer is running. Here's how to test and replace the drum belt:

Step 1: Locate the belt by removing the back or front service panel. Depending on the type of dryer you own, you may have to prop up the drum to keep it from sagging. Don't let the drum hang; the bolts that hold it in the cabinet could be damaged. Don't remove any more parts than necessary.

Advertisement

Step 2: Identify the belt. The old belt may be threaded around the idler pulley and motor drive shaft. Draw a diagram showing how the pulley is installed so you'll be able to replace it properly. If the old belt is worn or frayed, but not broken, leave it around the drum as a pattern for positioning the new belt; cut the old belt and remove it when the new belt is in position.

Step 3: Remove the old belt from the pulleys and stretch the replacement belt into place. The new belt must extend around the dryer drum and the pulleys. The trick is to align the belt on the drum with the pulleys -- the ribs on the new belt go against the drum.

Step 4: Once the belt is aligned, turn the drum by hand, if possible, to make sure the belt is tracking. You may have to reassemble part of the cabinet to do this.

Some older dryers have a V-belt pulley drum drive. With this system, two or three pulleys of different sizes set the speed of the drum. To change this type of belt, decrease the tension on the idler pulley and install the new belt in the V-grooves of all pulleys. Then place the idler pulley back into position.

With any dryer, make absolutely sure that you replace the old belt with a new one made especially for the dryer. Any difference in belts can change the speed of the drum and cause problems with other dryer components. 

Servicing the Drum Bearing

With the back service panel off, check the drum bearing around the dryer drum shaft. You may have to remove the dryer belt to reach it. If the bearing looks worn and dirty, or if it's loose, it should be replaced with a new bearing made for the dryer.

A screw in the center of the drum connects the shaft to the drum. Remove this assembly and then lift off the drum pulley. Support the drum to prevent it from sagging. The bearing fits around the drum shaft and is slip-fit. Pull off the old bearing and install the new one, securing it the same way the old one was held.

On some dryers, the bearing and shaft are held by a U-bolt, and there are two tapered blocks supporting the bearing and shaft. Remove the bearing by first removing the U-bolt and blocks.

When reassembling the bearing unit, make sure the parts go back together the way they came apart. If the part is assembled with shims, the shims should be placed between the bearing and the support channels. Do not overtighten the screws holding the parts; overtightening could cause damage to the bearing. If the bearing has a lubrication wick, saturate it with auto transmission oil.

Advertisement

Servicing the Drum Rollers

The front of the dryer's drum is usually supported by two rollers. These wheels are either metal with a rubber rim or pressed nylon. If the rollers squeak but appear to be in good condition, apply a few drops of 20-weight nondetergent motor oil (not all-purpose oil) to them. If the rollers are worn, you can replace them if the roller assembly is not riveted. To replace drum rollers:

Step 1: Remove the front of the cabinet. Rollers are usually held on a metal shaft by a spring clip.

Advertisement

Step 2: Remove the rollers by prying the spring clip off with a screwdriver. Under the clip are a washer, the rollers, and another washer. You might have to remove a small nut at the back of the shaft and remove the shaft itself to reach the rollers. Remove the rollers from the shaft and clean away built-up lint and dirt before installing the new roller. This dirt and lint buildup could cause the drum to turn slowly, which prevents proper drying and strains other dryer components.

Step 3: Install the new rollers on the shaft with the washers in the same position.

Servicing the Motor

Motor malfunctions usually call for service by a professional. There are three main causes of motor failure: lack of lubrication, a defective motor switch, or worn or frozen bearings. A humming sound can be related to a burned-out motor or a defective switch. Check these trouble spots before you call a professional service person or take the motor to a repair shop. Here's how to check a dryer motor:

Step 1: Remove the back access panel. Then reach behind the drum, motor pulley, and idler arm pulley. If these areas are clogged with dirt and lint, undue strain on the motor may be causing the humming noise. Worn or broken belts can also cause a humming noise. Check the belts for wear and damage. If the belts look all right, you may be able to stop the noise by spraying them with fan belt dressing, available at automotive and hardware stores and home centers.

Step 2: Turn the dryer on. The noise you hear may be the whirl of the spinning drum, not the motor. Some noise is normal.

Step 3: Force a little 20-weight nondetergent motor oil (not all-purpose oil) around the ends of the motor shaft. This lubrication may stop the humming noise. If this doesn't solve the problem, remove the motor and take it to a professional service person.

The centrifugal switch on the dryer motor may be located on top of the motor. Humming, no motor power, and no heat can be caused by a faulty centrifugal switch. If the switch is externally mounted, check the terminals of the switch to make sure they are tight and not burned. If you spot trouble, remove the switch and take it to a professional service person for testing. A faulty switch will probably have to be replaced. Some centrifugal switches are located inside the motor housing; you won't be able to remove the switch in this case. Remove the entire motor and take it to a professional for repairs.

Caution: Before turning the pulley, make sure the power to the dryer is turned off.

If you can't turn the pulley, or if the pulley is very hard to turn, the bearings in the motor may be worn. Remove the motor and take it to a professional service person for repairs, or replace the motor. Replacement may be cheaper than repair.

Some motors have overload protectors that turn off the motor when excess strain is put on it. Often, dryers are equipped with a reset button on the control panel. If the motor won't run, let the dryer cool for about ten minutes. Then press this reset button. If the dryer still doesn't operate, check for an overload protector on the motor.

Test the overload protector with a volt-ohm-milliammeter (VOM)set to the RX1 scale. Disconnect one lead wire to the protector and clip one probe of the VOM to each protector terminal. If the meter reads zero, the protector is working. If the needle jumps to a high reading, the overload protector is faulty and should be replaced. Remove the protector by prying it off or unscrewing it from the motor housing. Replace it with a new one of the same size and type, connecting the new protector the same way the old one was connected.

Routine maintenance will keep your dryer working properly, especially when you need it most. You can handle most maintenance and minor repairs yourself by following the guidelines in this article.

©Publications International, Ltd.

Advertisement

Repair Clothing Dryer FAQs

Is it cheaper to repair or replace a dryer?
It depends on the repair. As is the case with all appliances, if repair costs are more than half of what it would cost to buy a replacement, buy a new one.
Why is my dryer not generating heat?
There are several reasons your dryer might not be producing heat. The most common include a clogged dryer vent, tripped circuit breaker or unsteady gas flow if it's a gas dryer. The heating element also could be broken or it could also have a faulty thermal fuse.
Why won't my dryer start?
There are many things that could be the culprit for why your dryer won't start, including a bad thermal fuse; a failed start switch or door switch; a bad drive motor (what makes the dryer's drum turn and the blower wheel to work); a broken drive belt; a bad timer; a bad belt switch; a blown control board; or overall power issues.
Can tumble dryers be repaired?
Yes. But depending on the problem, and the cost of the repair, it might be more cost efficient to replace the dryer rather than repair it.
Why won't my dryer spin?
When a drum stops spinning, a broken drive belt is usually the reason. A drive belt that's functioning properly should provide some resistance, so if you notice your dryer's drum turning loosely, this is cause for concern.

Advertisement

Loading...