How to Repair a Toaster Oven
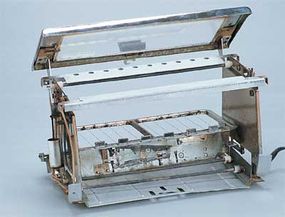
Toaster ovens operate much like toasters. However, a toaster oven is more complex and is typically more expensive to purchase. The higher cost means that repairs are easier to justify. You will probably think twice before tossing a $75 toaster oven into the recycle bin. And because toaster ovens are less compact, they are often easier to work on than pop-up toasters.
Some toaster ovens simply toast bread and related food products horizontally rather than vertically as with pop-up toasters. Other toaster ovens are actually miniature ovens. The differences are identified by the wattage used -- broilers require more watts of electrical power to operate -- and by the controls. Some toaster ovens allow you to bake and broil foods, offering precise temperature and function control.
Advertisement
How Toaster Ovens Work
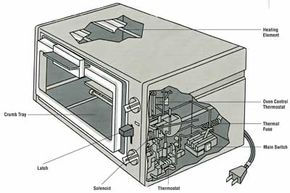
To operate a toaster oven, controls are set, the door is opened, food is placed on a tray, and the door is closed. If set for toasting, a toaster thermostat operates the upper and lower heating elements as selected by the color controller. If set for baking or broiling, the baking thermostat operates the heating elements as selected by the temperature controller and possibly by a timing mechanism.
There are a variety of toaster oven models, each with its own features. However, most operate in the same manner and can be diagnosed and repaired by applying the suggestions that follow.
How to Repair a Toaster Oven
Typical toaster oven repairs include servicing the main switch, the thermal fuse, the heating element, and the solenoid.
Servicing the Main Switch: The toaster oven's main switch is an important operating part, one that gets extensive use and is a frequent culprit when things go wrong. In many cases, all that's required is cleaning the switch. In others, the switch must be replaced. To access and replace the main switch:
Step 1: Remove the side panel and, if necessary, the power cord.
Step 2: Check the contact points for pitting or discoloration.
If they are not making good contact, carefully rub them with very fine sandpaper, then clean them with an electrical
contact cleaner spray or isopropyl alcohol on the end of a cotton swab. Be careful not to bend the contact leaves out of alignment.
Step 3: If the contacts are fused or the leaves broken, remove and replace the main switch. Main switches are fastened to the chassis with clips, screws, or rivets.
Servicing the Thermal Fuse: A thermal fuse protects the toaster oven's main switch from damage caused by an electrical overload. If the main switch doesn't work, check the thermal fuse using a continuity tester or multitester. The thermal fuse should show continuity rather than an open circuit. If defective, remove and replace the thermal fuse with one of identical rating. In most models, this means cutting the fuse leads or wires and replacing the fuse unit.
Some toaster ovens use a bimetallic thermostat or thermal cutout to protect the adjacent main switch from damage. Inspect the thermal cutout for debris, distortion, or discoloration. Clean debris away with a can of compressed air. As needed, clean the contact points with emery paper.
Servicing Heating Elements: A heating element is vital to your toaster oven. It may only be on for a few minutes to toast bread, or, in the case of a baking/broiling unit, it may be on for an hour or more at a time. A heating element is simply a high resistance wire that glows as electricity flows through it. Heating elements, then, are easy to test. Here's how:
Step 1: Determine whether or not there is a clear path for electric current by touching a continuity tester or multitester probe to each end of the element.
Step 2: If there is no clear path, remove the heating element. Removing an element may be as easy as unscrewing both ends and any support brackets; however, it may also require that rivets be removed and replaced. Your decision to replace a defective element will then depend on how easy it is to remove as well as the value of the toaster oven.

Step 3: Once the heating element has been removed, replace it with one of identical rating and structure. Be very careful not to distort the shape of the new element as it is installed. Element wires are fragile and can be damaged easily. Higher-wattage elements are of thicker wire, much like the element in your conventional oven.
Servicing a Solenoid: The solenoid turns the electric current to the heating elements on and off. If the heating elements stay on longer than they should and burn your food, or if opening the appliance door turns them off, the solenoid may be defective. To test and replace a solenoid:
Step 1: Look at the unit for visible damage and smell the area around the solenoid for obvious damage to components.
Step 2: Use a continuity tester or multitester to verify your findings.
Step 3: Replace the solenoid. In some units, this is easy. Simply unscrew the brackets and remove the unit. If replacing the unit requires cutting or desoldering, take the unit to an appliance-repair shop for service.
Mmm...what would go great with that hot buttered slice of toast? A hot cup of coffee, of course. So what do you do when your coffee maker is no longer cooperating with your morning routine? See the next page for suggestions.
