Parsley, carrots, arugula and spinach growing in a straw bale garden will yield just as much produce as they would in the ground. DeymosHR/Shutterstock
Key Takeaways
Straw bale gardening involves preparing straw bales with water and a nitrogen source, like blood meal, to start the decomposition process necessary for plant growth.
The bales are prepped over two weeks, where they are conditioned by adding water and nitrogen until the bales are ready to support plant life.
On the 14th day, seedlings can be planted directly into divots in the straw, or seeds can be sown into a layer of potting soil spread across the bale tops.
There are lots of ways to build a garden. You can go the traditional route, with a garden tilled right into the ground, or construct raised beds that you fill with soil.
Another option, though, uses bales of straw. They're cheap and easy to acquire, and it's possible to grow herbs, vegetables and flowers right in the bale. If a straw bale garden is ideal for you, here are a few basic tips to get you growing.
If you didn't grow up with livestock or on a farm, you may not know there's a difference between bales of stray and bales of hay. In fact, the two are completely different. Straw is dry, stiff and yellow. It's a byproduct of a grain crop; once the seeds of a plant like wheat are harvested for food, the straw is gathered and baled. It doesn't have much — if any — nutritional value left, so it's often used for livestock bedding, but not food.
Hay, on the other hand, is grown specifically to feed livestock. Hay bales are made up of plants — usually grass or legumes — that have been harvested and dried as food for cows or other grazing animals. Because hay is still full of seeds, if you try to use it for garden planting, you're very likely to end up with a whole lot of unwanted sprouts.
Advertisement
The solution for straw bale planting is simple: Make sure you're buying bales of straw, not hay!
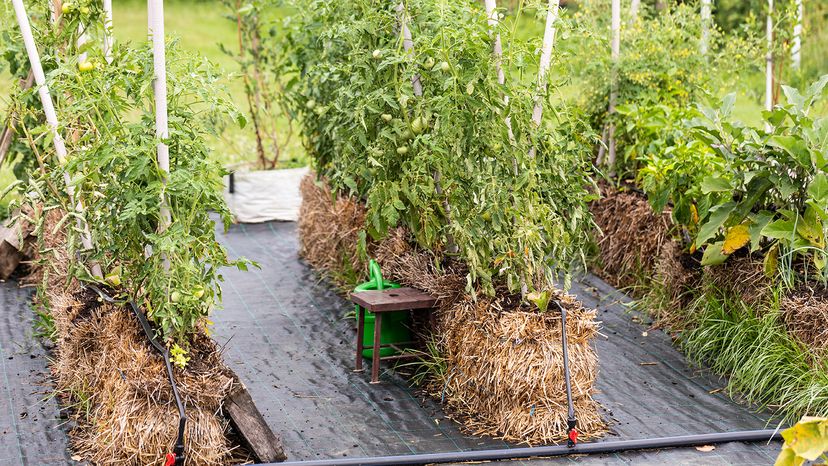
Straw bale gardening is an economical and efficient way to garden, saving space and creating raised beds for those who can't bend over or kneel easily.
Wikimedia Commons (CC By SA 3.0)
Advertisement
Source Your Straw Well
Straw bales aren't tough to find; most hardware stores and farm supply stores have bales available all year long. But not all straw is created equal. Sometimes, farmers use herbicides on their wheat or oat to keep weeds from overrunning the fields. But those same herbicides can also target vegetable crops. After the harvest, the herbicide can linger on the straw. Put it in your garden, or worse, use it to start your straw bale garden, and you're likely to end up with sickly, deformed vegetable plants, if they grow at all.
To avoid this problem, simply look for straw that's marked organic, or source it locally from a farmer who can guarantee it hasn't been sprayed. If you're not sure where to find "clean" straw, start by talking to someone at your local garden center.
Advertisement
Prep the Bales
Once you've acquired your bales, they'll need a bit of prep to be ready for planting. Choose the spot where you want your garden — the sunnier, the better — and arrange your straw bales. Make sure that the cut end is facing up, so that the pieces of straw act like straws and will absorb water efficiently.
The first step is to saturate them with water. Use your hose to drench them until the water begins to run out from underneath the bale.
Advertisement
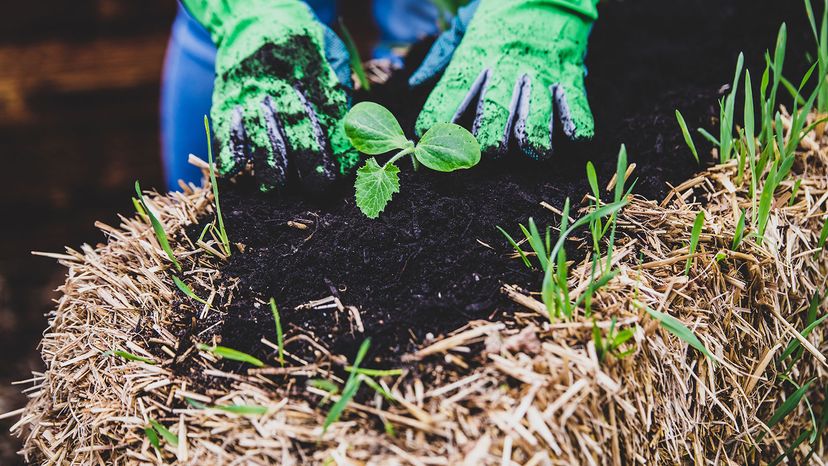
A gardener transplants an eggplant seedling into a straw bale. Plants can be planted in straw bales from seed or transplanted when they are bigger.
Miriam Doerr Martin Frommherz/Shutterstock
Because a straw bale doesn't have the nitrogen that soil contains, you'll need to add some. There are multiple options for nitrogen sources, but one of the best is blood meal. Sprinkle about three cups over the top of each bale, water it in well and leave it to soak in. That's it for day one. For the next two weeks, follow this schedule:
Day 2: Water thoroughly, adding at least 1 gallon (3.78 liters) of water to each bale.
Day 3: Sprinkle 3 cups (0.75 quarts) blood meal over each bale and water it in with 1 gallon (3.78 liters) of water. Once you begin adding your blood meal, don't overwater, which will force the nutrients out of the bale. You want the bale wet enough to begin to break down, but not so wet that your blood meal runs out the bottom.
Day 4: Water
Day 5: Sprinkle 3 cups (0.75 quarts) blood meal over each bale and water it in with 1 gallon (3.78 liters) of water.
Day 6: Water
Day 7: Sprinkle 1.5 cups (0.3 quarts) blood meal over each bale and water it in with 1 gallon (3.78 liters) of water.
Day 8: Sprinkle 1.5 cups (0.3 quarts) blood meal over each bale and water it in with 1 gallon (3.78 liters) of water.
Day 9: Sprinkle 1.5 cups (0.3 quarts) blood meal over each bale and water it in with 1 gallon (3.78 liters) of water.
Day 10: Water
Day 11: Water
Day 12: Water
Day 13: Water and add 2 cups (0.5 quarts) of all-purpose 5-5-5 fertilizer.
Day 14: You are ready to plant.
All the nitrogen will make the straw begin composting, which in turns makes a healthy environment for plants. On day 14, you're ready to plant. Make a divot in the straw and insert seedlings, pressing a peat moss and soil mix around them. If you are planting from seeds, spread a 1 to 2 inch (2.5 to 5 centimeter) thick layer of potting soil over the tops of your bales and plant your seeds in that, according to the instructions on the package, or as you normally would plant them.
Advertisement
Water Well
Because straw bales are above ground, and water can run right through them, they have a tendency to dry out rapidly. Make sure you water very regularly; the soil around the base of your plants should remain moist.
Growing plants will use up the nitrogen you added to the straw bale rather quickly. Make sure you're replenishing it by adding a complete fertilizer, such as 8-8-8 or 10-10-10, to maintain plant health. Evenly apply a 1/2 cup to 1 cup (0.25 to 0.125 quarts) of fertilizer per bale each month and water in adequately.
Advertisement
Benefits of Bale Gardening
There are lots of reasons straw bale gardening might be for you. First, it's extremely convenient. There's no bed construction or tilling required, and anywhere you can fit a straw bale, you can grow a garden. Straw bale gardens are especially ideal for those with mobility issues, because they require much less bending and stooping. They can be stacked to a convenient height.
Plus, at the end of the season, garden cleanup couldn't be easier. Most bales will have broken down enough by then to be spread over the lawn, added to a compost pile or used as a great mulch.
Advertisement
Now That's Resourceful
Joel Karsten, author of "Straw Bale Solutions," came up with the idea of planting in straw bales around 20 years ago when he needed a low-cost way to grow vegetables. He discovered that straw can replace the need for soil, while giving those with small spaces or mobility issues an answer to their gardening needs.
Advertisement
Frequently Asked Questions
How long do straw bales last as a planting medium?
Straw bales typically last for one growing season before breaking down enough to be used as compost.
Can I reuse straw bales for multiple seasons?
Straw bales are generally not reusable for planting after one season as they decompose and lose structure.
Cite This!
Please copy/paste the following text to properly cite this HowStuffWorks.com article: