How to Build Pole Barns

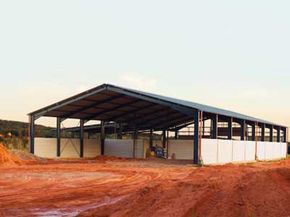
Agricultural pole-barn.
Looking for an economical, versatile, sturdy building? A pole barn might be just the answer.
iStockphoto.com/Markus Guhl

Pole barns are like blue jeans. They're built to last, provide good value and can be dressed up or down as desired. Chances are that if you've been to ­a local farmers' market or used a carport, horse riding arena, covered picnic area, storage facility or auto-repair garage, you've been introduced to pole barns.

A pole barn is a structure that's supported by poles set in the ground and anchored by concrete. Poles support the roof, and walls are optional. No foundation is required, and finished floors are also optional. Pole barns can be built to any size. The framing is horizontal to the posts, ensuring a sturdy and reliable structure. The posts and frame of pole barns are made of wood. Metal or wood siding can be used. Roofs typically are made from galvanized steel, although shingles­ also can be used [source: Burch].

Advertisement

­Features can run the gamut from cupolas with weathervanes, attics, covered porches, skylights and windows to Dutch doors, barn doors, sliding doors and overhead doors. Rooflines can dictate the structure's style, from the barn-style gambrel roofline to a carriage style befitting an open-sided "run-in" stall that's enclosed on three sides and open on one [source: Burch].

Pole construction is considered one of the most economical ways to build, and, from a builder's standpoint, it's one of the simplest. The materials are also relatively cheap. Wondering what materials can be used to construct pole barns? Read on to the next section to learn more.

Advertisement
Pole Barn Materials

Before starting the ­process of building a pole barn, talk with your local building inspector to see if ­you need a permit, zoning variance or other waivers for the project. Let the inspector know if you plan to use the structure for storage or agricultural purposes (which are usually subject to fewer building regulations). The inspector may want to see plans or blueprints and a property survey to ensure that the facility meets setback guidelines. You can also learn how deep to dig the post holes [source: Franklin].

You'll need the following materials to build a pole barn:

Advertisement

  • Poles made of pressure-treated lumber. Round poles, square posts or utility poles can be used.
  • Lumber for the framing and roof trusses (triangular, reinforced frames that support the roof) and girts (horizontal nailing boards that are nailed to the posts; siding is anchored to the grits); 2-by-4s for the frame and purlins (boards that are nailed across the top of the trusses and are used to attach the roofing); 2-by-6s for roof stringers (boards that are placed horizontally at the top edge of the poles, supporting the roof and the trusses)
  • Plywood or steel for the walls
  • Gravel and concrete to anchor the poles
  • Galvanized corrugated steel roofing sections and a roof cap that runs the length of the roof (alternatively, plywood and shingles for the roof)
  • Straight and screw-in roofing nails
  • Storm clips to help keep your nails in
  • Doors -- Sliding doors will give you a higher opening than an overhead door (the type usually found in many car garages). Overhead doors need at least a foot of clearance between the top of the door and the bottom of the truss. Sliding doors are also a little cheaper.

You'll also need the following tools to build a pole barn:

  • Digging equipment such as a tractor-powered auger, clamshell hand digger or post-hole digger
  • Hammer
  • Electric drill with attachment for roofing screws
  • Carpenter's level, a string level and line
  • Hand saw, a miter saw or circular saw and a bevel square set
  • Optional: backhoe [source: Franklin]

Advertisement

Pole Barn Building Process

Location, location, location. Find a site that is flat, graded and has a well-drained foundation. The site should be at least 6 feet (1.8 meters) wider and longer than the structure's footprint. Then figure out how large you want the pole barn to be. Pole barns are typically built in 8-foot (2.4-meter) sections, so they can range in size from 8 to 16 feet (2.4 to 4.8 meters) to 24 to 40 feet (7.3 to 12.2 meters) in length and width. How you plan to use the barn will also determine its size [source: Fetterville].

Carefully space the post holes, using stakes to mark the center of each hole, taking care to ensure that the structure's corners are square -- exactly 90 degrees. Dig the post holes to a depth appropriate to your area and type of soil. Check to see that the poles are in alignment and vertical. Brace them, checking again that everything is level and square before pouring the concrete into the hole. Allow the concrete to set for several days [source: Burch].

Advertisement

Set the stringers securely at the tops of the poles, checking them with a carpenter's level. Putting up the first truss is the most difficult and may require several people, ropes, poles, braces or a backhoe. Additional trusses can be braced against the ones that are already there. Install the purlins across the length of the trusses. If you're using tin roofing, overlap the sections, using screw-in roofing nails. Caulk under the overlapped sections. Install a roof cap. Keep in mind that plywood and shingle roofs require more time, effort, and precise measuring [source: Burch].

If you're installing walls, mount girts all around the building at ground level, making sure they're level. Nail the girts to posts in several rows, close enough to attach the siding. Add plywood or metal sheeting, making accommodations for any windows and doors that will be [source: Burch].

Your cows and chickens want you to insulate your pole barn -- find out how in the next section.

Advertisement

Insulation for Pole Barns

Proper insulation has multiple advantages. It can help regulate temperatures inside the pole barn, make the structure safer for any animals it houses, more comfortable for people and even make the structure last longer. Insulation can also address two problems associated with pole barns: extreme temperatures and moisture [source: Barn Insulation].

Any pole barn that houses animals should contain reflective insulation to protect livestock and poultry from heat stress. While heat stress is a function of temperature, humidity, air flow and solar radiation, once the temperature rises above 60 degrees Fahrenheit (15.6 degrees Celsius), the absorption of solar radiation from the hot roof and walls of the pole barn can pose a problem. Livestock and poultry lack sufficient cooling mechanisms to control their body temperatures. Heat stress can contribute to lower milk production, lower fertility rates and even death. In addition to controlling indoor temperatures and reflecting heat away from the building, reflective insulation also helps control condensation [source: Barn Insulation].

Advertisement

The vapor-retarding features of reflective insulation resist moisture. Without any type of condensation control, anything stored in the pole barn can be damaged by moisture accumulation in the walls and ceilings, causing dripping, rot, mold and fungus. Because it is nonabsorbent, reflective insulation won't break down or promote mold or fungus growth [source: Barn Insulation].

There are two kinds of reflective insulation recommended for pole barns. Both consist of outside reflective foil layers, but one has a layer of foam in the middle, called Foil-Foam-Foil. The other kind has a center of polyethylene bubble, called Foil-Bubble-Foil. Both are thin, lightweight, flexible and strong. They can be cut with a utility knife, stapled, nailed and glued in place [source: Pole-Barm Insulation].

Foil-Foam-Foil is more energy-efficient than Foil-Bubble-Foil. For example, Prodex Total Insulation (Foil-Foam-Foil) is tested to perform from 20 degrees below zero Celsius (minus 4 degrees Fahrenheit) to up to 80 degrees Celsius (176 degrees Fahrenheit) [source: Pole-Barm Insulation].

Not sure if you want to take on the whole project yourself? Read on to learn about pole barn kits, which provide everything but the tools and the labor.

Advertisement

Pole Barn Kits

So, you've decided you need a pole barn on your property but don't want the hassle of buying all the materials and tools or dealing with all the measuring and cutting. You can pay someone to build it for you, but there's another option -- a pole barn kit. Keep in mind, though, that assembly is required.

National and regional companies sell pole barn kits. Basically, the company delivers all the materials to you, and you supply the tools, the know-how and the labor. Some companies offer in-house financing, professional blueprints and toll-free customer service. Many can also hook you up with construction consultants in your area, if needed [source: DIY].

Advertisement

A pole barn kit for a wood-framed pole barn with footprints from 24 feet by 32 feet (7.3 by 9.8 meters) up to 40 feet by 80 feet (12.2 x 24.4 meters), with a wall height from 10 to 12 feet (3 to 3.7 meters) might include the following:

  • Pre-engineered wood trusses
  • Treated eave posts
  • Treated gable posts
  • Treated skirt boards (one row)
  • Wall girts
  • Roof purlins
  • Double top girt truss carrier
  • Painted galvalume siding (Galvalume is aluminum-zinc alloy coated sheet steel)
  • Painted galvalume roof
  • Painted galvalume trim
  • Painted steel sliding screws
  • Galvanized steel framing nails
  • One or two bags of concrete mix per post
  • One sliding door for gable end
  • One 3-foot (0.9-meter) flush entry door
  • Siding with a 25-year corrosion-resistant warranty and a 40-year paint warranty
  • Selection of 18 colors [sources: DIY, Fetterville]

No matter what you're looking for, you now have a myriad of options when it comes to building a pole barn. For more information, visit the links on the next page.

Advertisement

Lots More Information

Related HowStuffWorks Articles

Sources

  • Barn Insulation. (Accessed 12/07/08)http://www.barn-insulation.com
  • Burch, Monte. "Building a Drive-Thru Backyard Shed." Extreme How To. (Accessed 12/07/08)http://www.extremehowto.com/xh/article.asp?article_id=60282
  • DIY Pole Barns & Supplies, Inc. (Accessed 12/07/08)http://www.diypolebarns.com/pb_kits.php
  • Fetterville Sales. "Project Photo Gallery - Agricultural Farm Buildings." (Accessed 12/07/08)http://www.fettervillesales.com/project_gallery01a.htm
  • Franklin, Ellen. "I Built a 24' x50' Pole Barn for Under $3,000." Mother Earth News, February 1, 1995. (Accessed 12/7/08)http://www.motherearthnews.com/modern-homesteading/1995-02-01/Build-a-24-by-50-Pole-Barn-for-Under-3-000.aspx
  • Kaufold's Country Sheds and Gazebos. (Accessed 12/07/08)http://ww.sheds-gazebos.com/shopsite_sc/store/html/page1.html
  • Pole-Barm Insulation. "Insulation Used in Agriculture. (Accessed 12/07/08)http://www.pole-Barn Insulation/

Advertisement

Loading...