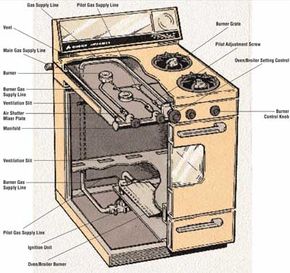
An oven that won't heat or heats unevenly most likely involves a faulty control, thermostat, or timer. Don't worry because most of these problems can be handled yourself at minimal cost.
Repairing the Oven Setting Control
When the oven setting control malfunctions, the oven won't heat. Here's how to repair an oven setting control:
Step 1: Remove the control knob.
Gas Oven And Range Service Guide
There are a myriad of problems that can cause your gas oven to malfunction. Click here for instructions on how to deal with specific issues.
Step 2: Remove the back service panel or the front panel, if necessary. Remove other control knobs as needed to remove the panel. The oven setting control is located directly in back of the control knob and is usually held to the control panel by two screws.
Step 3: Testing the control with a volt-ohm-milliammeter (VOM) is not recommended, because the results will not always be conclusive. If you suspect that the setting control is faulty, the best procedure is to substitute a control that you know is working, or you could simply replace the faulty control with a new one made for the oven.
Step 4: Disconnect the electrical lead wires from the control terminal and lift out the control. Connect the new control the same way the old one was connected.
Servicing Oven Thermostats
If the oven doesn't heat evenly or doesn't heat at all, the oven thermostat may be malfunctioning. First, determine how much the temperature in the oven is off from the control setting. To do this, put an oven thermometer on a center rack inside the oven and turn the oven on for about 20 minutes, with the thermostat set at any range between 300 degrees and 400 degrees Farenheit. If the oven thermometer reads 25 degrees or more lower or higher than the oven control setting, the thermostat should be recalibrated. Here's how to calibrate the thermostat:
Step 1: Pull off the thermostat knob on the control panel. Behind the knob are two screws holding a round, notched plate. Loosen these screws, but do not remove them.
Step 2: With a screwdriver, change the notch setting on the notched plate by turning the plate counterclockwise; for every eighth of a turn, the oven temperature goes up about 25 degrees Farenheit. To turn the heat down, turn the plate clockwise.
Some thermostats can be adjusted by turning a screw inside the control knob shaft housing. To do so, remove the knob and insert a screwdriver into the shaft so that the screwdriver blade engages a screw slot. Turn the screwdriver counterclockwise about one-eighth of a turn to raise the heat about 25 degrees Farenheit. Here's how to test a malfunctioning thermostat:
Step 1: Test the thermostat with a VOM (multimeter) set to the RX1 scale. The thermostat is located directly on the back of the control knob that regulates the heat. To gain access to the thermostat, remove the back service panel to the control panel.
Step 2: Disconnect one electrical lead wire from a terminal of the thermostat and clip one probe of the VOM to each thermostat terminal. If the thermostat is in working order, the meter will register zero. If the needle jumps to a higher reading, the thermostat is faulty and should be replaced.
Step 3: If necessary, replace the thermostat with a new one of the same type.
If you need to replace the thermostat, follow these guidlines:
Step 1: Disconnect the terminal wires to the thermostat and pull off the control knob.
Step 2: Remove the retaining screws. On some ranges, there is a wire running from the thermostat into the oven. This wire operates a sensing bulb that controls the thermostat. The sensing bulb is usually held by a bracket; unscrew this bracket to remove the bulb. Then carefully slip out the wire, the bulb, and the thermostat.
Step 3: Install the new thermostat using a reverse procedure.
Replacing the Timer
The range timer is usually located in the control panel on top of the range. If you suspect the timer is faulty, don't try to fix it yourself. Remove it and take it to a professional service person for testing. Here's how to remove the timer:
Step 1: Remove the back service panel to the control panel and release the spring clips that hold it in position, or remove the retaining screws.
Step 2: Push the timer forward to release it.
Step 3: Remove the electrical lead wires from the timer housing. If, when disassembling the timer, you notice that the electrical wire terminals look burned, remove these leads and buff the leads and the terminal points with fine steel wool. Burned and/or dirty terminals can cause the timer to malfunction, but a good cleaning can solve this problem.
Step 4: Replace the old timer or install a new one of the same size and type, if this is necessary. Connect the new timer the same way the old one was connected.
The flame color on a gas range burner can give you a clue if any burner troubles exist. In the next section, learn what those clues mean and what to do about them.