How to Add Decorative Touches to Your Home

A bluish decor in a living room
Achieving balance with decorating creates a visually pleasing room. John Keeble / Getty Images

You don't need to invest in new wall and floor coverings or new furniture in order to get a new, fresh look. Get out your paintbrushes, or set up your sewing machine instead. You can work wonders by being creative with what you've got.

This article provides ideas and instructions for adding decorative touches to your home by painting a mural on a wall or a pattern on your floor. If sewing is more up your alley, the article also includes projects to create a bedspread and dust ruffle, as well as a tablecloth and napkins.

Advertisement

We'll get started on the next page with tips on how to decorate a floor with paint.

How to Decorate a Floor With Paint

Before painting stripes or borders, define the edges with masking tape. Paint large areas first, then details.

Even the ugliest of wood floors, if it's reasonably level, can be redeemed with paint. The effort involved is minimal; the results are surprisingly good.

Tools:

  • Measuring rule
  • Screwdriver
  • Bucket and sponge
  • Scrub brush
  • Putty knife
  • Hammer
  • Nail set
  • Sanding block
  • Rented floor polisher with steel wool pads
  • Vacuum cleaner
  • Soft pencil
  • Chalk line
  • Single-edge razor blades
  • Paintbrushes for colors (size and number depend on design of floor)
  • Large paintbrushes for varnish

Materials:

  • Graph paper
  • Household cleaner
  • Clean rags
  • Fine-grit sandpaper
  • Plastic wood
  • Grade 000 steel wool
  • Tack cloths
  • Light cardboard
  • Masking tape
  • Oil-base interior gloss or semigloss enamel
  • Polyurethane varnish

Time: Varies with design of floor; for a simple pattern, about 1 week, including drying time

Advertisement

Planning the Floor Design

Measure the room and plan your floor design carefully. Make a floor plan of the room on graph paper, indicating doors, windows, and all floor obstructions, and draw your floor design on it in color. The easiest floor to paint is a plain one, all one color, but the possibilities are endless; stripes (in rainbow or earth colors), checkerboard or crossword patterns, borders on a plain ground, painted-on fool-the-eye rugs or tile patterns, supergraphics, art nouveau borders, or anything else you can think of. The only limitation is how much time you want to spend.

Buy paint after you decide on a pattern, and buy only as much as you'll need; use oil-base interior gloss or semigloss enamel. If you need special brushes, buy them when you buy the paint. Buy enough polyurethane varnish, preferably in a gloss finish, to give the floor three coats; read the label to figure coverage.

Preparing the Floor

Before you paint, remove the furniture and prepare the floor. Remove any floor registers. Wash the floor thoroughly with a strong solution of household cleaner, using a scrub brush if necessary to remove all old wax. Scrape off any paint or putty spots with a putty knife as you wash the floor. Rinse the floor carefully to remove all traces of soap; wipe with a clean rag and let dry completely.

Examine the floor and correct any irregularities. Use a nail set to drive protruding nailheads into the floor; sand any rough spots with fine-grit sandpaper. Fill cracks and nail holes with plastic wood, smoothing it in with the putty knife, and let the patches dry thoroughly. Finally, to make sure the new paint will adhere to the old finish, go over the floor with a rented floor polisher loaded with steel wool pads. Scour the edges of the floor lightly by hand with grade 000 steel wool.

Vacuum the floor thoroughly to remove dust and bits of steel wool; close doors and windows to keep dust out. Wipe the floor down with a tack cloth for a final cleaning.

Transferring the Design

Transfer your design carefully to the prepared floor, using a soft pencil to mark light outlines. Wear clean, soft socks so you don't mar the floor. Measure carefully from the walls and snap chalk lines to mark long edges. For complicated patterns, mark a grid on the floor to correspond to your graph paper diagram. Transfer the pattern from the graph paper diagram to the floor, square by square; correct mistakes freehand. For simple repeat patterns, cut stencils from light cardboard with single-edge razor blades and trace the stencil design lightly onto the floor.

Painting the Floor

Paint one color at a time or one area of the room at a time, depending on the complexity of your pattern. Use one brush for each color. If the floor will have a solid background color under a pattern or border stripes, paint the background color first and let it dry completely before proceeding, at least 24 hours. Wear clean, soft socks while you work.

Use masking tape to separate large areas of color and to define stripes and borders. In general, paint large areas first and let them dry; then paint small patterns and detailed edgings. Let each color dry before applying another color directly next to it. When the entire design has been painted on the floor, let the floor dry for 24 hours; leave the door closed to keep dust out.

Varnishing the Floor

Seal the newly painted floor with polyurethane varnish. Wearing clean, soft socks, go over the floor lightly with a clean tack cloth. Apply varnish along the grain of the floorboards, brushing it on slowly to prevent air bubbles. Let the varnish dry for 12 hours and apply another coat, again brushing slowly along the grain of the floorboards to prevent air bubbles; let dry 12 hours. Apply a third coat of varnish and let dry at least 24 hours. Replace floor registers.

Let the floor dry for 2 or 3 days before moving furniture into the room; polyurethane hardens with time.

Now that you've re-vamped your floors, learn how to paint a wall mural next.

How to Paint a Mural

Plot the design accurately on graph paper, drawing curves smoothly to scale and keeping angles and widths consistent. Plan the grid layout to fit the wall space you're painting.

Transform a plain room with a strong supergraphic; create your own indoor view with a full-wall mural. Either is easy to do with this simple grid system.

Tools:

  • Pencil
  • Measuring rule or tape measure
  • Bucket and sponge
  • Straightedge
  • Paintbrushes

Materials:

  • Graph paper
  • Household detergent
  • String
  • Metal washers or small weights
  • Masking tape
  • Latex enamel paints

Time: 1 to 2 days or more, plus drying time

Advertisement

Designing the Mural

Choose any design you like for your graphic or mural -- arrows, arches, a rainbow, animals, trees, whatever. Draw the design accurately on a sheet of graph paper (four squares per inch is easiest to enlarge on a wall), or draw a grid (four squares per inch) directly onto the picture or print you want to duplicate.

Gauge the grid according to the size of the graphic or mural. For example, if your graph-paper design is 4 inches wide and 3 inches high, and you want it to be 8 feet wide on the wall, it will also be 6 feet high. The 4 × 3-inch pattern will have horizontal rows of 16 squares, and vertical rows of 12 squares. For 8 linear feet to contain 16 horizontal squares, each foot will have two squares, and each square must be 6 inches on a side. Determine the vertical measurement the same way. For both dimensions, the size of each square is determined by your graph-paper drawing and the size of the wall.

Preparing the Wall

Before transferring your design to the wall, prepare the wall surface. Wash it thoroughly with a household detergent to remove dirt, dust, and grease. Let the wall dry completely.

Transferring the Design

Determine exactly where on the wall you want the mural to be. Starting at the upper left-hand corner, make the guidelines for the horizontal squares on the wall. Tape one end of a piece of string at the upper left-hand corner, letting it hang. Tie a metal washer or other weight to the bottom of the string. When the line hangs plumb, tape the bottom end of the string. Measure 6 inches to the right of the string, at top and bottom, and tape the second vertical string the same way. Repeat to place 17 strings, each 6 inches apart, forming 16 vertical divisions.

To complete the squares, measure an even distance down from the ceiling to the upper left and upper right vertical lines of the grid to determine the top of the mural. Stretch and tape a horizontal string between these two points; tape this string at several points to keep it from sagging.

Once the top horizontal string has been placed accurately, measure down 6 inches on both ends to position the next line. Repeat to place 13 horizontal strings, forming 12 rows of squares.

Tape pieces of string to the wall to make a grid; measure and use plumb weights to place them accurately. Transfer the plotted design carefully to the grid on the wall.

With all grid lines taped to the wall, transfer your design to the wall. Use a pencil to lightly copy your pattern -- square by square -- onto the wall. When the entire design has been transferred, carefully remove the tape and the strings; peel the tape off carefully so you don't damage the wall. Then final-draw the design, rounding curves evenly and adding any missing parts.

Painting the Mural

Paint the graphic or mural with latex enamel paint, one color at a time. If the design has a background color, paint the background first. Let the paint dry for 24 hours before painting over the background color. Work color by color; wash your paintbrushes thoroughly between colors. Paint all solid areas first; then mix colors for highlighting or shading.

When the entire design is complete, let it dry thoroughly, for at least 24 hours. If desired, you can outline key areas in black; use a very fine brush to make hairline outlines. Be careful not to overdo this outlining.

Let the completed mural dry thoroughly before replacing furniture or drapes that touch it. Clean the wall surface very carefully, if necessary.

Next, make your living space plush and cozy by learning how to make decorator pillows.

How to Make Decorator Pillows

A variety of pillows on sofa, chairs, floor, or bed makes a room both comfortable and relaxing, and pillows can also provide lively spots of color, texture, and pattern. It's easy to make your own.

Tools:

  • Tape measure
  • Tailors chalk or pencil
  • Scissors
  • Straight pins
  • Sewing machine
  • Zipper foot
  • Sewing needle
  • Steam iron
  • Ironing board

Materials:

  • Fabric
  • Thread
  • Pillow form
  • Piping or cording
  • Zipper
  • If desired, string and tassel

Time: 1 to 2 hours

Advertisement

Pillow forms come in numerous sizes and shapes, and generally fall into two categories: tailored, with squared corners and boxy shapes, or casual softer-looking, often made with soft materials. The easiest pillow covers to make are the casual type, using the square pillow form sometimes described as a knife-edge shape.

Making a Simple Knife-Edge Pillow

For the simplest knife-edge pillow, measure and mark two pieces of fabric to the size of the pillow form, plus a 5/8-inch seam allowance all around. Pin the two pieces together, right sides together and straight-stitch all around the edge on a sewing machine; leave an opening large enough to insert the pillow form. Backstitch to reinforce the ends. Press the seams open, clip the corners and turn the cover right side out. Insert the pillow form and hand stitch the opening closed.

Making a Pillow with Piping or Cording

For a tailored look, add piping or covered cording around the edges of the pillow; buy ready-made piping or cording to match or contrast with the cover fabric.

Starting in the middle of one side, and working on the right side, pin the piping or cording all around the edges of the pillow top. Place the cording with its tape or seam allowance toward the edge of the fabric and the finished cording toward the center, with the stitching line 5/8 inch from the edge of the fabric. Clip into the seam allowance of the cording at the corners so it will lie flat.

Using a sewing machine with a zipper foot, stitch the cording into place along the stitching line, all around the pillow top. Be careful not to stretch it. Where the ends of the cording meet, open up the cording for about 1 inch. Trim the end of the cord to butt into the other end of the cord, where the piping starts; trim the fabric cover to overlap the other end of the cording about 1/2 inch. Fold the trimmed fabric edge under 1/4 inch and fold the free end of the cording around the starting end, so that the cords butt together and the folded edge covers the joint. Stitch across both ends and about 1 inch beyond the joint; then backstitch to secure the piping.

To put the pillow together, pin the top and bottom pieces together, right sides together and cording in between. Using the zipper foot, stitch the two pieces together, following the line of stitching that holds the cording in place; leave an opening large enough to insert the pillow form. Backstitch to secure the ends of the seam. Remove the pins, press the seams open, trim the corners, and turn the cover right side out; insert the pillow form and hand-stitch the opening closed.

Making a Pillow Cover With a Zipper

To make a cover easier to remove for washing or cleaning, insert a zipper in one side seam. Use a zipper about 3 inches shorter than the side of the pillow -- if the finished pillow will be 15 inches square, for example, use a 12-inch zipper. After attaching cording to the pillow top as above, mark a space on one edge of the pillow top, the length of the row of zipper teeth. Stitch the two ends of the seam, backstitching at the markings for added strength; leave the marked-off area open.

Set the sewing machine to the longest stitch length and machine-baste the open section of the seam where the zipper will go. Spread the two fabric pieces apart and press the seam open. On the wrong side, lay the closed zipper face down against the basted section of the seam, laying the zipper teeth slightly away from the side that's corded. Pin it into place.

Using the zipper foot, stitch across one end of the zipper tapes, along the tape on the side away from the cording -- stay close enough to the teeth to catch the edge of the seam beneath the zipper -- and across the other end of the tapes. Then fold the fabric on the side with the cording away from the zipper. Sew the other tape of the zipper to the seam allowance only of the pillow top and cording, stitching close to the teeth of the zipper. Remove the pins and the basting threads holding the seam closed. Place the cover pieces together, right sides together, and pin them. Stitch them together around the other three sides, as above. Press the seams open and trim the corners. Turn the pillow cover right side out, open the zipper, and insert the pillow form; zip the opening closed.

Making a Harem Pillow

To make a harem pillow, make a knife-edge pillow without cording; use a zipper 5 inches shorter than the side of the pillow. On the inside of the cover, tie the corners firmly with string to form 2-inch ears; then turn the cover right side out and insert a soft pillow form. For extra plumpness, use a form a little larger than the cover. If desired, attach tassels to the corners of the cover; sew the cord of a tassel into the seam at each corner before you tie the corners.

Now that you know how to make pillows, learn how to make a matching bedspread next.

How to Make a Bedspread

The dust ruffle is attached to a plain panel between the box spring and the mattress; match the gathered ruffle to the panel edges, placing the ruffle seams against the panel's marked interval points.

For the guest room, the kids' room, or anywhere you want a special effect, a made-to-match bedspread and dust ruffle are a quick and easy answer.

Tools:

  • Tape measure
  • Pencil or fabric marker
  • Scissors
  • Straight pins
  • Sewing machine
  • Steam iron
  • Ironing board

Materials:

  • Fabric
  • Thread
  • Old sheet or preshrunk muslin for top panel of dust ruffle
  • Covered cording
  • Woven trim, or fringe, as desired

Time: 11/2 to 21/2 hours for the bedspread, 2 to 3 hours for the dust ruffle

Advertisement

Measuring and Buying the Fabric

To make a bedspread for a twin bed, you'll need 52/3 yards of fabric 36 to 45 inches wide; for a full-size spread, you'll need 52/3 yards of 44- or 45-inch fabric. For a king-size spread, buy 87/8 yards of 44- or 45-inch-fabric or 57/8 yards of 54- to 60-inch-wide fabric. If the fabric is very light, you may want to add a lining. An old sheet is ideal for this; if you must buy material buy inexpensive muslin. Preshrink it before you use it.

To make the dust ruffle, you'll need a panel of fabric the same size as the top of the box spring, plus 3/4 inch all around -- 39 × 753/4 inches for a twin bed, 54 × 753/4 inches for a full-size bed, or 76 × 803/4 inches for a king-size bed. This panel will be concealed between the mattress and the box spring; use an old sheet, or use preshrunk inexpensive muslin. For the ruffle itself, you'll need 41/8 yards of 44- or 45-inch fabric for a twin bed, 42/3 yards for a full-size bed, or 52/3 yards for a king-size bed.
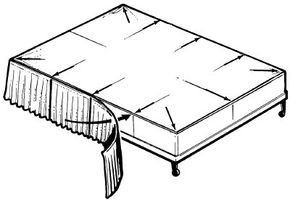
The Bedspread

This spread is designed to be tucked in at both sides and the foot, and folded over the pillows at the head. The finished size of a twin-size spread is 66 × 100 inches; of a full-size spread, 80 × 100 inches; of a king-size spread, 102 × 105 inches. Each spread is made up of a top panel and two side panels, varied in width to fit the width of the bed.

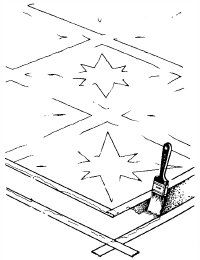
Cutting the Bedspread: Before cutting out the pieces of the bedspread, square off the end of the fabric. Spread the fabric out on your work surface. Make a small cut into the selvage near one end, and grasp one crosswise thread. Pull this crosswise thread gently to draw it right out of the fabric, all across the width of the fabric. This will leave a line in the fabric where the thread was. Carefully cut along the pulled-thread line, and discard the crooked end.

To cut the pieces for the spread, measure down from the pulled-thread line across the fabric and mark the required length; cut each piece carefully, making sure you cut straight across the fabric. For a twin spread, cut the top piece 32 × 102 inches, and two side pieces each 18 × 102 inches. For a full-size spread, cut one piece 44 × 102 inches, and two pieces each 19 × 102 inches. For a king-size spread, cut one piece 44 × 110 inches and two pieces each 30 × 110 inches, if you have 44-or 45-inch wide fabric; for 54- to 60-inch-.wide fabric, cut one piece 54 × 110 inches and two pieces each 27 × 110 inches.

Sewing the Bedspread: When the panels are cut, assemble the spread. Place a narrow side panel over the center panel, right sides together and matched along one long edge. Pin the pieces together along the matched edge. On a sewing machine, straightstitch the pieces together along the pinned edge, 1/2 inch from the edge, backstitching to secure the ends. Remove the pins and press the seam open. Repeat, pinning and stitching, to attach the other side panel to the other side of the top panel.

When the spread is assembled, make a double 1/2-inch hem around all four sides; hem first the short sides and then the long ones. On each side of the spread, turn the raw edge under 1/2 inch and press it into place; turn it under again 1/2 inch and press again. Pin the hem into place and straight-stitch it near the inside edge, backstitching to secure the ends of the hem. Remove the pins.

Variations on the Bedspread: Vary the bedspread as you like to suit the room and the fabric. To add decorative interest, insert covered cording in the seams, as for a daybed cover; or cover the seams with woven trim. To reinforce a very light fabric, add a lining cut from an old sheet or preshrunk muslin, in panels the same size as the spread panels. Lay out the spread and lining pieces together, wrong sides together, and treat them as one layer of fabric; assemble the spread as above.

If you prefer, make a coverlet instead of a tuck-in spread to hang loosely over the dust ruffle. For a twin bed, cut the top piece 32 × 102 inches, and the two side pieces each 15 × 102 inches, for a finished size of 60 × 100 inches. For a full-size bed, cut the top piece 44 × 102 inches, and the two side pieces each 16 × 102 inches, for a finished size of 75 × 100 inches. For a king-size spread with a finished size of 97 × 105 inches, cut the top piece 44 × 110 inches and the two side pieces each 27 × 110 inches from 44- or 45-inch-wide fabric; or the top piece 54 × 110 inches and two side pieces each 24 × 110 inches from 54- to 60-inch-wide fabric. Make the spread exactly as above; if desired, round off the two bottom corners. Add fringe all around the edge, if you like.

The Dust Ruffle

The dust ruffle consists of a long strip and a panel over the box spring, as specified above.

Making the Center Panel: To make the panel, cut an old sheet to fit, or cut lengths of preshrunk muslin and seam them together to the proper width. Across one narrow end of the panel, turn the raw edge under 3/4 inch and press it; turn it under again 3/4 inch, press, and pin it into place. Stitch the hem along the inside edge, backstitching to secure the ends, and then remove the pins.

Measuring and Cutting the Ruffle: Before cutting the ruffle, square the end of the fabric, if necessary, as above; draw out a thread and cut along the pulled-thread line. Then measure and cut the ruffle fabric into panels the width of the fabric and 161/2 inches long, or the distance from the top of the box spring to the floor, plus 21/2 inches -- if this distance is more than 14 inches, you'll need wider panels, and more fabric. For a twin bed, you'll have nine panels 161/2 inches long and 44 or 45 inches wide; for a full-size bed, ten panels; for a king-size bed, twelve panels.

Making the Ruffle: To make the ruffle, sew the panels together end to end. Place two panels together, right sides together, and match the 161/2-inch selvage edges on one end. Pin the matched edges and stitch them together 5/8 inch from the edge. Remove the pins.

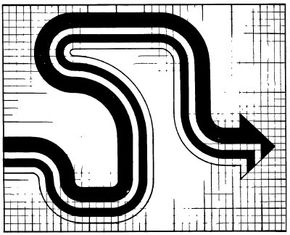
Open the double panel and place another panel on top of one of the two attached panels, right sides together. Pin the 161/2-inch edges together along the free end of the attached panel, and stitch them 5/8 inch from the edge, as above; remove the pins and unfold the panels. Continue this process, adding long panels accordion-style, until all the panels are stitched together end to end. Press all the seams open.

Make a double 3/4-inch hem on each narrow end and on one long side of the strip. For each hem, turn the raw edge under 3/4 inch and press it; turn it under 3/4 inch again, press, pin, and stitch the hem. Remove the pins.

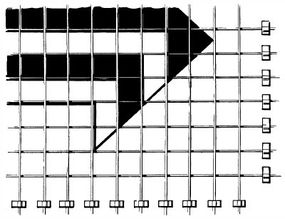
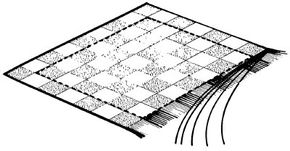
Gathering the Ruffle: At the unhemmed top of the dust ruffle, gather the long edge of the strip. Loosen the upper thread tension on the sewing machine and lengthen the stitch length to make the thread easier to gather. With the ruffle right side up, make two parallel rows of stitching along the top edge, one row 5/8 inch from the edge and the other 1/4 inch above it. Break the gathering threads and start again at each end-to-end seam along the ruffle; for each section, pull the bobbin thread with one hand and slide the fabric with the other to form and adjust the gathers.

Attaching the Ruffle to the Center Panel: When the ruffle is put together and gathered, measure the distance around two sides and one end of the box spring. Divide this number by the number of panels in the dust ruffle: 9 for a twin bed, 10 for a full-size bed, or 12 for a king-size bed. This figure is the distance between seams on the completed dust ruffle, gathered on the bed.

The assembled dust ruffle is attached to the plain sheet or muslin top panel on three sides; the hemmed end of the panel is left unattached, because the dust ruffle doesn't extend around the head of the bed. Starting at the hemmed end of one long side of the panel, make marks all around the panel's raw edges at the calculated seam interval. Pin the gathered ruffle to the three raw edges of the panel right sides together, matching the seams in the ruffle to the marks on the panel. If the ruffle doesn't fit exactly, pull in or let out the gathering threads.

Reset the upper thread tension and the stitch length and stitch the ruffle to the top panel all along the pinned edges; work with the gathered fabric so you can keep tucks and pleats from forming. Backstitch to secure the ends of the seam. Remove the pins. All along the dust ruffle, snip off the long ends of the gathering threads.

Press the seam away from the ruffle. To finish the dust ruffle, topstitch along the seamed edges of the top panel, 1/8 inch from the seam, stitching through the pressed-up edges of the ruffle seam. The seam will be 5/8 inch in from the edge of the box spring, so it won't show. If you made a coverlet instead of a tuck-in spread, and added fringe to the edge of the coverlet, use fringe on the edge of the dust ruffle too.

Using the Dust Ruffle: To put the dust ruffle on the bed, slide the mattress off and position the panel on the bed, plain end at the head of the bed. Then replace the mattress and put the bedspread on.

Put your newly obtained sewing skills to use by learning how to make a tablecloth and napkins next.

How to Make a Tablecloth and Napkins

To fringe the cloth and napkins, straight-stitch around the raw edges, 1 inch from the edge. Then carefully pull out threads on each side from the edge to the stitching, to form the fringe.

Table linens add elegance to even simple meals, but matched tablecloth-and-napkin sets are expensive. You can custom-make your own sets with very little effort, for a fraction of the ready-mades' price.

Tools:

Advertisement

  • Scissors
  • Tape measure
  • Straight pins
  • Sewing machine
  • Steam iron
  • Ironing board

Materials:

  • Washable polyester/cotton fabric
  • Thread
  • If desired, fringe

Time: 1 to 3 hours

Measuring and Buying the Fabric

Choose woven polyester/cotton fabric for easy care and washability; prints are good because they don't show stains. Make the tablecloth at least 12 inches wider than the table, to overhang each end at least 6 inches; make napkins 12 inches square. For a 48-inch-square cloth and four napkins (for a 30- or 36-inch table), buy 13/4 yards of woven 48-inch-wide fabric; the fabric must be a full 48 inches wide. For a 60-inch-square cloth and five napkins, buy 21/8 yards of woven 60-inch-wide fabric. For wider tables, seam two equal widths of material together to the required width, at least 12 inches wider than the table. For rectangular tables, add length as required to make the cloth at least 12 inches longer than the table.

If desired, buy fringe to trim the edges of the cloth. Buy extra fabric as required for additional 12-inch-square napkins. The specifications given below are for a 48-inch-square cloth and four napkins; modify instructions as necessary to fit your requirements.

Cutting the Fabric

Before cutting the tablecloth, square off the end of the fabric. Spread the fabric out on your work surface. Carefully trim off a 1/4-inch-wide strip along each selvage edge. Then make a small cut close to one end of the fabric into one cut selvage edge, and grasp one crosswise thread. Gently pull the thread to draw it right out of the fabric, across the entire fabric width. This will make a line across the fabric where the thread was; cut carefully along the pulled-thread line and discard the crooked end.

Measure 48 inches from the squared corner along the cut selvage edge; make another small cut in the edge at this point and draw out another crosswise thread. Cut across the fabric on the pulled-thread line. The squared and cut piece of fabric should be 48 inches square; this is the tablecloth.

To cut the napkins, measure 12 inches along the cut selvage edge from the pulled-thread line where the tablecloth was cut. Make a small cut, draw out a thread, and cut on the pulled-thread line, as above. Divide this 12-inch strip into four equal parts; because the selvage edges were trimmed, each part will be just under 12 inches wide. Cut the four 12 × 12-inch pieces as above, drawing out a thread and cutting on the pulled-thread line.

Finishing the Edges

Making a Self-Fringe: After cutting the tablecloth and napkins, finish the edges. One of the easiest ways to finish them is by fringing -- raveling threads to make a fine, even self-fringe. To fringe the tablecloth, straight-stitch all along the raw edges, 1 inch from the edge, on a sewing machine; stitch all the way around the cloth. If your machine makes fancy stitches, you can use them here to further decorate the fringed sides.

After stitching around the cloth, carefully pull out the long threads along each edge, one at a time, to fray the material back to the line of stitching, making a 1-inch-deep fringe. To fringe the napkins, stitch 1/2 to 3/4 inch from the raw edge; pull threads as above to make a 1/2- to 3/4-inch fringe.

Attaching a Fringe: For a more casual effect, finish the edge of the tablecloth and napkins with fringe; you'll need 11 yards of fringe for a 48-inch-square cloth and four napkins. Make sure you buy washable fringe, and preshrink it before sewing.

Turn the raw edges of the cloth up 1/4 inch to the right side of the fabric, and press them into place with a steam iron. Starting in the middle of a side, lay the fringe over the turned-up edge, fringe side toward the edge of the cloth, so that the raw edge is hidden by the top of the fringe. Pin the fringe into place as you go; be careful not to stretch it. At each corner of the cloth, make a pleat in the fringe to miter it so it will go around the corner without stretching. Where the ends of the fringe meet, overlap them; turn the top end under 1/2 inch.

Working on the right side of the cloth, straight-stitch the lop edge of the fringe to the turned edge of the tablecloth; backstitch at the end of the fringe to secure it. Then turn the tablecloth over and stitch again from the back, along the folded edge of the cloth; be careful not to catch the fringe as you sew. This encloses the raw edge of the cloth between two lines of stitching. Fringe the napkins the same way.

Creating a Hem: For a very simple effect, if you prefer, make a narrow hem all around the tablecloth and napkins, folding the fabric under twice to protect all raw edges. If desired, add braid or other trim about 1 or 2 inches above the hemmed edges, or embroider the cloth and napkins.