How to Repair Wooden Furniture Surfaces

furniture wooden repair
Have you tried to repair any wooden furniture? Hugo / Getty Images

From scratches to discoloration, the surfaces of your wooden furniture are vulnerable to all kinds of damage. Luckily, many of the problems can be fixed.

In this article, we'll tell you how. You'll learn how to repair everything from gouges to burns. You'll even find tips for repairing furniture veneer and hardware. We'll start by discussing surface stains and discoloration.

Advertisement

Removing Stains and Discoloration

Most finishes protect the surface of wooden furniture by forming a protective coating. To repair a damaged finish coating, work only to the depth that it's affected. On any surface, work carefully, and don't remove more of the finish than you have to. In this article, we'll discuss this and other simple techniques to help you remove stains, blushing, and other discoloration from the surfaces of wooden furniture.

White spots: Shellac and lacquer finishes are not resistant to water and alcohol. Spills and condensation from glasses can leave permanent white spots or rings on these finishes. To remove these white spots, first try polishing the surface with liquid furniture polish; buff the surface firmly. If this doesn't work, lightly wipe the stained surface with denatured alcohol. Use as little alcohol as possible; too much will damage the finish.

If neither polishing nor alcohol treatment removes the white spots, the damaged finish must be treated with abrasives. Gentle abrasives can be purchased from a home-supply store. To make your own gentle abrasive, mix cigarette ashes to a paste with a few drops of vegetable oil, light mineral oil, or linseed oil. Rub the ash-oil paste over the stained area, along the grain of the wood, and then wipe the surface clean with a soft cloth. If necessary, repeat the procedure. Stubborn spots may require several applications. Then wax and polish the entire surface.

If rubbing with ashes is not effective, go over the stained area with a mixture of rottenstone and linseed oil. Mix the rottenstone and oil to a thin paste, and rub the paste gently over the stain, along the grain of the wood. Rottenstone is a fast-cutting abrasive, so rub very carefully. Check the surface frequently to make sure you aren't cutting too deep. As soon as the white spots disappear, stop rubbing and wipe the wood clean with a soft cloth. Then apply two coats of hard furniture wax and buff the wood to a shine.

Blushing: Blushing, a white haze over a large surface or an entire piece of furniture, is a common problem with old shellac and lacquer finishes. The discoloration is caused by moisture, and it can sometimes be removed the same way white spots are removed. Buff the surface lightly and evenly with No. 0000 steel wool dipped in linseed oil. Work with the grain of the wood, rubbing evenly on the entire surface, until the white haze disappears. Then wipe the wood clean with a soft cloth, apply two coats of hard furniture wax, and buff the surface to a shine.

Blushing can sometimes be removed by reamalgamation. If the surface is crazed or alligatored, reamalgamation should be used instead of steel-wool rubbing. If neither rubbing nor reamalgamation removes the haze, the piece of furniture must be refinished.

Black spots: Black spots are caused by water that has penetrated the finish completely and entered the wood. They cannot be removed without damage to the finish. If the spots are on a clearly defined surface, you may be able to remove the finish from this surface only; otherwise, the entire piece of furniture will have to be stripped. When the finish has been removed, bleach the entire stained surface with a solution of oxalic acid. Then refinish as necessary.

Ink stains: Ink stains that have penetrated the finish, like black water spots, cannot be removed without re-finishing. Less serious ink stains can sometimes be removed. Lightly buff the stained area with a cloth moistened with mineral spirits; then rinse the wood with clean water on a soft cloth. Dry the surface thoroughly, and then wax and polish it.

If this does not remove the ink, lightly rub the stained area, along the grain of the wood, with No. 0000 steel wool moistened with mineral spirits. Then wipe the surface clean and wax and polish it. This treatment may damage the finish. If necessary, refinish the damaged spot as discussed below. If the area is badly damaged, the entire surface or piece of furniture will have to be refinished.

Grease, tar, paint, crayon, and lipstick spots: These spots usually affect only the surface of the finish. To remove wet paint, use the appropriate solvent on a soft cloth -- mineral spirits for oil-base paint, water for latex paint. To remove dry paint or other materials, very carefully lift the surface residue with the edge of a putty knife. Do not scrape the wood, or you'll scratch the finish. When the surface material has been removed, buff the area very lightly along the grain of the wood with No. 0000 steel wool moistened with mineral spirits. Then wax and polish the entire surface.

Wax and gum spots: Wax and gum usually come off easily, but they must be removed carefully to prevent damage to the finish. To make the wax or gum brittle, press it with a packet of ice wrapped in a towel or paper towel. Let the deposit harden; then lift it off with your thumbnail. The hardened wax or gum should pop off the surface with very little pressure. If necessary, repeat the ice application. Do not scrape the deposit off, or you'll scratch the finish.

When the wax or gum is completely removed, buff the area very lightly along the grain of the wood with No. 0000 steel wool moistened with mineral spirits. Then wax and polish the entire surface.

Spot Refinishing

Any repair that involves removing the damaged finish completely -- deep scratches, gouges, burns, or any other damage -- also involves refinishing the repair area. Spot refinishing is not always easy, and it's not always successful, especially on stained surfaces. If the damage isn't too bad, it's worth trying. If you'll have to touch up several areas on one surface, you're probably better off refinishing the surface or the piece of furniture completely.

To stain one area on a surface, use an oil-based stain that matches the surrounding stain. You may have to mix stains to get a good match. Test the stain on an inconspicuous unfinished part of the wood before working on the finished surface.

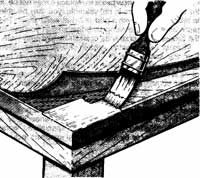
Before applying the stain, prepare the damaged area for finishing. Sealing is not necessary. Apply the stain to the damaged area with an artists' brush or a clean cloth, covering the entire bare area. Let the stain set for 15 minutes and then wipe it off with a clean cloth. If the color is too light, apply another coat of stain, wait 15 minutes, and wipe again. Repeat this procedure until you're satisfied with the color; then let the stain dry according to the manufacturer's instructions.

Lightly buff the stained surface with No. 0000 steel wool, and wipe it clean with a tack cloth. Apply a new coat of the same finish already on the surface -- varnish, penetrating resin, shellac, or lacquer -- over the newly stained area, feathering out the new finish into the surrounding old finish. Let the new finish dry for one to two days, and lightly buff the patched area with No. 0000 steel wool. Wax the entire surface with hard paste wax, and polish it to a shine.

Read the next page to find what to do if your furniture has scratches, dings, or dents.

Advertisement
How to Repair Scratches, Dings, and Dents

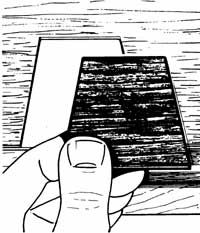
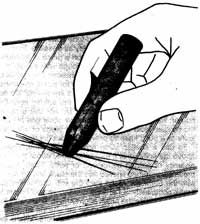
© Publications International, Ltd. Wax furniture-patching sticks can be used to hide fairly deep scratches; press the stick firmly to fill the scratch.

Old or new, wooden furniture often shows signs of extensive use: scratches, dings, and dents. Most of these surface damages are easy to repair, unless the problem is severe and extensive.

Scratches

Advertisement

To hide small scratches quickly, break the meat of a walnut, pecan, or Brazil nut and rub it along the scratch. The oil in the nut meat will darken the raw scratch.

Where many shallow scratches are present, apply hard paste wax to the surface with No. 0000 steel wool, stroking very lightly along the grain of the wood. Then buff the surface with a soft cloth. For shallow scratches on an otherwise sound shellac or lacquer finish, reamalgamation can be used to restore the finish.

For one or two deeper scratches, furniture-patching wax sticks are usually effective. These retouching sticks, made

in several wood colors, are available at hardware and sometimes grocery stores. Choose a stick to match the finish. To use the wax stick, run it firmly along the scratch, applying enough pressure to fill the scratch with wax. Remove any excess wax with the edge of a credit card or other thin plastic card. Let the wax dry; then buff with a soft cloth.

Badly scratched surfaces should usually be re-finished, but to hide one or two very deep scratches, you may be able to stain the raw area to match. Apply oil-based stain with an artists' brush, drawing it carefully along the scratch; let it stand for 15 minutes and wipe it off. If necessary, repeat this procedure until the scratch matches the rest of the wood.

Let the area dry completely, as directed by the stain manufacturer. Then apply hard paste wax and buff the waxed surface to a shine.

Dings

Dings are tiny chips in the finish, usually caused by a sharp blow. The wood may not be affected. To repair a ding, use a sharp craft knife to remove any loose finish in or around the ding. Work carefully, scraping the damaged spot with the flat, sharp edge of the knife blade; do not scratch the spot. Then very carefully feather the edges of the ding with No. 0000 steel wool.

Clean the ding area with a soft cloth moistened in mineral spirits, and let it dry completely. Then, with an artists' brush, carefully apply new finish to the spot -- varnish, shellac, lacquer, or enamel -- to match the rest of the finish. The spot will be very noticeable at first. Let the finish dry; it will be glossy. Then lightly buff the spot with No. 0000 steel wool, and wax and polish the entire piece of furniture. The ding should blend perfectly when the job is complete.

Dents

Small, shallow dents in pine and other soft woods are usually easy to remove; large and deep dents, especially in hard wood, are harder to repair. Dents are easiest to remove from bare wood. Very large, shallow dents are probably best left untreated. Very deep dents should be filled, as detailed below for cracks and gouges.

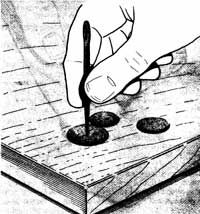
© Publications International, Ltd. Use a fine pin or needle to drive a series of small holes in a stubborn dent; then swell the wood to raise the dent.

On finished surfaces, you'll have to remove the finish around the damaged area. Using fine-grit sandpaper, carefully remove the finish for about 1/2 inch around the spot. To raise the wood in the dent, apply a few drops of water to the dent and let the water penetrate the wood for a day or so. Do not wet the entire surface. This treatment may be enough to raise the dent, especially if the dent is shallow and the wood is soft.

If this doesn't raise the dent, soak a cloth in water and wring it out. Place the damp cloth, folded in several layers, over the dent; then press the cloth firmly with a warm iron.

Be careful not to touch the iron directly to the wood. This moist heat may be enough to swell the wood and raise the dent. If it isn't, apply a commercial wood-swelling liquid to the area and give it time to work -- about a day or so, as directed by the manufacturer.

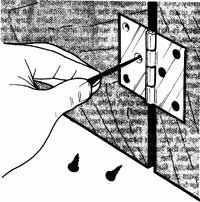
For deep dents that can't be raised with water, heat, or wood sweller, use a fine straight pin or needle to drive a series of holes in the dent. Pound the straight pin in about 1/4 inch, and carefully pull it out with pliers; the holes should be as small as possible. Then treat the dent you would for a shallow dent. The pinholes let the water penetrate the wood's surface. If you're careful, the holes won't show when the wood has been raised.

After the dent has been raised, let the wood dry for about a week, and then refinish the damaged area as above. Let the finish dry completely. Lightly buff the new finish with No. 0000 steel wool, and then wax and polish the entire surface.

Deeper cracks and gouges in the surface may require additional work. Learn the basic steps to repair cracks and gouges on wooden furniture in the next section.

Advertisement

How to Repair Cracks and Gouges

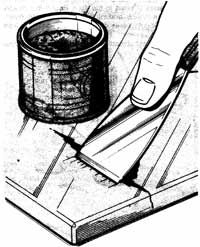
© Publications International, Ltd. Fill deep cracks and gouges with wood filler or water putty; leave the filler slightly high to allow for shrinkage as it dries. When the patch is dry, sand it smooth.

Cracks and gouges are a common problem on wooden furniture, especially if the piece is old or is excessively used. Some basic restoration techniques can remove these problems as long as the damage hasn't gone beyond the surface.

Cracks and gouges should be filled so that they're level with the surface of the wood. For very small holes, like staple holes, wood-tone putty sticks can be used. If you can't match the wood, several colors can be mixed together. To use a putty stick, wipe it across the hole and smooth the surface with your finger. If you plan to finish or refinish the wood, let the putty dry for at least a week before proceeding further.

Advertisement

For larger holes, wood filler and water putty are the easiest fillers. These fillers can be used on bare or finished wood. Wood filler is available in several colors, and water putty can be tinted with oil or water stain. However, wood filler and water putty patches are usually noticeable, and may look darker than the wood. For the best results, test the patch on an inconspicuous surface to make sure the color is right.

To use wood filler, carefully clean the crack or gouge with the tip of a craft knife, and then press the plastic firmly in with the tip of a craft knife or the edge of a putty knife. Wood filler shrinks slightly as it dries, so press it in tightly and leave it mounded slightly above the surface of the wood.

Wood filler dries fairly quickly, but let it set for at least two days. Then smooth the patch lightly with fine-grit sandpaper and buff the area with No. 0000 steel wool. If surrounding finish is involved, feather the edges so that the new patch blends in with it. Then, if necessary, stain the patch and buff it lightly with No. 0000 steel wool. Apply finish to match the rest of the surface, using an artists' brush and feathering the edges. Let the finish dry and then lightly buff it with No. 0000 steel wool; clean the area of any residue, and wax and polish the surface.

Water putty dries flint-hard, usually harder than the wood being patched. It's best used on bare wood. Water putty can be toned with oil and water stains, but you'll have to experiment to come up with a perfect match. To use water putty, mix the powder with water to the consistency of putty; then trowel it into the break with a putty knife, leaving the patch slightly high. Let the patch dry completely, and sand and steel-wool the area smooth and level with the surrounding surface. Finish the surface as above, or finish the entire piece of furniture.

For the most professional patching job, use shellac sticks to fill cracks and gouges. Shellac sticks leave the least conspicuous patch, and are very effective on finished wood that's in good condition. Shellac sticks are available in several wood-tone colors; use a stick that matches the finish as closely as possible. Practice on scrap wood before working on a piece of furniture.

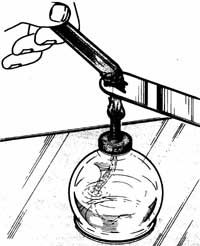
© Publications International, Ltd. Heat the shellac stick over an alcohol lamp or a propane torch, holding a palette or putty knife between the stick and the flame to keep it from dripping.

Carefully clean the crack or gouge with the tip of a craft knife. Shellac sticks must be heated and melted to fill the crack. The best heat source for this is an alcohol lamp or a propane torch turned to a low setting. Do not use a match to soften the stick; the smoke from the match may discolor the shellac. Do not use a range burner; liquid shellac could damage either gas or electric ranges. Hold the stick over the blade of a palette knife or a putty knife to prevent it from dripping.

To use a shellac stick, hold it to the heat source above the knife, until it has softened to about the consistency of glazing compound or putty. Then quickly press the softened shellac into the crack and smooth it with the hot knife. Make sure the soft shellac fills the break completely; it hardens quickly, so you'll have to work fast. Leave the patch slightly high. Then, with the heated putty knife blade, trowel the shellac smooth.

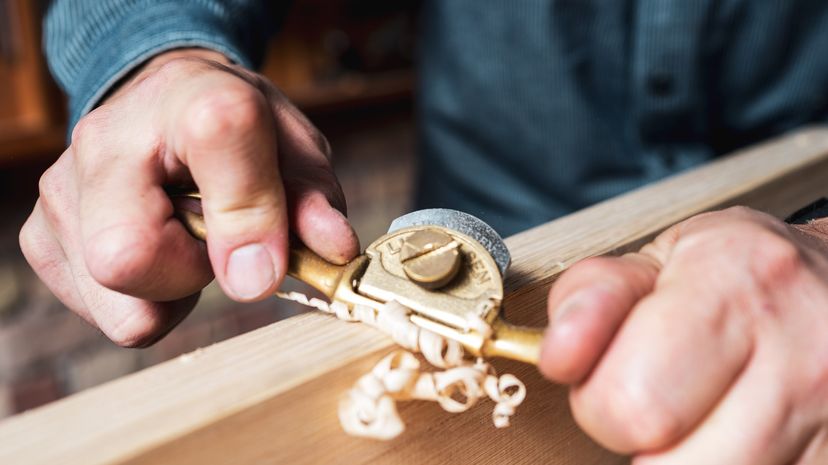
Let the patch set for one to two hours. When the shellac is hard, plane or sand the surface smooth and level. The finish surrounding the break usually doesn't have to be retouched, but the surface can be coated with shellac, if desired. Apply the shellac finish. To make the shellac match a satin-gloss finish, rub the surface smooth with No. 0000 steel wool and linseed oil.

To fill very deep holes, use wood plastic or water putty to fill the hole almost level. Let the filler dry completely, and then fill the indentation with a shellac stick.

If a hole or split is very large, don't overlook the possibility of filling it with a piece of wood cut and trimmed to fit perfectly. If the patching wood can be taken from the piece of furniture in a spot that won't show, the repair may be almost impossible to detect.

Fit the wood patch into the hole or split; use carpenters' glue to bond it to the surrounding wood. Leave the patch slightly high. When the glue is completely dry, sand the plug smoothly level with the surface of the surrounding wood. Then refinish the piece of furniture.

Even if the wooden surface is burned, it can still be repaired. Tips for removing mild scorches and for fixing more serious burns are outlined in the next section.

Advertisement

How to Repair Burns

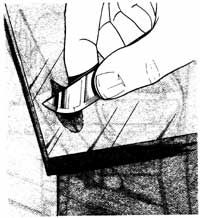
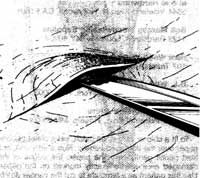
© Publications International, Ltd. To remove a burn spot, scrape away the charred wood with a craft knife; feather the edges of the depression.

Burns on wooden furniture can range from scorches to deep char, but the usual problem is cigarette burns. These damages can be removed as long as the problem doesn't go beyond the surface and extensively affect the wood.

Scorches from cigarettes or cigars are usually the easiest to remove. Buff the scorched area with a fine steel wool pad moistened with mineral spirits until the scorch disappears. Then wipe it clean and wax and polish the surface.

Advertisement

More serious burns require the removal of the charred wood. Shallow burns, when repaired, will always leave a slight indentation in the wood, but this depression will not be conspicuous. Deep burn holes can be filled.

First, remove the damaged wood. With the flat sharp edge of a craft knife, very carefully scrape away the charred wood. For deep burns, use a curved blade. Do not scratch the burn area. Scrape away the char right to the bare wood, feathering out the edges. Any burned or scorched spots will show, so all the burn crust must be removed. Work carefully to avoid scratching the wood with the point of the knife.

When the charred wood has been completely removed, lightly sand the edges of the groove or trench to level it with the surrounding surface as much as possible. Press lightly into the groove with fine-grit sandpaper, removing only the char from the burned area. Be careful not to damage the surrounding finish. If you're not sure all the burn has been removed, wet the sanded area. If water makes the burned area look burned again, you haven't removed all the char.

With deep burns, the groove left after the char is removed will probably be quite noticeable. Level the groove as much as possible with fine-grit sandpaper, but stay close to the edges of the groove. If you sand too far out from the burn area, the damaged area will be very visible as a wide saucer-shaped indentation. If the depression isn't too deep, try swelling the wood as detailed above for dents. If you're left with a deep gouge, the burn area can be filled with wood plastic or a shellac stick.

After smoothing out the burn, refinish the damaged area as above. Let the new finish dry for one or two days, and then lightly buff the patch with No. 0000 steel wool to blend the edges into the old finish. Finally, wax and polish the entire piece of furniture.

Veneer, a thin layer of wood attached with glue to a solid base, is particularly vulnerable to damage. In the next section, we'll show you how to make various repairs to this surface.

Advertisement

How to Repair a Veneer Surface

© Publications International, Ltd. To repair a large blister in veneer, slit it and insert a little glue under the edges; then flatten it with heat.

Because veneer is only a thin layer of wood attached with glue to a solid base, it is very vulnerable to damage on wooden furniture. On old furniture, the glue that holds the veneer is often not water-resistant. Prolonged humidity or exposure to water can soften the glue, letting the veneer blister, crack, or peel. Veneer is also easily damaged from the surface, and old veneers are often cracked, buckled, or broken, with chips or entire pieces missing. In this article, we'll discuss basic techniques to repair veneer on your wooden furniture for any at-home furniture refinishing or restoration project.

In most cases, as long as the veneer layer is basically in good shape, the thinness that makes it damage-prone also makes it easy to repair. Undamaged veneer can be reglued; chips and bare spots can be filled with matching veneer. If you're careful to match the grain the repairs will hardly show. In this section, we'll show you how to make repairs to several veneer problems.

Advertisement

Blisters

Small blisters in veneer can usually be flattened with heat.

To protect the surface, set a sheet of wax paper and then a sheet of smooth cardboard on the surface, and cover the cardboard with a clean cloth. Press the blistered area firmly with a medium-hot iron. If there are several blisters, move the iron slowly and evenly back and forth. Be careful not to touch the exposed surface with the iron.

Check the surface every few minutes or so as you work, and stop pressing as soon as the blisters have flattened. Leaving the cardboard in place, weight the repair area solidly for 24 hours. Then wax and polish the surface.

Large blisters must usually be slit, because the veneer has swelled. With a sharp craft knife or single-edge razor blade, carefully cut the blister open down the middle, along the grain of the wood. Be careful not to cut into the base wood. Then cover the surface and apply heat as above, checking every few seconds as the glue softens; if the glue has deteriorated and does not soften, carefully scrape it out and insert a little carpenters' glue under the slit edges of the bubble with the tip of the knife.

Be careful not to use too much glue. If necessary, wipe off any excess as the blister flattens. As soon as one edge of the slit bubble overlaps the other, carefully shave off the overlapping edge with a craft knife or razor blade. Heat the blister again; if the edges overlap further, shave the overlapping edge again. When the blister is completely flattened, weight the repair area solidly for 24 hours. Then wax and polish the entire surface.

Loose Veneer

Lifted veneer occurs most often at the corners of tabletops, on cabinet and dresser edges, legs, and drawer fronts. If the loose veneer is undamaged, it can be reglued.

©Publications International, Ltd. Loose veneer can be reglued. Apply glue to the base wood, press the veneer into place, and clamp it firmly.

First, remove the residue of old glue left on the back of the veneer and on the base wood. With a sharp craft knife or razor blade, carefully scrape out as much of the old glue as possible. Don't lift the veneer any further; if you bend it up, you'll damage it.

After scraping out as much old glue as you can, clean the bonding surfaces with benzene or naphtha to remove any residue; glue left under the loose area will interfere with the new adhesive. If any glue still remains, sand the bonding surfaces lightly with fine-grit sandpaper, and then wipe them clean with a soft cloth moistened with mineral spirits. If more than one veneer layer is loose, clean each layer the same way.

The veneer can be reattached with contact cement, but you may prefer to use carpenters' glue because it sets more slowly and allows repositioning. To reglue the veneer, apply contact cement to both bonding surfaces and let it set, as directed by the manufacturer. If necessary, set a small tack or two between the layers to keep them from touching. If you'd prefer to use carpenters' glue, use a small brush to spread it along the grain. Then, starting at the solidly attached veneer and working out toward the loose edge, smooth the loose veneer carefully into place.

Contact cement bonds immediately, so make sure the veneer is exactly matched; if you're using carpenters' glue, press from the center out to force out any excess, and wipe the excess off immediately. If more than one veneer layer is loose, work from the bottom up to reglue each layer.

Reglued veneer, whatever adhesive is used, should be clamped or weighted. To protect the surface, cover it with a sheet of wax paper; make sure all excess glue is removed. Set a buffer block of scrap wood over the newly glued area, and use another block or a soft cloth to protect the opposite edge or side of the surface. Clamp the glued and protected surface firmly with C-clamps or hand screws, for one to two days. Then remove the clamps and the buffers, and wax and polish the entire surface.

Cracked or Broken Veneer

If the veneer is lifted and cracked, but not broken completely through, it can be reglued. Large areas may be easier to repair if you break the veneer off along the cracks. Broken veneer can be reglued, but you must be very careful not to damage the edges of the break. Do not trim ragged edges; an irregular mend line will not be as visible as a perfectly straight line.

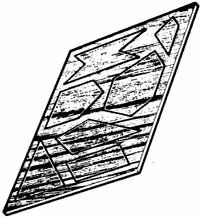
© Publications International, Ltd. To mend veneer, cut a patch in an irregular shape; any of these shapes will be less visible than a square.

Before applying glue to the veneer, clean the bonding surfaces carefully, as above. Fit the broken edges carefully together to make sure they match perfectly. Then apply contact cement to both surfaces, or spread carpenters' glue on the base wood. Set the broken veneer carefully into place, matching the edges exactly, and press firmly to knit the broken edges together. Clamp the mended area. Refinishing may be necessary when the mend is complete; if so, use a non-wash-away paint and varnish remover, and treat the veneered surface very gently.

Chipped or Missing Veneer

Replacing veneer is easy, but finding a new piece to replace it may not be. If the piece of furniture is not valuable, you may be able to take the patch from a part of it that won't show. The patch area must be along an edge, so that you can lift the veneer with a craft knife or a stiff-bladed putty knife.

In most cases, patch veneer should not be taken from the same piece of furniture; you'll have to buy matching veneer to make the repair. If only a small piece is missing, you may be able to fill in the hole with veneer edging tape, sold at many home centers and lumberyards. Or, if you have access to junk furniture, you may be able to salvage a similar veneer from another piece of furniture. For larger patches, or if you can't find a scrap piece of matching veneer, buy a sheet of matching veneer from a specialized wood supplier. National veneer suppliers can be found by searching the Internet.

To fit a chip or very small patch, set a sheet of bond paper over the damaged veneer. Rub a very soft, dull lead pencil gently over the paper; the edges of the damaged area will be exactly marked on the paper. Use this pattern as a template to cut the veneer patch. Tape the pattern to the patching wood, matching the grain of the new veneer to the grain of the damaged area. Cut the path firmly and carefully with a sharp craft knife; it's better to make it too big than too small.

© Publications International, Ltd. Before gluing the patch in, test it for fit; it should fit exactly, flush with the surrounding surface, with no gaps.

To make a larger patch, tape the patching veneer firmly over the damaged area with masking tape, with the grain and pattern of the patch matching the grain and pattern of the damaged veneer. Make sure the patch is flat against the surface, and securely held in place.

Cut the patch in an irregular shape, as illustrated, or in a boat or shield shape; these shapes will be less visible than a square or rectangular Patch Would be. Cut the patch carefully with a craft knife, scoring through the patching veneer and through the damaged veneer layer below it.

Untape the patching sheet and pop out the patch. With the

tip of the craft knife, remove the cut-out patch of damaged veneer; if necessary, score it and remove it in pieces.

Be very careful not to damage the edges of the patch. Be very careful not to damage the edges of the patch area. Remove only the top veneer laver; do not cut into the base wood. Remove any old glue and clean the base wood as above.

Test the fit of the patch in the hole. It should fit exactly, flush with the surrounding surface, with no gaps or overlaps. If the patch is too big or too thick, do not force it in. Carefully sand the edges or the back with fine-girt sandpaper to fit it to the hole.

Glue the fitted patch into place with contact cement or carpenters' glue, as above, and clamp or weight it solidly. Let the repair dry for one to two days; then very lightly sand the patch and the surrounding veneer. Re-finish the damaged area or, if necessary, the entire surface or piece of furniture.

In the final section, we'll show you how to repair a key furniture-surface accessory: the hardware.

Advertisement

How to Repair Furniture Hardware

© Publications International, Ltd. Enlarged screw holes can be made smaller with wood toothpicks, glued in and trimmed flush with the surface.

The hardware on old furniture -- drawer pulls, handles, hinges, locks, protective corners, and decorative bands and escutcheons -- often shows signs of long, hard use. Sometimes hardware is missing; sometimes it's loose, broken, or bent. Loose hardware can be repaired; missing or damaged pieces should be replaced. Replacement is also the solution if you don't like the existing hardware. In this article, we'll discuss some techniques to quickly replace or repair worn hardware on your wooden furniture so they work once more.

Many pieces of furniture are made with very common types of hardware; matching these basic designs is fairly simple. If the hardware is more distinctive or unusual, it may be easier to replace all the hardware than to find a matching piece; make sure the new hardware's bases are at least as large as the old. But if the piece of furniture is very valuable or an antique, or if the hardware is very attractive, the old hardware should not be removed. In this case, missing parts should be replaced with matching or similar hardware; a slight difference in design usually doesn't look bad.

Advertisement

Hardware stores, home centers, and similar stores offer a fair selection of furniture hardware; specialty hardware outlets and craft suppliers are usually better sources. Search the Internet for hardware vendors. Let's get started by reviewing how to handle a common hardware problem -- loose drawer pulls and handles.

Drawer Pulls and Handles

To tighten a loosely attached drawer pull, remove the pull and replace the screw with a longer one. If the screw is part of the pull, you'll have to make the hole in the wood smaller. When the hole is only slightly enlarged, you can tighten the pull by using a hollow fiber plug with the screw. For metal pulls, fit a piece of solid-core solder into the hole and then replace the screw.

When the hole is much too big, insert wood toothpicks or thin shavings of wood, with glue applied on the outside, into the hole. Let the glue dry and carefully trim them flush with the wood surface. Then dip the pull's screw into glue, replace the pull, and tighten the screw firmly. For a more substantial repair, enlarge the hole, glue a piece of dowel into it, and drill a new screw hole.

Hinges

Hinges that don't work properly usually have bent hinge pins; in this case, replace the hinges. If the hinges are loose, try using slightly longer screws to attach them. When the screw holes are very much enlarged, adjust them by one of the methods detailed above. If the hinge leaves are damaged and the hinges cannot be replaced, glue the hinges into position with epoxy or a rubber- or silicone-base adhesive.

Locks

Locks on old pieces are often damaged, and keys are often missing. If the piece of furniture is an antique, or the lock is very unusual, have it repaired by a professional. Otherwise, remove the damaged furniture lock and take it to a locksmith; order a matching or similar lock to replace it.

Loose Metal Bands and Escutcheons

Old bands and escutcheons often have an attractive design and patina; don't replace them unless they're badly damaged. To secure a loose band or escutcheon, squeeze adhesive caulking compound under the metal, and press it down to bond it to the wood. If this doesn't work, fasten the band or escutcheon with tiny metal screws, of the same metal as the hardware. You must match the metals -- brass to brass, copper to copper, steel to steel, or whatever. If you don't match the screws to the metal plate, the metal will corrode. Use several screws, placing them to form a pattern; drill pilot holes before inserting them.

Coverup Hardware

If old hardware holes are impossible to repair, or if you want to change the look of a piece entirely, the surface can be covered with new wood or metal escutcheon plates. Escutcheons are used particularly under drawer pulls or handles; many handles are made with escutcheon-type backers. Attach the escutcheons with adhesive or screws, matched metal to metal. If you're using escutcheon-type handles, no other treatment is necessary. If you're using an escutcheon under other hardware, drill new mounting holes as required. Keep your design simple, and try to match the style of the piece.

So whether it's the hardware, the veneer, or a burn, there probably is a solution. The end result is a furniture surface that stands up to the everyday beating it inevitably takes.

©Publications International, Ltd.

Advertisement

Wood Furniture Repair FAQs

Do vinegar and olive oil fix the scratches on wood furniture?
Yes. Olive oil and vinegar have the necessary ingredients needed to fix scratches in on wood furniture. Mix 3 parts of oil to one part of vinegar. Pour just a little onto the scratch and let it soak for at least 24 hours before wiping it off. Repeat until the scratch is gone.
How much does sofa repair cost?
This really depends on the damage done to the sofa. In most cases, furniture repair costs anywhere from $100 to $300, or about $150 on average. It can be much more if you need to reupholster the couch.
How can you repair dents in wood?
Put a few drops of water in the dent. Next cover the area with a damp cloth. Use an iron at max setting and apply it onto the damp cloth. This should fix the dent by forcing the wood fibers back into their original position.
How do you fix tarnished wood?
One common home remedy is to mix canola oil (or olive oil) with vinegar. Use 3 parts oil to one part vinegar and apply some of the mixture to a soft cloth and rub the furniture. This will make your wood pieces as good as the day you first bought them. The combination of oil and vinegar can also repair scuffs with ease.
 

Advertisement

Loading...