How to Repair Loose Mortar Joints
Loose or crumbling brick mortar joints can be very expensive to have fixed, but the repair work -- called tuckpointing -- can be done by anyone with a strong arm. Because loose or crumbling mortar lets moisture through, it can result in damage to interior walls as well as hasten the deterioration of sound mortar. For both reasons, tuckpoint as soon as weather permits when you notice damaged mortar joints.
Tools:
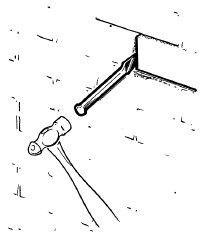
- cold chisel
- heavy hammer
- safety goggles
- garden hose
- small, sharp trowel
- jointer or small piece of metal pipe
- stiff brush (scrub brush)
Materials:
- mortar mix (available in sacks at hardware stores, just add water)
- mortar coloring (also available at hardware stores)
- corrugated cardboard to use in matching color
Time: 1/2 day for small area, more for more serious damageTo begin the project, wearing safety goggles, use the cold chisel and hammer to clean out the old mortar, cutting at least 1/2 inch down into crumbling joints. You must remove all loose mortar so that you have a sound base for the new fill. Clean out the vertical joints first, then the horizontal ones.
Advertisement
Still wearing safety goggles, flush the newly cut joints with the garden hose, using fairly strong water pressure to make sure all loose mortar and dust are removed.
Once the mortar joints are cut and flushed, mix the new mortar. Following the directions on the sack, mix a small amount of mortar and smear it on a piece of cardboard. The mortar will dry very rapidly on the cardboard, letting you see what color it will dry to in the wall. If the new mortar is a different color than the old, add mortar coloring, experimenting with test batches on the cardboard until you have a good match. Then mix the amount of mortar you will need.
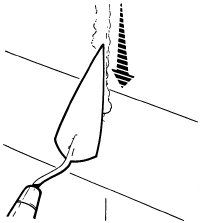
Before applying the new mortar to the wall, wet the cleaned joints again, using a heavy mist so that the brick is wet but not streaming. Using a small, sharp trowel, fill the cleaned-out joints with mortar, working first on the verticals and then on the horizontals. Pack the mortar in tightly, making sure there are no gaps or air holes.
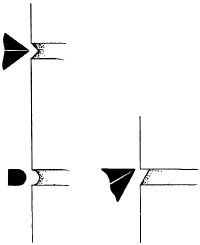
Finish each joint as you fill it; don't fill all the joints first and then go back. If the old joints are V-shaped, use the point of the trowel to finish the new mortar. Holding it at a steady 45-degree angle, draw the trowel firmly along each joint as soon as it is filled. Shake the excess mortar off the trowel before you begin to fill the next joint. If the old mortar joints are U-shaped, use a mortar jointer or a piece of small-diameter metal pipe, bent to give you a good grip. The technique is the same: draw the jointer or pipe firmly along the joint to leave a smooth, concave surface.
To prevent the mortar from drying too quickly, wet the new joints down a few times a day for two or three days, using the fine spray of the garden hose. When the wall is completely dry, clean any excess mortar from the bricks with a dry, stiff brush.
Continue to the next page to learn how to make brick wall or chimney repairs when there's not just crumbling mortar but a whole loose brick.
For further tips and instructions on how to fix things around the house:
- Home-Repair Safety Tips: Doing the job yourself doesn't save you money if you end up in the emergency room. Read these tips to make sure you work smart when doing home repairs.
- Home-Repair Tool Basics: Does your tool box have what it takes? Learn what tools you're likely to be looking for when making repairs around the house.