You might consider replacing some of your old incandescent fixtures with fluorescent lamps. Fluorescent light provides even and shadow-free illumination, but, best of all, fluorescent bulbs are more efficient than incandescent bulbs. In an incandescent bulb, much of the electric power is discharged as heat instead of light. The fluorescent bulb, in contrast, remains cool.
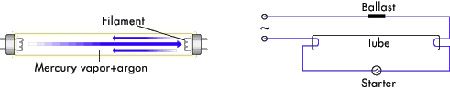
How does a fluorescent lamp work? In a fluorescent circuit, beginning at the left-hand prong of the plug, current goes through the ballast, through one of the lamp filaments, through the closed switch in the starter, through the other filament in the lamp, and out the right-hand prong of the plug. The current heats the two small elements in the ends of the fluorescent tube; then the starter opens and current flows through the lamp.
Advertisement
The ballast is a magnetic coil that adjusts the current through the tube. It makes a surge of current arc through the tube when the starter opens, and then it keeps the current flowing at the right rate once the tube is glowing. In most fluorescent fixtures, the starter is an automatic switch. Once it senses that the lamp is glowing, it stays open. The starter closes whenever you deenergize the fixture.
Many fluorescent fixtures have more than one tube in order to provide more light. These lamps must have individual starters and ballasts for each tube. The fixture may appear to have two tubes working off one ballast, but actually there are two ballasts built into one case. Fixtures with four tubes, similarly, have four starters and four ballasts. In some kinds of fixtures, the starters are built in and cannot be individually replaced.Since there are only three primary parts in a fluorescent lamp, you can usually take care of any repairs yourself. All fluorescent lamps grow dimmer with age, and they may even begin to flicker or flash on and off. These are warning signals, and you should make the necessary repairs as soon as you notice any change in the lamp's normal performance. A dim tube usually requires replacement, and failure to replace it can strain other parts of the fixture. Likewise, repeated flickering or flashing will wear out the starter, causing the insulation at the starter to deteriorate.
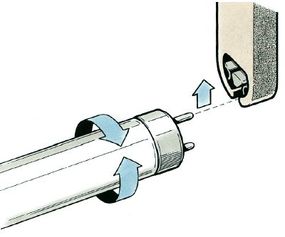
Fluorescent fixtures can be serviced quite simply by the replacement method. If you suspect that a part may be defective, replace the part with a new one. Start with the fluorescent tube or bulb. You can either install a new one or, if you're not sure the tube is burned out, test the old tube in another fluorescent fixture. Remove the old tube by twisting it out of its sockets in the fixture. Install the new tube the same way -- insert the tube's prongs into the socket and twist the tube to lock it into place.
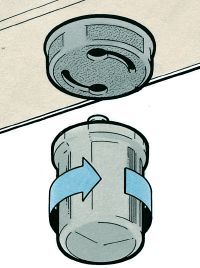
If the problem is not in the tube, try changing the starter. Fluorescent lamp starters are rated by wattage, and it's important you use the right starter for the tube in your fixture. Remove the old starter the same way you removed the old tube, by twisting it out of its socket in the fixture. Install a new one by inserting it into the socket and twisting it to lock it into place.
The ballast is also rated according to wattage, and a replacement ballast -- like a replacement starter -- must match the wattage of the tube and the type of fixture. The ballast is the least likely part to fail and most difficult to replace, so leave the ballast for last when you start replacing parts. If neither the tube nor the starter is defective, the problem must be the ballast. To replace a faulty ballast, deenergize the circuit, disassemble the fixture, transfer wires from the old ballast to the new one -- one at a time, to avoid an incorrect connection -- and, finally, reassemble the
fixture.
If the tube, the starter, and the ballast are all working properly but the lamp still doesn't light, check for a defective switch. If the lamp is controlled by a wall switch, replace the switch, as detailed in the next section. If the lamp has a push-button switch, the old switch can be replaced by a new one of the same type. To deenergize the circuit before working on the switch, remove the circuit's fuse or trip the circuit breaker.
In most cases, the switch screws into a threaded mounting nut on the inside of the lamp. Two wires from the switch are connected, usually with wirenuts, to four wires from the fluorescent tube. Disassemble the fixture as far as necessary to gain access to the back of the switch, then screw in the new switch and transfer wires from the old switch to the new one, one at a time to avoid an incorrect connection. Reassemble the fixture, and reenergize the circuit.
On the next page, we'll discuss the steps you'll need to take to install a new fluorescent fixture.
Advertisement