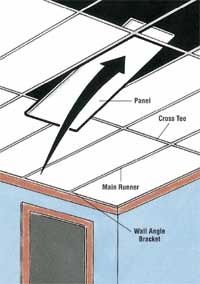
A suspended ceiling can cover a lot of flaws and obstructions, including pipes, wiring, and ductwork. It works, however, only where you can afford to lose some ceiling height. Suspended ceiling panels are sold in 2 X 2-foot and 2 X 4-foot sizes. Use the smaller size for smaller rooms. To install a suspended ceiling:
Step 1: Measure the ceiling and plot it out on graph paper, marking the exact locations of all windows and doors. Mark the direction of ceiling joists. Mark the joists on the ceiling itself, using a pencil or chalk to draw the joist lines across the ceiling.
Advertisement
Step 2: Take the diagram with you when you buy the ceiling materials. With the dealer, plan the layout for the ceiling, figuring full panels across the main ceiling and evenly trimmed partial panels at the edges. To calculate the width of the border panels in each direction, determine the width of the gap left after full panels are placed all across the dimension; divide this number by two. The dealer should help you calculate how many panels you'll need, and should tell you how many wall angles (in 10-foot lengths), main runners (in 12-foot lengths), and cross tees (in 4-foot or 2-foot lengths) you'll need, and how much 12-gauge hanger wire to buy.
Step 3: Mark the level the new ceiling will hang at, allowing at least 4 inches clearance between the panels and the old ceiling. Snap a chalk line at this height across each wall, using a level to keep it straight. Make sure the lines meet exactly at the corners of the room. Nail wall angle brackets along the chalk line all around the room, with the bottom leg of the L-angle facing into the room and flush along the chalk line. Use 6d common nails to fasten the brackets, setting them every 1 1/2 to 2 feet. Cut the bracket to the required lengths with tin snips or a hacksaw.

Step 4: Install screw eyes following the ceiling layout diagram. The long panels of the ceiling grid are set parallel to the ceiling joists, so the T-shaped main runner must be attached at right angles to the joists, every 4 feet across the ceiling. Hanger wire threaded through screw eyes in the joists suspends the main runners of the grid system.
Step 5: For each screw eye, cut a length of hanger wire that is long enough to fasten securely through the screw eye. Extend the wire down to the stretched runner string, and fasten the runner. Thread a wire through each screw eye and twist the end firmly around the dangling wire. Exactly at the point where the wire crosses the string beneath it, bend the wire sharply with pliers to a 90-degree angle.
Step 6: Set the main runners into place. Cut T-shaped main runner sections to required lengths with tin snips or a hacksaw. Lift each long main runner and set one end into place on the wall angle bracket at one side of the ceiling, with the single leg of the "T" facing up. Swing the other end up and position the runner exactly along the marker string and under the screw eyes in the joists. Thread the bent end of each hanging wire through a hole in the runner leg; bend the end of the wire up and secure it. Check each runner with a level, and adjust the length of the hangers if necessary. Repeat until all main runners have been installed.
Step 7: Install the cross tee sections of the ceiling grid. Snap the sections into place every 2 feet along the main runners. If you're using 2 X 2-foot ceiling panels, use 2-foot cross tees to divide each 2 X 4-foot panel in half.
Step 8: Install the panels. Tilt each panel to angle it through a grid opening, then carefully lower it until it rests on the bracket edges of the grid sections. Measure border panels carefully and cut them to size with a utility knife.
To fit a panel around a post, carefully measure across the opening to the post in both directions; sketch the opening and mark the post. Measure the diameter of the post. Mark the panel lightly where the post will go through it, then cut the panel in two exactly through the center of the post, across the shorter dimension. Carve an opening for the post on the inside cut edge of each panel, forming two semicircular or rectangular cutouts. Cut only a little at a time, holding the cut sections up to the post frequently to fit them exactly. Set the two sections into place in the suspension grid.
Advertisement