How To Repair a Leaky Roof

By: Fix-It Club
A study in terracotta blue and white. Spanish roof tiles on a wood clad house
Do you know what to do to fix a leaky roof?
­iStockphoto/Leeds

­Sometimes roofs develop leaks years before the entire roof needs replacing. Usually these leaks are caused by localized damage, such as cracked or missing shingles or shakes, or on a fla­t roof, a blistered or cracked area. The hardest part to repairing this kind of damage is locating it.

In this article, you'll learn helpful tips for finding and fixing leaks on all kinds of roofs, as well as some maintenance suggestions for gutters and vent pipes. Since working on a roof can be a dangerous proposition, be sure to take note of the precautionary tips -- they just might save you from a serious injury.

Advertisement

Let's get started by taking a look at how to repair leaks on shingle roofs.

Shingle Roofs

Round the corners of the new shingle and slide it up into the gap.
­

­­

Shingle roofs are usually easy to fix. At the marked leak point, look for damaged, curled, or missing shingles. At every place where two surfaces meet and around every chimney or vent, look for breaks in the flashing or caulking or for gaps in the lines of roof cement.

Advertisement

­If you can't see any damage to the shingles or flashing in the leak area, you'll have to call a professional roofer; the problem may be inadequate flashing or simply deterioration of the shingles.

If you find evidence of shingle problems, repairs are fairly simple. Curled-back shingles can be reattached with asphalt roof cement or compound in tubes for use with a caulking gun. In warm weather, you can easily straighten out the curled shingle. In cold weather, shingles become very brittle and must be softened before they can be flattened out.

To soften a brittle shingle, carefully use a propane torch with a flame-spreader nozzle. Apply the flame carefully to the curled edges of the shingle; it should get just warm enough to soften but not hot enough to catch fire. Then flatten the edges of the shingle.

To reattach the shingle, apply roof cement generously to the bottom; a good dollop of cement at each corner is usually enough.

Press the shingle firmly into place.

If shingles are torn, rotten, or missing, they should be replaced with new ones. Any shingle that lifts right off the roof with no effort is rotten and should be replaced.

If you find a large area of rotten shingles, you may need a whole new roof. If so, consider calling a professional roofer. Otherwise, replace the damaged shingles with shingles left over

from the previous roof installation.

If you can't get matching shingles, you can

make do with nonmatching ones. In an emergency, cut shingle-size patches from sheet aluminum or copper.

To replace damaged shingles:

Step 1: To remove damaged shingle, lift edges of surrounding shingles, and carefully remove nails with pry bar. Slide out old shingle. If there's loose or brittle roof cement left under it, scrape opening clean. When shingles are blown off by a storm, remove any protruding nails left in roof. Nails that don't stick up can be left in place.

Step 2: To make it easier to slide new shingle into place, slightly round its back corners with sharp utility knife.

Step 3: Slide new shingle into gap, with its front edge aligned with shingles on each side and its back edge under shingles in row above it.

Step 4: Lift corners of overlapping shingles and fasten top of new shingle with 6d galvanized roofing nails driven through each corner. Cover nail heads with roof cement, then smooth down overlapping shingle edges.

­If you're replacing rows of shingles, you only need to round the back corners where the top row meets the row above. Ridge shingles, the tent-shape shingles along the peak of a roof, can be replaced the same way. Overlap them along the ridge and over the shingles on both sides. Do not try to use flat shingles; you must use new ridge shingles. Cover the back of each new ridge shingle with roof cement before setting it into place. Secure each corner of the shingle with a roofing nail, and cover the nail heads with roof cement.

After replacing the damaged shingles or if the shingles are undamaged, inspect the chimney flashing, the flashing around vents or vent pipes, and any line of roof cement where two surfaces meet.

If the metal flashing around a chimney or dormer is not thoroughly caulked, fill the joints with roof cement in a caulking gun. Along joints sealed with a line of roof cement, apply roof cement with a putty knife to areas that look worn or cracked. Apply the cement liberally, covering the questionable areas completely. If there are any exposed nail heads in the flashing, cover them with roof cement.

Flat roofs and shake roofs have their own set of unique leak problems -- and unique ways of conquering these issues. Read the next section for helpful tips about repairing leaks on these types of roofs.

How To Repair a Leaky Flat Roof

As with any roof, it's important to first find the cause of the leak. How to find that leak -- and ultimately fix it -- varies depending on the type of roof. Following are some tips for mending leaks on flat roofs and wooden shake roofs.

Flat Roofs

­Flat roofs are built up of layers of roofing felt and tar. Leaks usually occur at low spots or where the roofing felt has been damaged. In most cases, the leak is directly below the damaged spot and the damage to the roofing felt is easy to see.

Advertisement

If there's still water pooled in the leak area, mop it up or soak

it up with rags, and let the surface dry. Brush off any gravel. Look for cracks in the felt or for large blisters where the top layer has separated.

To mend a blister:

Step 1: Use sharp utility knife to slice blister open down middle. Cut should penetrate to full depth of blistered layer

but should not reach sound roofing felt beneath it.

Step 2: Lift cut edges of blister. If there's water inside blister, press from edges in toward center to squeeze out water from between roofing layers. Soak up all the water you can with rags; then prop edges up to let layers dry.

In cold weather or if layers are thoroughly saturated, use propane torch with flame-spreader nozzle to dry out felt (be sure to wear safety goggles). Carefully move flame back and forth over inside layers of blister. Roofing felt and tar are very flammable, so don't let layers get hot enough to burn or bubble.

Caution: If there's water under a large area of the roof, the problem is more than a simple blister; water may be running in from an adjoining pitched roof surface. In this case, it's best to call a professional roofer.

Step 3: Spread thick coating of roof cement on bottom edges of loose felt and firmly press down sides of blister.

Step 4: Close blister permanently with row of 6d galvanized roofing nails along each side of slit, then spread roof cement over entire blister, making sure nail heads are well covered.

How To Repair a Wooden Shake Roof

Repairing a wooden shake roof is similar to repairing a

shingle roof, although it can be a little more difficult. Use the same type of shakes or shingles to replace the damaged ones. If a ridge shingle is damaged, use a new specially cut ridge shingle instead of trying to make do with regular shingles.

Advertisement

To repair a wooden shake roof:

Step 1: Use hammer and sharp chisel to split damaged shake. Slant chisel up into shake at same angle as pitch of roof. Be careful not to gouge surrounding shakes. Pull out pieces of damaged shake.

Since shakes aren't flexible like shingles, it isn't possible to pry out nails. Use hacksaw to cut off nail heads as far down nail shaft as you can. You may want to wrap electrical tape around one end of hacksaw blade to protect your fingers. If

you can't reach nails without damaging other shakes, you'll have to work around them.

Step 2: Measure gap left by old shake, and cut new one

about 3/8 inch smaller than this measurement, using fine-tooth hacksaw. You must allow this 3/8-inch clearance because shake will swell the first time it rains.

Step 3: Install new shake. If you were able to cut off nails that held old shake, just slide new one up into place, with its top edge under overlapping shingles. Nail shake down with two galvanized roofing nails, one at each side of exposed top edge. If you weren't able to cut off nails, you'll have to notch new shake to fit around them.

Push shake up into gap, hard enough so edge is marked by old nails. Then carefully cut slots at marked points with coping saw. If possible, clamp shake in vise so it doesn't split. Slide notched shake into place, and nail it with two roofing nails.

Step 4: Set heads of nails with nail set, and seal them with caulking compound.

­

Roof leaks often occur at flashing joints, such as around chimneys or at vent pipes, and at open roof valleys. Take a look at the next section for suggestions on how to repair leaks in these areas.

How To Repair a Leaky Open Roof Valley

You've checked your shakes or shingles, looked for pooled water, and your roof is still leaking. It might be time to inspect other areas on your roof that often cause leaks -- open roof valleys and flashing.

­Open Roof Valleys

Advertisement

T­o repair an open valley: ­

Step 1: Inspect valley for holes all along joint. You can patch small holes with the same type of sheet metal valley is made of. Most valleys use either aluminum or copper. Using different metal to patch valley will cause corrosion.

Step 2: Clean surface of valley with wire brush.

Step 3: Cut sheet metal patch about 2 inches bigger all around than hole.

Step 4: Spread thick coating of roof cement on damaged area and press patch into place, bending it to shape of valley. Spread more roof cement over edges of patch to seal out water.

How To Repair Metal Flashing

An open roof valley can be fixed without professional assistance.
­

Metal flashing is used to seal out water around the chimney, at vent pipes, along the valleys where two roof pitches meet, and sometimes over exposed windows. To prevent leaks at the flashing, inspect it every spring. If you see thin spots or gaps along a flashing joint, spread roof cement over the entire joint, applying it generously with a trowel. The flashing edge should be covered completely.

At the chimney, examine the flashing carefully. Chimney flashing is installed in two parts: the base, which covers the bottom of the chimney and extends onto the roof; and the cap, which is mortared into the chimney bricks. If the mortar holding the cap flashing is crumbling or if the flashing has pulled loose, you'll have to resecure the flashing.

Advertisement

To resecure the flashing around a chimney:

Step 1: Pull lip of cap flashing out of mortar joint, only as far as it comes easily. Do not yank entire flashing out or pull it completely away from chimney. The less you have to separate it, the easier it will be to fix.

­Step 2: With flashing out of mortar joint, clean out old mortar with hammer and chisel, wearing safety goggles to protect your eyes. Then, being careful not to damage flashing, use wire brush on joint to clean out debris.

Step 3: Wet joint with paintbrush dipped in water. With small trowel, fill joint firmly with cement mortar.

Step 4: When joint is full, press lip of flashing into mortar, in same position it was in before. Press flashing in firmly, but don't push too far or it may pop back out and you'll have to start all over again. Let mortar dry as directed.

Step 5: When joint is completely cured, caulk around joint and over lip of cap flashing with butyl rubber caulk.

At vent pipes or metal chimneys, make sure the joint at the base of the pipe or chimney is sealed. If you can see gaps at the roof line, caulk around the base of the pipe or chimney with roof cement in a caulking gun. Vent pipes on pitched roofs usually have a protective collar; if the collar is loose, tap it back into place, and then caulk the collar base joint with roof caulk.

Learn even more about flashing -- specifically the type used around a roof's vent pipes -- in the next section.

How To Repair Vent Pipes

Vent pipes on your roof may develop leaks when the metal flashing holding them in place wears out. Find out how to repair leaky vent pipes.
­

Vent pipes and appliance chimneys are sealed with metal flashing to prevent leaks, but the flashing may eventually need replacement. Pitched roof vents are usually flashed with a flat metal sheet cut to fit around the pipe and a protective collar that fits around its base. Flashing for flat roofs usually covers the entire vent, with a flat base and a pipe casing that slides on over the chimney. Replacing either type of flashing is fairly easy.

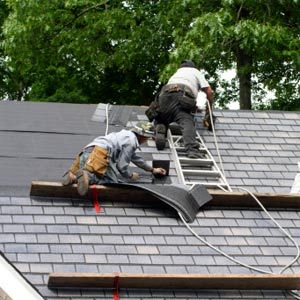
Make sure your replacement flashing is exactly the same type and diameter as the old one. Follow the roof safety procedures detailed below.

Advertisement

Caution: Wear work gloves when working with metal flashing because the edges of the flashing are sharp.

On a pitched roof, the base of the flashing is covered with shingles on the side above the chimney and left exposed on the side below it.

To reflash a vent pipe on a pitched roof:

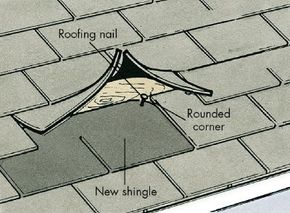
Step 1: Remove shingles on part of roof above chimney. Lift shingles with pry bar, but be careful not to damage them, as you will have to put them back to cover new flashing. If you break a shingle, you'll need a new one to replace it.

Step 2: Remove flashing by inserting blade of pry bar under its edge, and lever bar on block of scrap wood to lift flashing.

Step 3: Lift flashing up over vent pipe, being careful not to knock pipe out of place. Then pull out any nails left around pipe, and fill holes with roof cement.

Step 4: Set new flashing over pipe, with its protective collar aligned same way as old one. Nail down flashing with 6d galvanized roofing nails, and cover nail heads with roof cement. Apply more roof cement to seal base of protective collar.

Step 5: Put shingles back over top of flashing. Starting with bottom row and working up, nail each shingle into place at top. Use two 6d galvanized roofing nails for small shingles, four nails for large ones. As you work, cover nail heads with roof cement. Slide top edges of top row of shingles under overlapping bottom edges of the row above.

To reflash a vent pipe on a flat roof:

Step 1: If there's gravel on roof, sweep it away from vent pipe to clear 4-foot-square area.

Step 2: Locate edge of flashing base, and use sharp utility knife to cut slit through roofing felt along one side of it.

Step 3: Insert blade of pry bar into slit and under edge of flashing. Lever bar over block of scrap wood, working along slit in roofing, to release flashing. Cut around remaining three sides to free flashing completely. Lift old flashing out and over pipe.

Step 4: Set new flashing on top of roof to determine how to fill hole. For each layer of roofing you can see in hole, cut patch of 15-pound roofing felt with utility knife. Use base of old flashing as pattern to cut out felt. On each piece of roofing felt, mark location of vent pipe and cut hole at that point so patch will fit snugly over pipe.

Step 5: Spread thick layer of roof cement on bottom of hole, set first patch over pipe, and press it firmly into hole. Then spread more roof cement on top. Fill entire hole this way, building up layers of roofing felt and roof cement, until top patch is level with roof surface. Spread thick layer of roof cement over top patch, and fill any gaps around vent pipe with more cement.

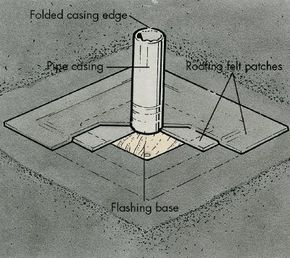
Step 6: Set new flashing carefully into place over vent pipe, and press it down firmly so vent pipe is encased in flashing pipe and base is aligned in exactly the same way old flashing was.

Step 7: Nail down flashing with 6d galvanized roofing nails, and cover nail heads with roof cement. Using pliers, fold top edge of casing pipe down over top edge of vent pipe to seal new flashing.

Step 8: Cover base of flashing with two more layers of roofing felt -- the first layer 3 inches larger and the second 6 inches larger all around than flashing. As you did with first patches, cut hole in center of each piece so it will fit over vent pipe. Spread another thick layer of roof cement over base of flashing, extending it 3 inches onto roof all around. Set smaller piece of roofing felt over pipe, and press it into place. Cover this piece of felt with another layer of roof cement, again extending it 3 inches onto roof all around; set larger patch into place. Press this final patch down, and nail it into place with 6d galvanized roofing nails, about 1 inch apart. Cover nail heads with roof cement.

Step 9: If you removed gravel from patch area, you can spread it back over bare spot, but this isn't necessary.

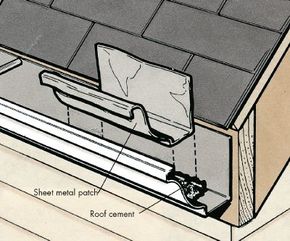
When you have a leak, you often think the roof itself is the culprit, right? Well, proper drainage via roof accessories -- gutters and downspouts -- is key to preventing water from backing up and into your home. See the next page for tips on how to keep gutters clear.

How To Maintain Gutters

Gutters must be kept clean to prevent overflow from damaging your house.­

­

Good drainage is very important to your home's structural well-being. Gutters and downspouts, which are connected to the roof and are the main components of a home's outdoor drainage system, must be kept clear to prevent storm water from overflowing or backing up. Blocked gutters can cause erosion around the house, damage to the exterior walls, basement leaks, and -- eventually -- uneven settling of the foundation.

Advertisement

To prevent these drainage problems, regularly maintain your gutters and downspouts, and repair them at the first sign of trouble. When you work on your gutters, follow the roof safety procedures outlined earlier in this article.

At the minimum, clean your gutters twice a year, in late spring and late fall. If you live in a wooded area, clean them more frequently.

Maintaining Gutters

A plastic scoop is an ideal gutter-cleaning tool. Wear work gloves to protect your hands. To clean the gutters shovel out leaves and other debris with the plastic scoop. Work from a ladder that's tall enough to let you reach the gutters comfortably. As you work, move the ladder frequently. Don't lean or bend to reach to either side or you might lose your balance.

After cleaning out all the loose debris, flush the gutters with a garden hose. Check the downspouts by flushing them with the hose. If a downspout is clogged, you can break up the clog with a plumbers' snake fed down through the opening in the gutter. Clear out any remaining debris with the hose.

To keep the downspouts clear, use a wire leaf strainer at each one. Insert a leaf strainer into each downspout opening along the gutters, then push it in just far enough to hold it steady. The strainer will prevent sticks and other debris from entering the downspout and clogging it.

Many homeowners use plastic or metal screening leaf guards on their gutters to keep leaves from building up. Leaf guards are not effective against leaf fragments, leaf cases, and other small debris that can go right through the screening. Gutters covered by leaf guards must still be cleaned regularly, and leaf guards may make the cleaning much more difficult.

After cleaning out the gutters, let them dry thoroughly, and inspect them for signs of damage. Rust spots and holes can be mended with scrap wire screening and asphalt roof cement. Find out how on the next page.

How To Repair Gutters

Leaky gutters can be repaired with wire screening for small holes or sheet metal patches for larger ones. Find out how to repair your gutters.
2009 HowStuffWorks

­

­If your gutters have any cracks or holes, the seepage could cause structural damage to your house. You'll want to apply the relatively cheap and quick fix of repairing the gutters before any real damage is done.

Advertisement

­First, wire-brush the damaged area to remove dirt and loosen rust. Clean the area well with a rag soaked in mineral spirits. If the hole is small, or if the metal isn't rusted all the way through, a screening patch isn't needed; just spread roof cement over the damaged area.

To repair an open hole in a gutter:

Step 1: Cut piece of scrap wire screening, 1/2 to 1 inch bigger all around than hole.

Step 2: Using trowel, spread roof cement around hole, and press wire screening patch down into hole. Spread thin layer of cement over screening. Let dry.

Step 3: If holes of screening are still open, spread another layer of cement over patch to close it completely.

­If the gutter is extensively damaged or has a large hole in it, patch it with sheet metal instead of wire screening. If the gutters are copper, use copper for this repair. Use sheet aluminum for other types of gutters. Here's how:

Step 1: Cut piece of sheet metal big enough to cover inside of gutter completely and wrap around outside edges. Patch should extend at least 1 inch beyond damage each way along gutter.

Step 2: Bend patch to exact shape of inside of gutter.

Step 3: Use roof cement to coat entire area inside gutter where patch will go, then press patch down into cemented gutter to cover hole.

Step 4: Bend edges back over gutter lips with pliers, then coat entire patch inside gutter with roof cement. Make sure edges of patch are well covered.

Besides patching obvious damage, inspect gutters for sags, loose sections, and loose hangers. Gutters are held by sleeve-and-spike supports, fascia brackets nailed to the face of the wall, or strap hangers nailed to the roof.

Loose hangers can be adjusted or renailed; use 6d galvanized roofing nails to reset them. Cover the nail heads with roof cement to prevent leaks. If you can't get at a fascia bracket to renail it or if the gutter sags even though all its supports are solid, add supports. There should be a support about every 21/2 feet along the gutter. Make sure you cover all nail heads with roof cement.

How To Instiall Pop Rivets

­If a section of downspout or an elbow is loose, reattach it with pop rivets using an inexpensive pop rivet tool. Pop rivets can be installed from the outside, so it isn't necessary to take the sections of downspout apart.

To install pop rivets:

Advertisement

Step 1: Hold loose section up in proper position. Use electric drill and bit the size of the pop rivets to drill through overlapping sections. Make one hole on each exposed side of downspout.

Step 2: To set pop rivet through each drilled hole, place rivet in pop rivet tool, insert tip of tool into hole, and squeeze handles of tool until rivet pops off. Pop rivets will hold section of downspout in place permanently.

­

From blocked gutters and loose shingles to pooled water and gaping flashing, the types of problems that can cause leaks in your roof are numerous. Don't let a leaky roof cause water damage in your home. Use the tools in this article to help you quickly spot -- and fix -- the problem with relative ease.

Lots More Information