How Lawn Tillers Work

Lady tillers
"Back in my day, our tillers were large an unwieldy. And we worked in dresses and liked it!"
Maeers/Getty Images

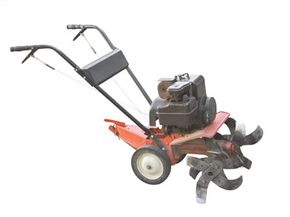
­Nothing beats the feeling of accomplishment a homeowner gets from enjoying their own magazine-worthy lawn and garden. Whether it's a small vegetable patch, a formal rose garden, some raised beds and planters ­or a simple green Bermuda grass lawn, to get to the pleasurable part takes some serious pain. Tilling is a means of cultivating soil, or getting it ready for planting, and it's the most labor-intensive part of any gardening project. Tilling is necessary because soil often is compacted, weedy or rocky. None of these conditions are very conducive to growing grass, plants, flowers or vegetables. So to get the soil ready for planting, you have to till it, often working in soil amendments, like compost or fertilizer, as you go. The least painful way to do this is with a lawn tiller, or rotary tiller.

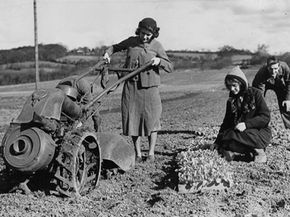
­Who invented the roto-tiller is a matter of debate. Some people place its roots in Switzerland, with Dr. Konrad von Meyenburg. He applied for a patent for a "Machine for­ Mechanical Tillage" in 1910, which was granted two years later. Others give credit to an Australian farmer named Arthur Clifford Howard, who began experimenting with a tilling machine powered by a steam tractor in 1912. Popular lawn and garden tool manufacturer Troy-Bilt sets 1937 as the year the first tillers began to plow up U.S. soil with their own Model A-1 tiller. This model had a four-and-a-quarter horsepower engine and was designed by C.W. Kelsey. It used cleated steel wheels to do the digging and weighed in at a robust 400 pounds (181 kilograms).

Advertisement

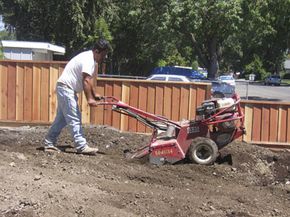
Since then, roto-tillers have gotten smaller and more manageable. But don't be fooled by television ads that show a well-dressed housewife on a leisurely stroll with her tiller. Despite 40-plus years of tweaking the design to make a tough process easier, tilling a yard or garden is still hard work, even with a top-of-the-line tiller. If you're cultivating compacted soil, the realistic version of the TV commercial would look more like a man-versus-machine cage match than a walk in the park.

What kind of tiller you should buy is based on a few factors. And you can always choose to rent one if you have a one-time project planned. We'll get into these factors and look at the basics of what helps a lawn tiller do its thing on the following pages.

Lawn Tiller Basics

Front-tined tiller
A front-tined tiller
Keith Webber Jr | ©istock

Tillers are pretty simple machines. The central component of any lawn tiller is the tines -- the rotating metal blades that dig into the soil. The tines are sharp on the edge, but that isn't the secret to tilling magic. It's the shape of the tines that can take the credit. Each tine consists of four blades curved in opposing directions. Blades one and three are curved pointing in toward the tiller; blades two and four point away from the tiller. The inverted tines keep material from accumulating on the blades. The outward pointing tines are the heavy cutters. They all work in conjunction with each other to dig into the soil aggressively, while moving it away from the blades to avoid clogging. The tines are grouped in twos and there are generally two to four sets on most home-consumer tillers. The gardener steers the tiller by holding on to two long handle bars that point toward him or her.

­Horsepower refers to the size of the engine that turns the tines, and in some cases, the wheels. The more of it you have, the easier it is to dig deeper into the soil. Smaller four-tin­ed tillers generally have one to five horsepower engines. Larger models with eight tines come with engines that have the power of five to 12 horses. Aside from large and small, the other distinguishing factor in tiller land is whether the tines are in front of the wheels or behind them.

Advertisement

This is also what makes a tiller self-propelled or not. If it's a front-tined machine, the wheels are in the rear and only used to guide the tiller along. The actual forward propulsion comes from the tines digging into the soil and pulling the unit forward. Rear-tined tillers have wheels in the front that are mounted on a turning axel like a car. In this case, the wheels pull the unit forward when put in gear and the tines' only job is to dig. Most times, the rear-tines spin in the opposite direction of travel to provide more friction, which results in deeper digging. These are called counter-rotating tines. You can also go with one that has standard rotating tines, meaning the blades spin in a forward direction.

On front-tined tillers, the gardener pushes down on the handles, which raises the spinning tines, to get the tiller from one place to another. When it's in the right place, the front end is lowered and the tines dig in, pulling the machine forward. Rear-tined tillers have tines that only spin when you want them to. The wheels turn and pull the machine forward until you get to the right spot. Then with the simple pull of a lever, the tines begin spinning. While it's unsafe and nearly impossible to pull a front-tined tiller backwards, rear-tined models come with a reverse gear, and since the tines are already spinning in that direction, it's not too hard to back it up.

The tines on all tillers can be adjusted for depth, depending on how far down you need to go. The width of the path is determined by how many tines are at work. Smaller mini-cultivators only dig an 8-inch (20-centimeter) wide swath. Full-sized consumer tillers with eight tines can dig as wide as 3 feet (0.9 meters) in a single pass. There are also wider 12- to 16-tined tillers that hook onto the back of a tractor and connect to the transmission to spin the tines. These are mainly for commercial agricultural use and home farmers.

Plow ahead to find out how to choose your tiller.

Choosing a Lawn and Garden Tiller

Rear-tined tiller
A rear-tined tiller
Carol Mattsson | ©istock

When it comes time to choose a tiller, you first need to decide whether to purchase or rent. Most rental houses will let you till on an hourly, daily or weekly basis. A top-of-the-line, 12 horsepower rear-tined tiller will run you a little over $100 per day, or $20 per hour. A front-tined unit costs about half that amount. If you're tilling up a dirt front yard for grass seeding and you don't anticipat­e needing it beyond this job, renting may be your best option. If you're an avid gardener you might come out better to purchase.

Once you've figured this out, you need to determine what kind of tiller suits the job. You can decide this by figuring out how large an area you're tilling, how compacted the soil is and how hard you're willing to work. For the sake of simplicity, we'll break your choices down to three groups:

Advertisement

  • Mini-tillers or cultivators
  • Mid-size front-tined tillers
  • Large rear-tined tillers

If you're tilling soil for a small herb garden and the dirt isn't hard and rocky, you can get by with a mini-tiller. Some weed eaters even come with a cultivating attachment that works just as well. If your soil is compact and rocky, a mini-tiller won't do, even if it's a small area. In this case, go with a mid-size front-tined tiller. A four horsepower model is easy to handle and maneuver in tight spaces. If you're tilling an entire yard for grass seeding or a large garden, then do yourself a favor and go with a rear-tined unit. If the ground is especially hard or rocky, you should also choose a model with counter-rotating tines. Large, rear-tined models are tough to turn, though, so only use it if you're working in an open area with plenty of room to maneuver.

Most tillers run on gasoline and start like your lawn mower does. Some large models have electric starters and the smallest cultivators may even run on electricity. If you cheap out and go with a front-tined tiller, be prepared to work harder. It will take more than one pass to do the tilling that a single pass with a rear-tined tiller would.

Approximate pricing for the three varieties is as follows:

  • Mini-tiller -- $250 to $350
  • Mid-size front-tined tiller -- $500 to $750
  • Large rear-tined tiller -- $800 to $2,000

­

Front-tined tillers are more difficult to manage, but this is offset somewhat by its lighter weight. Rear-tined models can be easier to use, but they cost a lot more and take up much more room in your shed or garage -- something to consider. But even the largest tiller is no match for heavily compacted red-clay soil. While the machine does part of the work, you'll soon learn that it's backbreaking toil, no matter what kind of model you use. When it comes time to buy or rent, factor in all the above points and make your decision wisely. It's better to spend a little more money and save your muscles for the planting and harvesting. But if you're on a budget and working in tight spaces, you can't go wrong with a modest front-tined unit. If you're not into work at all and have money to burn, just hire a landscape crew to do the work for you.

Read on to learn about how to properly maintain your new tiller.

Lawn Tiller Maintenance and Care

Mini-cultivator
A mini-cultivator
Baxternator | ©istock

Now that you have your tiller and you've dug around a bit, you need to learn how to properly care for your machine. Tilling is dirty business, and as a result your tiller will require a little more maintenance than many other home tools. The first and most important rule for tiller ownership is to keep the machine clean. After you till, hose off the tiller, giving special attention to the tines. If you have any vines or roots wound around the axle, be sure to cut them off.

­The tines themselves will become dull after a while, especially if used in rocky soil. If you have a lighter mini-tiller or a small front-tined tiller, flip it over and sharpen the blades with a metal file. If you have a large tiller, don't attempt to turn it over. In this case, remove the blades and clamp them in a vice before using the metal file. If you don't feel comfortable doing this yourself, you can always take the unit in for servicing about once a year, depending on how much you ­use it.

Advertisement

Because of the large amount of dirt and dust the tiller sees, there are two things you'll want to do with regularity: Change the oil and the air filter. Changing each one is something most handy homeowners can do themselves. There will be a drain plug near the bottom of the oil reservoir. Remove this plug and drain the oil into an oil pan while the engine is warm. Replace the drain plug and refill with new oil of the recommended grade. Then start and run the engine at idle for 30 seconds. Stop the engine, wait another 30 seconds and re-check the oil level. At this point, make sure that it reaches the full mark on the dipstick, and be sure to properly dispose of the oil at an authorized recycling center near you.

The same goes for the air filter. Look up the kind you need in your manual, and you can switch it out in a matter of minutes. Most air filters are encased in an easy-to-remove square plastic box. Change the air filter after every 18 to 20 hours of use or once per year, whichever comes first. The oil should only be changed yearly unless you use it more than 50 hours per year. Refer to your owner's manual if you aren't sure about which parts are where. And again, if you don't feel comfortable performing these routine maintenance checks, you can pay someone to do it for you.

At the end of the gardening season, run the gas tank dry before you store it. If you can't run it dry, don't attempt to empty the gas tank. Just head down to your local hardware store and purchase a fuel stabilizer, then use as directed. This will keep the gas from going bad in the off-season. Always store your tiller in a dry, shady area, preferably in a basement or shed. Sunlight can have negative effects on the tires, and moisture leads to rust.


Lots More Information

Related HowStuffWorks Articles

More Great Links

  • "History of the First American-Made Rototiller." Troy-Bilt. 2008. http://www.troybilt.com/wcsstore/pics/TroyBilt/factsheet_troyhistory.pdf
  • "How to Choose the Right Roto Tiller." Lawn Mowers and Garden Tractors. 2008.http://www.lawn-mowers-and-garden-tractors.com/tillers/roto-tillers.html
  • "Rototillers." DIY Network. 2008. http://www.diynetwork.com/diy/home_improvement/article/0,,DIY_13954_2270252,00.html
  • "Tillers and Weed Eaters." northsidetoolrental.com, 2008. http://www.northsidetoolrental.com/construction_rental_equipment_detail_new.asp?ID=246
  • Hofer, Marie. "Rototillers." HGTV. 2008.http://www.hgtv.com/gl-tools-equipment/rototillers/index.html
  • Jones, Donald A. "The Rototiller in America." Infinity Publishing.
  • Patrico, Jim. "The Right Roto Tiller." The Progressive Farmer. 2008. http://progressivefarmer.com/tabid/1029/Default.aspx
  • Relf, Dianne. "Selecting a Power Tiller." Virginia Tech. August 1996. http://www.ext.vt.edu/departments/envirohort/articles/tools_and_equipment/pwrtillr.html
  • "Rotary Tiller Safety and Maintenance." LSU AgCenter. 2008. http://www.lsuagcenter.com/en/lawn_garden/commercial_horticulture/equipment/Rotary+Tillers/Rotary+Tiller+Safety+and+Maintenance.htm