Too much stress making you sick? Using a thermometer will help tell. See more stress pictures.
David De Lossy/Getty Images
If you look around your house, you will find lots of different devices whose goal in life is to either detect or measure changes in temperature:
The thermometer in the backyard tells you how hot or cold it is outside.
The meat and candy thermometers in the kitchen measure food temperatures.
The thermometer in the furnace tells it when to turn on and off.
The thermometer in the oven lets it keep a set temperature (hot).
The thermometer in the refrigerator lets it keep a set temperature (cold).
The fever thermometer in the medicine cabinet measures temperature accurately over a very small range.
In this article, we will look at the different thermometer technologies used today and understand how they work. You will also get to build your own thermometer!
The bulb thermometer is the common glass thermometer you probably grew up with. The thermometer contains some type of fluid, generally mercury.
Bulb thermometers rely on the simple principle that a liquid changes its volume relative to its temperature. Liquids take up less space when they are cold and more space when they are warm (this same principal works for gases and is the basis of the hot air balloon -- for more information, see How Hot Air Balloons Work).
Advertisement
You probably work with liquids every day, but may not notice that things like water, milk and cooking oil all take up more or less space as their temperatures change. In these cases, the change in volume is fairly small. All bulb thermometers use a fairly large bulb and a narrow tube to accentuate the change in volume. You can see this for yourself by making your own bulb thermometer from scratch. Here is what you'll need:
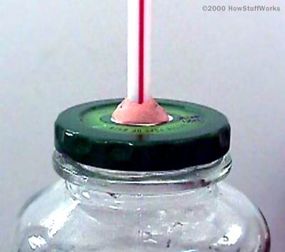
A glass jar or bottle with a water-tight lid - The lid should be the screw-on kind and made from metal or plastic. I used a 48-ounce apple juice jar. The jar needs to be glass so that its shape does not change when you squeeze it.
A drill or a hammer and a large nail
Some silly putty, plumbers putty, caulk or chewing gum
A drinking straw - 8 or 10 inches (about 23 cm) long, the thinner the better, preferably clear
Some food coloring (not required)
To make your thermometer:
Drill or punch a hole in the lid of your jar. The hole should be as close to the diameter of the straw as you can get.
Insert the end of the straw into the hole, and then seal around the hole with your silly putty both on the inside and the outside of the lid. When you get done, it should look something like this:
Fill your jar with cold water. You can do this either by filling it with water and leaving it in the refrigerator overnight, or by making some ice water in a pitcher and then pouring the ice water into your jar (straining the ice out in the process -- all you want is water in the jar). Add food coloring if you desire and shake it up. Put the jar on the table to keep it steady -- you want the jar filled to the brim with cold water, as full as you can get it without overflowing.
Put the lid on the jar as shown in the figure above. When you screw on the cap, a little water may spill out the sides, and a little water may be visible in the straw. That's okay.
Place the jar in your kitchen sink, plug the sink and run hot water into the sink until the sink is about half full. Watch the level of the liquid in the straw and a very unusual thing will happen: You will SEE the water in the jar expanding right before your eyes! As the water in the jar gets warmer, it will expand and rise up the straw. This sort of expansion happens every day, but we don't really notice it because the amount of expansion is fairly small. Here, because we have routed the expanding water into a narrow straw, it is much more obvious. We can actually see it happening.
What you have created is a simple bulb thermometer. And it works pretty well. If you wanted to you could calibrate it, and it would tell you the temperature fairly accurately. This particular thermometer has a few problems, however:
Because the working fluid is water, it cannot measure temperatures below 32 degrees F / 0 degrees C (the water would freeze). It also cannot measure temperatures above 212 degrees F / 100 degrees C (the water would boil).
Because the "bulb" (the jar) is so large, it takes a long time for the thermometer to reach the same temperatures as the object it is measuring -- perhaps an hour.
Because the top of the tube is open, the water can evaporate and pick up dust and debris.
Sealing mercury in a small glass thermometer solves these problems. The small size of the bulb means that the bulb reaches the temperature of what it is measuring very quickly, and the tube in such a thermometer is micro-fine. Mercury also avoids the freezing and boiling problems associated with water.
How do you calibrate the thermometer? Two common scales are used:
Fahrenheit scale - Daniel Fahrenheit arbitrarily decided that the freezing and boiling points of water would be separated by 180 degrees, and he pegged freezing water at 32 degrees. So he made a thermometer, stuck it in freezing water and marked the level of the mercury on the glass as 32 degrees. Then he stuck the same thermometer in boiling water and marked the level of the mercury as 212 degrees. He then put 180 evenly spaced marks between those two points.
Celsius scale - Anders Celsius arbitrarily decided that the freezing and boiling points of water would be separated by 100 degrees, and he pegged the freezing point of water at 100 degrees. (His scale was later inverted, so the boiling point of water became 100 degrees and the freezing point became 0 degrees.)
As you can see, the temperature scales we commonly use are completely arbitrary! You could come up with your own scale if you wanted to. The freezing and boiling points of water are nice because they are easily reproduced, but there is nothing to say that you couldn't use another scale.
Advertisement
Bimetallic Strip Thermometers
Bulb thermometers are good for measuring temperature accurately, but they are harder to use when the goal is to control the temperature. The bimetallic strip thermometer, because it is made of metal, is good at controlling things.
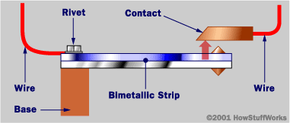
The principle behind a bimetallic strip thermometer relies on the fact that different metals expand at different rates as they warm up. By bonding two different metals together, you can make a simple electric controller that can withstand fairly high temperatures. This sort of controller is often found in ovens. Here is the general layout:
Advertisement
Two metals make up the bimetallic strip (hence the name). In this diagram, the green metal would be chosen to expand faster than the blue metal if the device were being used in an oven. In a refrigerator, you would use the opposite setup, so that as the temperature rises the blue metal expands faster than the green metal. This causes the strip to bend upward, making contact so that current can flow. By adjusting the size of the gap between the strip and the contact, you control the temperature.
You will often find long bimetallic strips coiled into spirals. This is the typical layout of a backyard dial thermometer. By coiling a very long strip it becomes much more sensitive to small temperature changes. In a furnace thermostat, the same technique is used and a mercury switch is attached to the coil. The switch turns the furnace on and off.
Advertisement
Electronic Thermometers
It is now common to measure temperature with electronics. The most common sensor is a thermoresistor (or thermistor).
This device changes its resistance with changes in temperature. A computer or other circuit measures the resistance and converts it to a temperature, either to display it or to make decisions about turning something on or off. If you would like to build your own electronic thermometer, check out How Microcontrollers Work.
Advertisement
For more information on thermometers and related topics, check out the links on the next page!