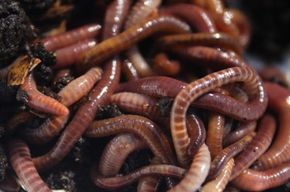
Worms consume up to 50 percent of their own body weight in food each day -- that translates into a lot of fertilizer. See more pictures of green living.
Anthony-Masterson/Getty Images
Deep beneath the earth, they thrive -- pink, slimy and insatiably hungry. They're with us all the time, rooting through our gardens, digging through our lawns and consuming everything in their path. Aristotle called them the intestines of the world. The ancient Chinese called them angels of the soil. Angels or intestines, worms are a tiny but formidable force, eating their way through organic matter and leaving a trail of rich humus in their wake. Vermicomposting is the practice of using worms to turn your organic waste into nutrient-rich fertilizer.
Why use worms? Well, for one, because they're cool. Not only are they slimy and neat-looking, these amazing little organisms can eat up to half their body weight in food every day. Using worms instead of a compost pile ensures faster composting and a rich, dark fertilizer. Besides -- what's more fun than getting to say, "Worms eat my garbage?"
Advertisement
Do you want to find out what types of worms are typically used for vermicomposting? Do you know how many male worms you'll need? How many female? The real answer to this may surprise you. Find out where you can buy worms by the pound on the next page.
Red wigglers are considered by many to be the best compost worms. How many pounds do you need?
Suzanne Carter-Jackson/iStockphoto
What kind of worms do you want wiggling around your house? Red wigglers, of course. Red wigglers, or Eisenia foetida, are the best compost worms. Unlike your everyday night crawlers, they live well in close, highly populated conditions and don't burrow. In nature, you would almost never find a red wiggler worm heading deep underground.
If you decide to start a compost bin, you can get these red wigglers from any of a number of places. Like night crawlers, they make a tasty meal for fish, and bait shops often carry them. These usually come packaged in small containers and at a relatively high price. It's better to get your worms online from a reputable worm farm. The advantage to this is that they sell worms by the pound -- and knowing how much your worms weigh is vitally important to your compost. You should be able to get the worms for about $20 per pound plus shipping. Anybody who sells them for more is ripping you off. You can also get your worms from a neighbor who composts. You'll find when you begin vermicomposting that your worm population will double every 90 days or so. That's how you know that your worms are healthy and happy. Just be sure you weigh your worms before you put them in the bin.
Advertisement
Why is it important to weigh your worms? Fat worms are good. Red wiggler worms can eat about half of their weight in food every day. This means if you put one pound (16 ounces) of worms (about 1,000 worms) into your bin, you will be able to feed them one half of a pound (8 ounces) of food every day. The best way to decide how many worms you'll need for your bin is to weigh the amount of organic waste you throw away each day for about a week. When you know about how much you toss on average, buy twice as many pounds of worms as the amount of waste. For example, if you average one pound of organic waste per day, you should buy two pounds of worms.
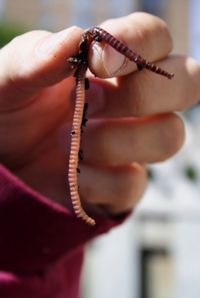
Reports vary on how long worms will live. Some say only a few months, some say up to 10 years. No matter what, the worms will reproduce; however, you don't need to concern yourself with buying an equal number of male and female worms -- they're hermaphroditic. In other words, they have both male and female sex organs, yet it still takes two worms to reproduce.
Sexually mature worms have dark red bands around their necks. Every few months, they'll congregate into one huge, squiggling ball at the bottom of your bin. When you see that, you know that it's time to hang the "Do Not Disturb" sign.
Up next, find out how to build your own vermicomposting bin.
What is biodegradable?
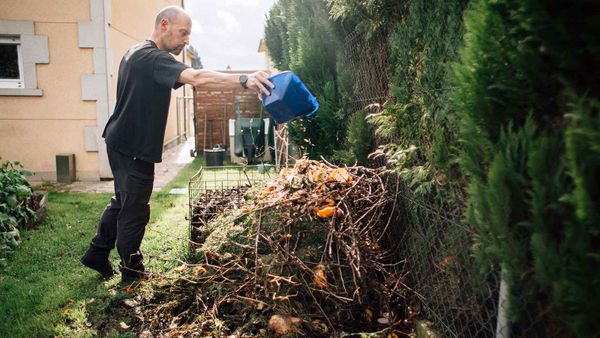
What happens when you throw your apple core out the window and say, "Don't worry, it's biodegradable?" When that apple core hits the ground, it's already being broken down by oxygen and other environmental factors. As it rests on the ground, a variety of critters begin to nibble at the core, helping to speed the breakdown process. Worms, flies and other insects arrive on the scene to get their share. As these decomposers digest, they help complete the cycle and turn that apple core into topsoil.
Advertisement
Building a Worm Compost Bin
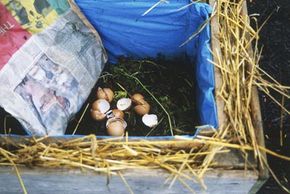
Worm bins come in all shapes and sizes. If you're building your own, cover the basic elements, but then the rest is up to you and your imagination.
Peter Anderson/Getty Images
Worm composting begins with a proper bin. You can build your own or invest in ultra-deluxe, multi-tiered, screened-in, self-sifting ventilation systems for hundreds of dollars. Another option is to find a plastic tub and poke holes in it. Like many activities, worm composting is limited only by your imagination. For example, the community composting system at Common Ground Athens in Athens, Ga., was built by yours truly, using a salvaged bathtub. For temperature and moisture levels, however, a wooden bin is best. There are only a few requirements for a good worm bin:
More surface area than depth (wide and shallow)
Air holes in the bottom
Low sides for ventilation
If kept properly, your worms will not crawl out of the bin. Worms are a non-migratory species, which means that they won't go anywhere if they don't have to. They're also afraid of light. If you open your bin during the day, any worms at the top will dive down below the surface. They have no reason to leave if there's food and comfortable bedding. If you are truly afraid of your worms escaping, you can build in a layer of mesh wiring around the air holes. Even if you're not afraid of your red wigglers wiggling away, keep a lid with air holes on the bin and a layer of black plastic over the bedding (also with air holes cut in it) to keep light and other animals out.
Advertisement
The next thing you need is bedding. Shredded paper and leaves work well. This means that you can compost your office paper as well as your kitchen waste. Bedding needs to be lightly moist, but not dripping wet. Worms breathe through their skin, so having the right level of dampness and air flow is the key. But beware -- if it gets too wet in the bin, the worms can drown. The best way to wet the bedding is to fill a separate bucket with water. Then dunk your bedding, by the handful, in the water and then squeeze it out until it's barely dripping. Next, pull the bedding apart before putting it in the bin to create air pockets and passageways for the worms. Finally, throw in a couple of handfuls of dirt and leaves from your back yard to give them some grit and good bacteria. Worms are similar to birds in their digestion: They have gizzards that require grit to aid in grinding up their food. Soil and other gritty organic waste, such as coffee grounds, can help with this process.
Where should you keep your bin? Anywhere that's safe from other animals and extreme temperatures. This can be a basement, patio or even your kitchen. If you bury the food below the bedding properly, the only smell coming from the bin should be that of fresh, damp earth. If your vermicomposting system is healthy, the decomposing food will not smell or attract flies. Remember, worms can freeze or even burn, so your worm bin should be kept in temperatures ranging from 40 to 90 degrees Fahrenheit (4.4 to 32.2 degrees Celsius). If it gets colder or hotter, try to bring them inside.
Once you've found a good location and you have your worm bin and bedding all set up, it's time to dump in the worms. They'll need a day or two to adjust to the new space before you begin to feed them. Find out which foods will make your worms thrive, as well as the foods that will kill your worms on the next page.
Red Wigglers: Crusaders Against Identity Theft
The best bedding to use for your worm bin is shredded paper. You can shred your bank statements, credit card receipts and old account numbers and simply feed them to the worms. The wigglers would be happy to chew them up and make them into compost for your garden -- no landfills necessary!
Advertisement
Worm Compost Food and Established Bins
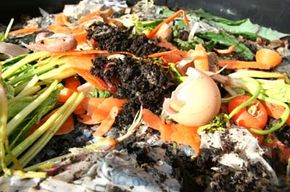
Worms love to munch through your leftover organic waste. Just remember to watch out for the foods that can harm them.
Lisa Fletcher/iStockphoto
Now comes the fun part of having a worm bin -- feeding the little guys. You can bury just about anything that originally came out of the ground in the bin. Coffee grounds and filters, tea leaves and bags, fruit and veggie peels and cores, paper, rice, grits, and natural fabrics are all things that can go in the bin. Eggshells that have been washed out and ground up are also an excellent source of calcium for the worms.
The following items make good worm food:
Advertisement
Leafy greens
Potatoes
Non-acidic fruits and vegetables (tomatoes, green peppers)
Low-acidity citrus
Coffee & tea grounds
Rice
Grits
Paper
Cotton
Eggshells
There are also several items that will harm the worms. For one, don't feed them anything fatty or oily. Worms can't digest meat proteins or lactose, so no dairy products either, like milk or cheese. While worms do like egg shells, the egg cannot go in the bin. Citrus and salt can actually harm the skin of the worms. We mentioned earlier that worms breathe through their skin, so just imagine if your lungs were on the outside of your body and someone decided to rub salt and lemon on them -- you probably wouldn't appreciate it either.
These items will harm your worms. Never give them:
Butter
Oil
Salad containing salad dressing
Eggs
Meat
Highly acidic fruits and vegetables (lemons, limes, oranges)
Hot peppers
Salt
Animal waste
Plastic
Synthetic materials
Insecticides
Once you've had your worms for a while, you'll get a feel for what they like to eat and what they don't. You'll also know how much to feed them and when. If your bin starts to smell bad, you're either feeding them so much that they can't keep up, or you're not burying the food well enough under the bedding.
Established bins that are healthy begin to reproduce worms and attract other decomposers. If you see other insects crawling around in there, don't be worried. It's OK unless there are a lot of flies hanging around. If you have a lid on your worm bin and bury your food well, you should not have to worry about flies or maggots. These other insects are helping the process, making sure that you can compost even more of your organic waste. After a while, you may also see tiny white sacks that may appear to be maggots. These are actually worm egg sacks -- or possibly even baby worms.
Your worm population should double in size every three months or so. When this happens, you can build new worm bins and transfer some worms over if they get to be too much for one area. If you feel that you can't keep up with the feeding schedule, you have a few different options. Teach your neighbors how to compost and donate some worms to them, set your worms free -- although this is a waste of really good worms -- or go fishing. They make great bait.
We've saved the best for last. Did you know that your worms can provide you with black gold? Read the next page to find out just how valuable it can be.
Eat My Shorts!
The Len Foote Hike Inn is a hotel in the North Georgia mountains that has an extensive vermicomposting system in the basement. With the help of the guests, they compost 1,500 pounds (680.4 kilograms) of food and office waste per year, and use the fertilizer in their organic garden. When the hotel staff gets bored, they find new (yet safe) things to shred and feed to the worms. One famous story tells of a pair of corduroy pants left by a guest that were never claimed. The staff shredded them up, buried them, and never saw them again. When sifting one day, an employee came across a button and a zipper … the rest had been eaten!
Advertisement
Black Gold and Commercial Composting
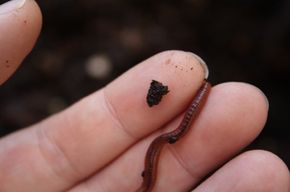
A red wiggler and some of its rich, black gold.
Suzanne Carter-Jackson/iStockphoto
Sifting your vermicompost material is relatively simple, if a little time consuming. The good stuff, sometimes called worm castings, will congregate at the bottom of the bin. To collect the castings, you can feed your worms heavily on one side of the bin, toward the top, and then wait for about a week. The worms will be attracted to the food and find their way over. At that time, you can move the bedding from the opposite side and start gathering the compost while they're busy eating. Attaching chicken wire to a wooden frame will make a perfectly acceptable sifting device, although some people prefer to use colanders or other screen-type materials.
Place your sifting device over an empty container, and use the screen to separate the worm castings from the worms and other large pieces of organic materials left behind. You can throw the worms and remaining organic pieces back into the bin.
Advertisement
When all is said and done, you're only after one thing -- black gold. And no, we're not talking oil here. Whatever you want to call it -- worm castings, tailings, solids, grit, dirt, humus, black gold, or even the "latter end of the digestive cycle," it's all one thing: worm poop.
The special thing about worm poop is that it's highly concentrated into some of the most nutrient-packed fertilizer that you can use. One University of Georgia study found that plants fertilized with worm castings saw a 126-percent higher growth rate than those treated with chemical fertilizers. Farmers know this, and they pay a lot more money for soil with worm castings in it.
In fact, there's a lot to be said for composting on a large scale for profit. With the current trend of eco-consciousness, people are always looking for ways to eat organic foods, keep unnecessary waste out of landfills and recycle. A lot of people are looking to start their own systems and want to know where they can get the worms. Worm farming is a lucrative business which -- with a good bit of start-up capital, marketing and patience -- can really pay off.
Red wigglers: Intestines of the world, or angels of the soil?
Suzanne Carter-Jackson/iStockphoto
A couple of examples of places that make vermicomposting part of their business practices are IKEA and the Len Foote Hike Inn. IKEA, the behemoth socially-responsible Swedish furniture company, is running a pilot program to compost, on a large scale, cafeteria leavings and office materials. Giant, sterile composting bins reside in trucks
that can move in and out of loading docks to make way for shipments.
The Len Foote Hike Inn, located in Dawsonville, Ga., houses a basement full of 10 giant worm bins and composts over 1,500 pounds (680.4 kilograms) of waste every year. They take the opportunity to teach guests about sustainable business practices and help others start their own composting bins.
Vermicomposting, it seems, truly is an "underground movement," with thousands of amateur and professional composters singing the praises of their little soil angels. Whether you're looking for a fun experiment
for the house, want to impress (or perhaps gross out) your kids, earn some extra money or recycle your credit card receipts, vermicomposting is a fun and environmentally sound hobby. And hey,
if it doesn't work out -- you can always go fishing.
Follow the links on the next page for lots more information about worms, composting and other gardening related topics.
Appelhof, Mary. "Worms Eat My Garbage: How to Set Up and Maintain a Worm Composting System." Flower press publishers. June 30, 1997. (June 20, 2008) www.wormwoman.com
Google products. "Worm Composting Bins." (June 13, 2008) http://www.google.com/products?q=worm+composting+bins
Montgomery County, Md. "Composting with Worms." Department of Environmental Protection. August 15, 2006. (June 20, 2008) http://www.montgomerycountymd.gov/deptmpl.asp?url=/content/dep/composting/worms.asp
Worm Farm. "Commercial Composting -- You Need to Look at it Differently." (June 20, 2008) http://www.wormfarmguide.com/commercial-composting.html
Cite This!
Please copy/paste the following text to properly cite this HowStuffWorks.com article: