Dazzle your buddies at the soda fountain by explaining how these tiles were installed.
iStockphoto.com/Lillis Photography
Installing ceramic tile is easy with modern fast-setting mastics, sealants, and grout. Whatever style or size you choose to install, the principles are the same.
Before you begin, you'll need a hammer, chalk line, level, saber saw with carbide blade (helpful but not necessary), rubber gloves, tile mastic, tile grout sealer, tiles, edging cap and two outside corner edge caps for ceramic tile, and a paint stirring stick or old toothbrush to use for forcing grout deeply into the tile joints. You can also rent or buy a grooved trowel, tile nippers, tile cutter, and rubber squeegee.
Advertisement
Inspect the walls. They must be smooth and free of loose plaster, dust, or peeling paint. Read the mastic instructions; on new plaster or unfinished drywall, a primer may be necessary.
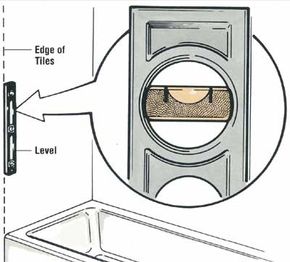
Use a level to draw a vertical line from the outside edge of the tub to mark the end of the tiles.
Publications International, Ltd.
Step 1: Start at the back wall (the wall opposite the faucet end of the tub). Using a level, draw a vertical line from the outside edge of the tub up as high as you want the tile on the wall. Check the tub for level: If one side is higher or lower by more than 1/8 inch, adjust the starter row of tiles.
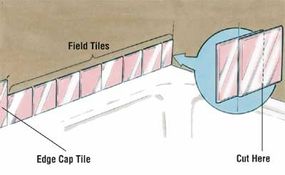
Step 2: Temporarily place the starter row of tiles (start with an edge cap tile) along the top edge of the tub. The tile next to the corner wall will have to be cut to fit. Adjust the run slightly so that not less than half a tile will have to be cut. Remove the tile.
Advertisement
Step 3: Spread as much mastic along the wall of the tub as you'll be able to cover with tiles in a half hour. As you progress, spread more mastic as needed.
Temporarily place the starter row to mark the end pieces for cutting.
Publications International, Ltd.
Step 4: Place the first row of tiles in position. Push each tile with a slight twisting motion to spread the mastic, but don't slide the tile around or the mastic will rise in the grout line. Leave a 1/8-inch gap between the tub and the first row of tiles. Plastic tile spacers are available at tile and hardware stores.
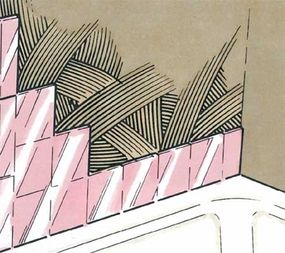
Step 5: Put the edge cap and first two tiles of the next row in place. Then put the edge cap and first tile of the third row in place. You now have the beginning of a stair-step pattern.
Step 6: Continue placing tiles in a stair-step pattern until all except the top row of cap tiles are in place. Finish by placing the row of cap tiles along the top of the tiled area, starting with an outside corner cap.
Apply mastic, then place the tiles in a stair-step pattern.
Publications International, Ltd.
Step 7: Place the tiles on the long wall in the same stair-step fashion. Start by placing a row temporarily along the top of the tub to determine how much must be trimmed off the tile. Spread the mastic as you did for the first wall, and install a row of tiles along the edge of the tub. Then place the tiles of the next two rows to start a stair-step pattern. Fill in the rest of the wall, and finish the top with a row of cap tiles.
Step 8: The procedure for the faucet wall is the same as it is for the other two walls. Use a saber saw equipped with a carbide blade or use tile nippers to cut the openings for the spout, faucets, and shower arm. The openings don't have to be exact, because the chrome trim rings (escutcheons) will cover minor imperfections.
Step 9: Clean up any excess mastic and clean the tools. Allow the mastic at least 24 hours to dry thoroughly.
Now it's time to grout those tiles. Detailed instructions are in the next section.
Advertisement
Grouting Ceramic Tile
Spread grout evenly over the wall using a rubber squeegee to work the grout into the areas between the tiles.
Publications International, Ltd.
Grout can be applied to the ceramic once the mastic is completely dry. To grout ceramic tiles:
Step 1: Mix the grout to a creamy consistency and set it aside. Wet the tiles so that they do not remove moisture from the grout.
Advertisement
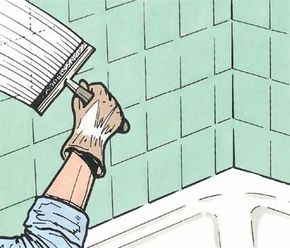
Wear gloves and spread grout evenly over half of the back wall, then use a rubber squeegee to work the grout well into the tile. Wipe the excess away with a wet sponge.
Step 2: Use a blunt stick to force the grout deep into the tile joints. Remove the excess grout with a sponge and continue in the same manner for the remaining area.
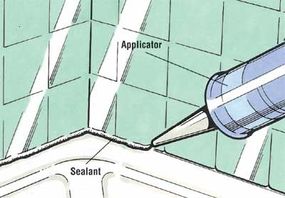
Run a bead of caulk between the tub and first row of tiles.
Publications International, Ltd.
Step 3: Allow the grout to dry overnight. Polish off the thin film of grout that has dried on the tile. Run a bead of tub caulk around the 1/8-inch gap between the tub and the first row of tiles. If you have tiled around a window, be sure to caulk it carefully.
Step 4: Apply a grout sealer according to the manufacturer's directions.
Now that you've read the instructions in this article, you're ready to do a bathroom makeover.